Skip to content

Welcome!

Publishing These DevLogs

I spent the vast majority of today getting this blog site up and running. I had all of the "posts" already written up, except for the "Welcome!" one. I was writing the posts for myself because I felt it was weirdly therapeutic and I wanted something that I could look back on at the end of it and see our progress. I've been (and will probably continue) writing them purely from my point of view and highlighting the stuff that I am working on, mainly because they are the parts that I know the best.

After refreshing myself on the tech stack, I tried getting it deployed. Turns out there are some size limits on web deploys for the stack I am running and the images and gifs I had pushed my deploy size up over the limit on the free tier (and is just below the paid tier's limit...). I decided to offload the images into an Azure Blob Storage and redirected the image urls in the posts to point there instead of a relative path. It makes it more of a hassle to add images into the posts but I think using a combination of Obsidian (where I was writing the posts originally) for authoring the posts and staging the images, then moving them over to Azure will work well. Also, I'm sure there is a lot more that I could do to reduce the file sizes, I just feel like I am already spending too much time on the blog already.

Housekeeping and Morale

Most of today was a lot of housekeeping tasks. There were quite a few board items that were not tagged properly that I had created, nor did they have any sort of description of what they should actually do (besides the title). I should have done this sooner but there were a lot to get through and I got burned out after getting the ones I thought we would immediately need to address.

I also took some time to finish writing up the devlog from yesterday. I had a lot of the screenshots/gifs put in so I could remember the order of things, but I ended up working later than I wanted to last night and did not have time at the end to finish adding the actual text of the devlog.

Morale: Making Mood Matter

High-Level Overview

The next major system to tackle is the Crew Morale system. At it's core, it is pretty simple. There is a default value and a list of modifiers that affect that value. Here is a simple diagram showing how this functions.

Placeholder

We start with some base Morale value, 50 in this case. Then we go through the list of modifiers and sum up their modifier values. In the example below, after applying each of the debuff modifiers, the working value is down -45 giving us a total of 15. Then we apply all of the buffs (+20) for a final total of 35. This is event-driven, so it only updates when there are changes to the modifiers.

The end goal of this feature is to have thresholds, similar to the Warmth mechanic, where once the Crew has reached a certain threshold, there is a chance that they panic and run away from the Caravan. I haven't gotten this part in yet but it is next on the list.

Placeholder

Integrating the Warmth Mechanic

Since we don't have the Glimmerstalkers in yet (the main antagonists of the game and primary sources of morale modifiers) I only needed to incorporate the morale modifiers generated by the Warmth mechanics. Each state in the Warmth mechanic, except Normal has an associated morale modifier (the exact values will come through playtesting):

  • Warm (+)
  • Hypothermia (-)
  • Freezing (--)

I wanted to start with the Freezing state, since that was the biggest one, and the one that we already had built into the Crew controller as an explicit state. I added in a call to add the Freezing modifier when we enter the Freezing state and remove it when we leave the state.

private void HandleWarmthStateChange(WarmthStatus state)
{
    switch (state)
    {
        case WarmthStatus.Freezing:
            _freezingTimer.Start();
            _moraleMechanic.AddModifier(_freezingModifierTemplate);

            break;
        default:
            _freezingTimer.Stop();
            _freezingTimer.Reset();
            _moraleMechanic.RemoveModifier(_freezingModifierTemplate);

            break;
    }
}

Looks simple, right? Well, now it is. This actually stumped me for quite a while, trying to figure out how I wanted to handle adding/creating the modifiers.

Wild Brainstorming

It took me longer than I'd like to admit to come up with a solution I liked for handling the modifiers. The biggest constraint that I was running into was that I wanted to use ScriptableObjects (the Templates) as the "data" containers/configuration for each modifier (similar to how we do the spells). Normally, this wouldn't be that big of a deal. As mentioned, we do this already for the spells, so what is the problem? The problem lies in the fact that we need to support multiple "instances" of the modifiers, whereas we'll only ever have one instance of each spell.

Because we need to support multiple instances of the same modifier (i.e. they can have the "Minor Fear" applied multiple times) we needed a way to track them individually (i.e. if they clear after a certain duration, that needs to be tracked separately). If we put the timer in the Template, then they would all share the same timer and it would be a mess. The modifier you just put on clears immediately after because the original modifier's timer is up. No good!

The other constraint that we had was that we wanted to support modifiers that would be cleared either by a timer (Timed) or ones that had to be cleared programmatically (Manual). These had different requirements, most notably the Timed ones needed a timer of some sort while the Manual ones didn't.

Unified CheckToClear Method

My initial thought was to have a CheckToClear method on the Template. Then in the Morale system, it would call that every frame and the Template would decide what it needed to clear itself. This would have allowed me to stuff a timer into the Timed modifiers that it would check to see if it had elapsed yet. The Manual modifiers could always just return false so they never cleared.

I was feeling pretty good about this solution but I forgot something critical. I needed to support multiple instances. This solution led to the example I mentioned above with all of the "instances" using the same timer under the hood. I also put "instances" in quotes, because they weren't really instances. They were all a reference to the same Template.

All this led me to decide that I would need at least two things: a ScriptableObject (referred to as a Template) to represent the data/config and a wrapper class that I could instance and store. I went through multiple designs with this, each one getting more and more complicated as I tried to work through limitations. If we were only supporting "Timed" modifiers, this would have been easier because we could make assumptions. However, we also want to support "Manual" modifiers, that will stay in the list until they are explicitly removed.

ScriptableObject Sub-Types

Next, I tried making sub-ScriptableObjects, like I did for the spells, with one being Timed and the other Manual. The Timed one had duration config fields in it. Then, when I went to add a modifier, I would check to see if it was a Timed one and use a particular wrapper for it that had a SimpleTimer in it.

I got through adding support for the Timed ones when I ran into the problem of, how do I store all of the modifiers? - Do I try to cram them into one list? - That would make the "current morale" calculations easy, since I could just burn through one list - Do I maintain separate Timed and Manual lists? - This would make supporting the different needs easier but means coalescing the lists when I need to calculate them - Do I use a dictionary instead, with the Template as the key and some wrapper as the value? - This would make it easier to see how many of each Template type there is. Good for checking if we've reached our MaxInstance limit or not - This still, ultimately, ran into the same problem of the two types needing different information. It just pushes the problem around and doesn't fix it

I tried several variations of this and none of them sat right with me. They all just felt dirty and convoluted.

K.I.S.S

Ultimately, I decided to forego sub-classing and all of that and go back to the basics. The humble (lesser) god-object. Instead of having multiple sub-types, all of the information would be on the MoraleModifierBase class and we would use an enum flag to determine how it should be treated. This may not be the best practice but 1) this is a game jam and 2) this class is incredibly small with a very low chance of growing wildly.

This simplified everything. I could just use a simple wrapper class that holds the Template and an (optional) timer.

private class MoraleModifier
{
    public MoraleModifierBase Template { get; set; }
    public SimpleTimer Timer { get; set; } = new SimpleTimer();
}

[CreateAssetMenu(fileName = "MoraleModifier", menuName = "THGJ22/Morale/Morale Modifier")]
public class MoraleModifierBase : ScriptableObject
{
    [Header("Config")]
    [field: SerializeField]
    public int Amount { get; private set; }

    [field: SerializeField]
    public int MaxInstances { get; private set; } = 1;

    [field: SerializeField]
    public float ClearDuration { get; private set; }

    [field: SerializeField]
    public MoraleModifierClearType ClearType { get; private set; }
}

public enum MoraleModifierClearType
{
    Timed,
    Manual
}

Armed with this, I was able to utilize a single list with all of the modifiers in it and all of the instances were properly instanced. Now, I just needed to account for the different Clear Types when creating the wrapper class. To do this, we check the ClearType and if it is Timed we initialize a new SimpleTimer and start it. Otherwise, we just leave it null.

public void AddModifier(MoraleModifierBase modifierTemplate)
{
    var totalWithSameTemplate = _modifiers.Count(m => m.Template == modifierTemplate);

    if (totalWithSameTemplate >= modifierTemplate.MaxInstances) return;

    SimpleTimer modifierTimer = null;

    if (modifierTemplate.ClearType == MoraleModifierClearType.Timed)
    {
        modifierTimer = new SimpleTimer(modifierTemplate.ClearDuration);
        modifierTimer.Start();
    }

    var modifier = new MoraleModifier
    {
        Template = modifierTemplate,
        Timer = modifierTimer
    };

    _modifiers.Add(modifier);
}

Then when we go to check the timers, we kick out early if they are not Timed modifiers.

private void CheckToClearModifiers(float deltaTime)
{
    for (int i = _modifiers.Count - 1; i >= 0; i--)
    {
        var modifier = _modifiers[i];

        if (modifier.Template.ClearType != MoraleModifierClearType.Timed || modifier.Timer == null) continue;

        modifier.Timer.Update(deltaTime);

        if (modifier.Timer.HasElapsed)
        {
            _modifiers.Remove(modifier);
        }
    }
}

Better Way to Handle Templates

Now that I had the basis down for how I wanted to handle things internally to the MoraleMechanic class, I started looking harder at the public interface of the class. As you can see in the above example of the AddModifier method, I was taking in the MoraleModifierBase directly. While this would have worked, it was kind of awkward to need the Templates all over the place so they could be passed in.

I wanted to have it more self contained, so the caller could just say what Modifier they wanted to add/remove and it would take care of itself. This led me to rework it to use an enum as the primary value being passed around, then internally it would do a lookup for the Template that matches the enum value.

This also meant we need to somehow map between the enum values and the Templates. A dictionary stood out to me as the best way: enum as the key, Template as the value. So I went about making a new ScriptableObject, a MoraleModifierSet, that would allow me to define different sets and use them (like for "skittish" Crew who are more affected by negative modifiers...but that's for stretch goals).

If you've worked with Unity, SerializeField, and the Inspector though, you've probably come across the problem on Dictionaries not being supported in the Inspector. It has been a while since I've needed a dictionary in the Inspector, so I had to go digging to see what people were saying for supporting dictionaries. I tried a couple of options that I didn't quite like. Ultimately, I went with a List of key/value pairs with dictionary-like accessors.

[CreateAssetMenu(fileName = "MoraleModifierSet", menuName = "THGJ22/Morale/Morale Modifier Set")]
public class MoraleModifierSet : ScriptableObject
{
    [SerializeField]
    private List<ModifierKeyValue> _templates = new List<ModifierKeyValue>();

    public MoraleModifierBase this[MoraleModifierType type]
    {
        get => _templates.FirstOrDefault(t => t.Type == type)?.Template;
    }

    [Serializable]
    private class ModifierKeyValue
    {
        [field: SerializeField]
        public MoraleModifierType Type { get; set; }

        [field: SerializeField]
        public MoraleModifierBase Template { get; set; }
    }
}

This allows me to view them (roughly) as key/value pair while allowing me to make the actual collection read-only. Here you can see how the actual MoraleModifierBase looks in the Unity Inspector, as well as the Modifier Set.

Placeholder

Placeholder

The AddModifier method was refactored to look like this:

public void AddModifier(MoraleModifierType modifierType)
{
    var totalWithSameTemplate = _modifiers.Count(m => m.Template.Type == modifierType);
    var modifierTemplate = _modifierTemplates[modifierType];

    if (totalWithSameTemplate >= modifierTemplate.MaxInstances) return;

    SimpleTimer modifierTimer = null;

    if (modifierTemplate.ClearType == MoraleModifierClearType.Timed)
    {
        modifierTimer = new SimpleTimer(modifierTemplate.ClearDuration);
        modifierTimer.Start();
    }

    var modifier = new MoraleModifier
    {
        Template = modifierTemplate,
        Timer = modifierTimer
    };

    _modifiers.Add(modifier);
}

And the calling code was refactored to this:

private void HandleWarmthStateChange(WarmthStatus state)
{
    switch (state)
    {
        case WarmthStatus.Freezing:
            _freezingTimer.Start();
            _moraleMechanic.AddModifier(MoraleModifierType.Freezing);

            break;
        default:
            _freezingTimer.Stop();
            _freezingTimer.Reset();
            _moraleMechanic.RemoveModifier(MoraleModifierType.Freezing);

            break;
    }
}

Seeing it all in Action...Maybe

Now that I had the base system in place, I needed to test it before adding a bunch more modifiers. It should be adding the Freezing modifier to the Crew when they reach the Freezing state. I threw some console logs in the Morale update method, hit play, and waited for their Morale to drop. And waited. And waited.

Some more console logs later, it turns out that the Crew prefab did not have the Warmth mechanic added as a component, so nothing ever triggered the Freezing state in the Crew. Easy-peasy. I got that added in and configured, ready for more testing. Hit play and waited for their Morale to drop. This time I had logs to see the Crews' Warmth and Morale and was feeling good. The Crews' Warmth dropped below the Freezing threshold but their Morale did not drop.

Even more logs to see what the Warmth state was. This was like trying to find a needle in a haystack. Because we had four characters with the Warmth mechanic and three with the Moral mechanic, we were dumping at least seven log messages per frame. I was having a hard time determining which Crew was associated with which numbers and which states were tied to which Crew. It was a bloodbath and something needed to change.

Improved Debugging

Needing better information, I turned my attention from finding the issue to gathering better, more actionable information.

The first change I made was to give the Crew actual names. Instead of them all being CrewMemeber_Crew (Clione), now they would have distinct names like Crew_Jarnathan. This made associating individual values to their respective Crew much easier. This helped quite a bit when looking through the logs but the sheer number of them was still obnoxious.

The next change I made was adding a "debug panel" to the game. This can be toggled with the backtick/tilde (~) key. It contains a list of characters, including their names and the values/states for their Warmth/Morale.

Placeholder

Anywhere in the code can call update functions to set the current values of the Warmth or Morale.

private void Update()
{
    _warmthValue = ApplyWarmthDelta(-_depletionRate * Time.deltaTime, true);

    DebugUI.Instance.UpdateWarmth(name, _warmthValue, _currentState);

    CheckAndApplyState();
}

Notice that I didn't say you can update the Names. That is because, behind the scenes, it is using the name to find an existing detail line entry to update, or creating one if it doesn't exist. Essentially, the name is the key and a new entry will be added for each new name that is sent to it. Here you can see a snippet showing the Morale being updated and it "safe" getting the Detail line.

public void UpdateMorale(string name, int morale)
{
    var details = GetDetails(name);

    details.SetMorale(morale);
}

private DebugDetailsUI GetDetails(string name)
{
    if (!_details.TryGetValue(name, out var details))
    {
        details = Instantiate(_detailsPrefab, _detailsContainer.transform);
        details.SetName(name);
        _details.Add(name, details);
    }

    return details;
}

All of this combined to gave a much nicer view of the current states of the Crew. The improved view made it very obvious what was (or in this case, wasn't) happening. If you watch long enough in the first gif of the debug panel, you'd see that when the Crews' Warmth values drop below 25 they drop into the Hypothermia state. However, when they drop below 10 they don't drop into the Freezing state.

The Fix

After bringing the issue up to the team, Andrew pointed out that the order of the Warmth thresholds matters. I had been ordering them in the "natural" flow of warmest to coldest. Like so:

Placeholder

Andrew had his ordered differently, from when he initially built the system. His made more sense from a mathematical/programmatic standpoint. Here was his:

Placeholder

As you can see, it you were to start at the top, you could just check them one right after another and the logic works out. Compare that to mine where if Hypothermia is checked before Freezing then it will always return first, even if the value is below 10.

I added a board item as a stretch goal to make that system more order-independent but for now, we'll run with the Order that Andrew had, since it works and we should only need to adjust the actual threshold values moving forward. The actual order of the states won't change though.

After adjusting the order of the thresholds, the Warmth mechanic changed states as expected. Success!

Placeholder

Funeral Procession

While testing out the Freezing state on the Crew, I did run into an interesting bug. When the Crew die, they do not stop following their assigned sled. Instead, they die then float along side it. Hopefully an easy fix, but it was a good way to end the night.

Andrew summed it up perfectly:

"Gonna make it to the outpost one way or another"

Placeholder

Spell Casting, Continued

Spell List

I worked on getting the Spell Caster component able to actually cast spells. The first thing I needed was a way to define what spells the spell caster has available. I decided to go straight to using a list, instead of just a singular spell, because I knew that I was going to need to do that anyway, so why wait?

I exposed a list of SpellBases to the inspector, where a developer could slot in one or more of the ScriptableObject-based Spells. I also added a int field to keep track of the index of the currently selected/active Spell. Again, this is more of a future thing but I wanted to get the structure laid out ahead of time.

Placeholder

Decisions for Handling Input

Now that I had a spell to work with, I needed to actually have something to trigger the Spell. I added in a CastSpell action to the Player Input Actions and tied it to the E key (for now). This allowed me to add a check into my Spell Caster class to see if it was pressed. However, I ran into a dilemma. Do I make the triggers require discrete button presses or do I allow them to hold down the button and let the spell cooldown limit when it triggers. Since we wanted some spells to be "continuous" I decided to start with checking if the button is being held down and attempting to cast the spell every frame. This worked really well for both holding the button down or just pressing it once, since as soon as the spell triggered it would go on cooldown, preventing additional triggers. This took care of the Warmth spell (and the future Light spell) but what to do about the other types of spells?

This problem is more common in shooter games where you have semi-auto (discrete triggers) and full-auto (continuous hold). They typically have different logic based on the type of gun being wielded. If the gun is flagged as semi-auto, they check for discrete actions and if you press and hold the button it will still only trigger once, even if the "cooldown" has elapsed. Then if a gun is flagged as full-auto, they just check for if the is currently being pressed with it immediately firing as soon as the cooldown has elapsed.

I flip flopped on whether I wanted to implement the same type of system, where the spell could define what type it is and adjust the checks accordingly. However, I felt like I was getting too into the weeds with the system and consulted my oracle (Terra) to guide me down the right path. Ultimately, we decided it would be best to just stick with using the "full-auto" input system, even if it wasn't the most "proper". This is a game jam after all and there isn't anything that says we can't go back and refactor it if we have time. Really, the only difference between the two styles is really player expectation. Luckily, because there are no direct real-world examples to casting magic, the player can just assume that is how magic works in this game. It doesn't have the in-built expectation for a semi-auto gun to behave like a semi-auto gun.

404 - Component Not Found

Anyway, I got all that implemented and tested it out. It didn't work, yay! It would pick up the test cubes I put around that had the Warmth Mechanic component on the but it wouldn't pick up the Player. I spent a decent amount of time troubleshooting this. I hadn't used the Physics.OverlapSphere call in quite a long time, so I tried to make sure that I knew what it was doing.. That all looked good and I couldn't find anything in the code that seemed off.

After putting in some debug statements, I found that the Player was being hit by the sphere but it did not find the Warmth Mechanic on it. Lo and behold, the Player prefab lacked a Warmth component. I put that on, admonished myself for the oversight, and retested.

It still didn't work, yay! My debug statement still showed that the Player was being hit but it couldn't find the component. I had just ensured that it existed, so why wasn't the code finding it? Well, it turns out that the "graphics" for the Player had their own colliders and those were getting picked up by the sphere instead(?) of the collider on the Character Controller component. Since the Warmth Mechanic component was on the root Player GameObject and not on the bland capsule that is the Player's body, the check couldn't find it.

I removed the offending colliders, since they weren't needed anyway and everything seemed to work as expected. Finally! In the screenshot below, you can see that we attempt to cast the Warmth spell several times but it only actually triggers once due to the cooldown. You can also see that it found both the test cube and the Player.

Placeholder

Placeholder

Selectable Spells

Now that spell casting was working with one spell, I needed to expand it to support multiple spells. We already had the spell list and the field for tracking the active spell, now we just needed a way to actually change which spell is the active spell. As with most things, this came with a decision to be made. Should there be discrete buttons for selecting specific spells (i.e. press 1 for the first spell, 2 for the second, etc) or should the input "cycle" through the spells (i.e. scroll wheel up/E increments the index and scroll wheel down/Q decrements it), or some combination of the two. A lot of games I've seen tend to do a combination where you can hit the number to immediately swap to the slot or you can use the scroll wheel to cycle through them. Ideally, we would also support both but again, this is a game jam so I went with one and have the intent to add in the other if there is time.

I decided to go with the explicit numbers instead of the cycle, just because in the moment when playing, I think being able to explicitly pick which spell you need will be more important. This proved to be an interesting feature to add in. I started with adding the Input Actions, bound to the respective number keys. I added four of them for now, since that is the current number of spells we intend to support. More can be added later if need be.

Now that I had the Input Actions, I needed to update our GameInput class to expose that in a better package. My first attempt was to just put a if/else block where I checked each action individually, something like this:

public void HandleSpellSelection()
{
    if (GameInput.Instance.DidSelectSpell1())
    {
        _activeSpellIndex = 0;
    }
    else if (GameInput.Instance.DidSelectSpell2())
    {
        _activeSpellIndex = 1;
    }
    // Etc
}

This seemed like it was going to be a pretty big hassle, and it also opened it up to checking for spells that we may not have yet. For instance, we currently only have the Warmth spell but we support up to four spells. With the above solution, we would be checking to see if the Player tried selecting spells 2-4 and we'd have to handle that gracefully, since they don't actually exist in the list.

I knew there had to be a better way and after some sleuthing, I found that you can find actions dynamically by name on the Input Actions. Granted, this would make it a bit more fragile (since it is using strings instead of compiled property names) but I felt the risk was worth the reward. Running with this, I was able to make a more generic method for checking the inputs. Here is what I came up with:

In the SpellCaster class, now we only check for however many spells we actually have.

private void HandleSpellSelection()
{
    for (int i = 0; i < _spells.Count; i++)
    {
        var slotNumber = i + 1; // Slots use 1-based indexing
        if (GameInput.Instance.WasSpellSelected(i + 1))
        {
            _activeSpellIndex = i;
        }
    }
}

In the GameInput class, we dynamically build the Action name, based on the slot number passed in.

public bool WasSpellSelected(int slotNumber)
{
    var actionName = $"{nameof(_playerInputActions.Player)}/SelectSpell{slotNumber}";
    var spellAction = _playerInputActions.FindAction(actionName);

    if (spellAction == null) return false;

    return spellAction.WasPressedThisFrame();
}

This avoids the whole problem with accidentally selecting a spell index that does not exist and it also makes it more extensible in the future if we want to add more spells. This code wouldn't need to change, only the actual actions defined in the Input Actions would need to be added. As mentioned before though, if the action names ever changed, this code would break. This shouldn't be an issue for this particular project though, since we shouldn't need to change those names.

Visualizing Spell Selection

We have the various spells slots being selected now but the Player has no way of knowing what spell slot they have active. It was finally time to add in some UI to give the player some information.

I built out a small UI chunk with a HorizontalLayoutGroup on it and created a SpellSlotUI prefab for it to lay out. There were a couple of things I knew we would need for each spell slot:

  • A numeric display for what slot it is, so the Player knows which number to press
  • A display for a spell icon, for easy identification
  • A way to show which spell is active
  • A visual way to see the remaining cooldown time

The first two were pretty easy, I just set up an Image for the icon and a TextMeshPro Text field for the number. I also added a script to the top level of the prefab that took those as dependencies.

For showing which spell was active, I wanted a two prong approach. I wanted to use color to draw the eye but I didn't want to rely solely on color (in case it blended in on a particular background or if the Player is color-blind). In addition to the color outline, I also increased the size of the slot as well. It took a few tries to remember how to make the Unity UI scalable how I wanted but I got it working fairly quickly.

Placeholder

On the script, I added a couple of methods: one to initialize the slot (taking in the index and the SpellBase data) and another for setting it Active/Inactive. All together it ends up looking like this.

Placeholder

I'm pretty happy with how it is turning out but the big blank squares are kind of grating. The spells needed some icons. I updated the SpellBase ScriptableObject to include a Sprite to use for the icon so each spell could define their own icons. Andrew is still workshopping what the icons should look like in general, so I sidestepped making my own and reused one of the placeholder ones he had added previously. Once I configured the image to be a Sprite, via the Inspector, I was able to drag it into the new Warmth spell definition and away it went!

Placeholder

In keeping with the whole "dynamic number of spells" theme being carried over from the spell selection, I made sure that it dynamically displays slots for the number of spells the Player has. It is set up to allow runtime changes to the available spells but we currently do not support that in the rest of the game. For now it just initializes with however many spells the Player has configured

Note: We only have the one spell implemented currently, so I had to duplicate the spell in order to test this. Hence the same icon for each.

Placeholder

The last thing that needed to be added was some type of visual to show that the spell is in cooldown and when it is expected to be off cooldown. I decided to go with a simple "wipe" overlay, since it is easy to implement using the Slider component provided by Unity and it is visually apparent. As we get final icons and such put in, a different style might work better (if the contrast is a lot lower) but for now it works great.

Placeholder

After that was wrapped up, I stuffed it into a PR and sent it off to the team for review.

Adding Energy Management

The next board item I picked up was adding energy management to the spells. This meant adding an energy pool to the Spell Caster component and the means of depleting and restoring the pool.

Depleting the pool was fairly straight forward. We were already casting spells, so it was easy to add in a check to see if the spell cast was successful and, if it was, remove the used energy from the pool.

private void HandleCastingSpell()
{
    if (!GameInput.Instance.CastSpell()) return;
    var spellToCast = _spells[_activeSpellIndex];

    if (!spellToCast.CanPerform(this)) return;

    if (spellToCast.Cast(this))
    {
        RemoveEnergyFromPool(spellToCast.EnergyCost);
    }
}

We also needed to update the CanPerform check to include energy as well. Now we are checking both the cooldown timer and the energy.

public virtual bool CanPerform(SpellCaster caster)
{
    if (_cooldownTimer.IsRunning && !_cooldownTimer.HasElapsed)
    {
        return false;
    }

    if (caster.CurrentEnergyPool < EnergyCost)
    {
        return false;
    }

    return true;
}

This is it in action, after adding a piece to the UI to display the current energy pool level. That was done in almost the exact same way as the cooldown display, using a Slider and exposing methods to manipulate it.

Placeholder

Now that energy depletion was taken care of, I needed to work on restoring energy. The high level concept in the game (in regards to restoring energy) is that there are piles of energy-infused snow that the Player can approach to recharge their energy. The piles should also have a limited amount of energy and should disappear when it is depleted.

To accommodate this, I added an IEnergyRecharger interface and built a basic interaction system. It works similarly to to the spell casting, where it looks for an input, does a raycast to find any IEnergyRechargers, then extracts the energy from it. There is a cooldown on the extraction, so we can control the recharge rate. This would allow us to have piles of snow that are "supercharged" if we wanted that have more energy and recharge faster. Once the snow pile is out of energy, it is destroyed.

As I was testing it, one thing was missing. How could I tell if I was looking at something (and within range of) that I could recharge my energy from? I decided to add a targeting indicator that changes color when looking at an IEnergyRecharger within range. I did have to re-order the logic in my Spell Caster class so I could tell if one was found without needing to hold the Recharge Energy button. For now it is just a (too small) dot but I hope that it gets updated to be something better later.

This is what that ended up looking like.

Placeholder

Here is the full system in action:

Placeholder

Crew Following

Today was all about trying to get the Crew/NPCs to follow the sleds. I had so many ideas on how to get the Crew walking next to the sleds and spent too much a decent amount of time trying to get things to work. I originally wanted to have them pick random points within a radius of their tether every couple of seconds, so they would kind of "wander" next to the sled. I got that implemented but, boy, did it look terrible. Unfortunately, I don't have a screengrab of that.

The main problem was that the positions I was generating were stationary in the world, meaning the Crew would be walking to a point that was being left behind by the sleds. Couple that with 50% of the points being generated behind the tether point and you had a lot of crew moving in really bizarre ways.

To fix that, I tried several different things: - Generating an offset to the tether point every few seconds so the point was always moving with the sled - This...sorta...worked, as it gave the Crew a point to actually follow, instead of just move to - However, because the actual walk speed of the Crew is faster than the sled was moving, as soon as the offset changed, they would "powerwalk" over to it, instead of keeping their same pace. This just looked really awkward - I think this had promise, but there was a lot of tweaking that would need to happen and I felt like I was burning too much time on this. Hopefully, we will be able to revisit it later - Moving the tether point - This had the same effect as generating the offset - Just following the tether point directly - This ended up looking the best, though it would be nice to have some variation on it. - I think to make this one look really good, when the Crew is spawned, it should pick a point around the tether point to spawn in, that way it breaks up the "rigidity" of the current system

I ended up just having them follow the tether point directly. Next, I needed to get them animating.

As mentioned the other day, Andrew did a lot of good work making sure the animations and everything were set up for the Crew, so getting the actual animations to play when they are walking was really easy. However, there was a slight issue with the facing. As you can see, they are doing a nice side-walk to show off their skills!

Placeholder

I saw that Andrew also had a "speed" variable set up in the Locomotion state to blend between running and walking. We don't really have running integrated yet but I figured I would see what it looked like just using the NavMesh Agent velocity as the speed value. Now they are showing off their sideways dancing skills!

Placeholder

I reverted that change and figured we would get there later. Everything was looking pretty decent except for their facing. A quick turn in the prefab and they were looking great. I was showing Terra my work and she pointed out that it looks really weird that they are all walking in unison. It kind of took her out of the immersion (as much as one can be with a completely empty world). You can see that in the gif below.

Placeholder

I tried implementing a couple of things that didn't quite work out. The gif below doesn't do it justice but they looked like the roadrunner, their feet a blur!

Placeholder

I ended up adding a small StateMachineBehaviour that I tacked onto the Locomotion state in the Animation Controller that gives each one a random offset to their animations. This made everything look way more organic.

using UnityEngine;

public class RandomizeAnimOffset : StateMachineBehaviour
{
    private bool _hasOffsetApplied;

    public override void OnStateEnter(Animator animator, AnimatorStateInfo stateInfo, int layerIndex)
    {
        if (_hasOffsetApplied) return;

        float offset = Random.Range(0f, 1f);
        animator.Play(stateInfo.shortNameHash, layerIndex, offset);

        _hasOffsetApplied = true;
    }
}

I also rearranged the sled spawn points to avoid a particularly awkward movement pattern when the sled was falling in line. Overall, I am pretty happy with how it all turned out.

Placeholder

Here are some of the oddities that are still lingering that I'm hoping to just avoid until we get to polishing everything.

Here is what happens when the Crew somehow gets trapped within the sled. I think this one happened because the back sled is too close to the front sled and the Crew spawned on the left-front tether point on the back sled. That would have put it within the bounds of the front sled and it is just ping-ponging within those boundaries. Better sled spawn positions (and/or some type of NavMesh check) would go a long way to prevent that.

Placeholder

The following gif was the awkward movement I mentioned above, and why I ended up putting the sleds more in line with each other. It is almost like the Crew is parented to the sled, but what I think is happening is that the tether is so close to the Crew that it tries to "orient" on it and it just ends up looking really awkward. I tried a couple of things, like manually dampening the movement, so it was "springier" (like the sled follow) but that just straight up didn't work. I even tried spawning the Crew off to the side (by the building) and that also looked goofy for a different reason. I'm sure there is a way to fix it but I had spent way too much time on this already, considering this is a game jam and needed to move on. That is probably the hardest part of the game jam so far...cutting losses early to avoid wasting time. "Good enough" is good enough!

Placeholder

End Tile Spawning Issue

Once I got the Crew manager and follow behavior checked in, I fixed a small bug I introduced previously where the "end" tile wasn't being spawned at the end if the "Desired Tile Count" (i.e. how many total tiles should the game cover) was more than three. I had tested it with two and three tiles and it worked just fine. It turns out that as long as it was below the "Max Loaded Tile Count" (i.e. how many tiles should the game keep loaded and in the scene at once) it would work fine.

This was because I was using the count of the loaded tiles to determine when to spawn the end tile and not the running tally of how many tiles have we spawned in total. Bonehead mistake that I remember going "I'll need to change that before checking this in!" and then promptly forgetting its existence. That was the primary reason that I had added the _totalSpawnedTileCount variable in the first place!

Placeholder

Reworking Spell Casting

I had a bit more time left in the day, so I spent it refactoring the work that Andrew did on the Warmth spell to make it more generic and to build up a system that we can use to make the other spells easier. Andrew had a lot of good code in his implementation, it just wasn't very modular. I made some good progress on breaking everything out and I am reusing a lot of the actual logic from the existing Warmth spell. Andrew did all the heavy lifting to get the spell actually working and I just need to finish "systemizing" it.

Ultimately, I am trying to get a structure similar to this:

SpellBase
├── RadiantSpellBase (Spells that radiate out from a point, "Sphere Cast")
│   ├── Warmth
│   └── Light
└── ProjectedSpellBase (Spells that project in a line out from a point, "Ray Cast")
    ├── Pulse
    └── Soothe

I have the SpellBase and RadiantSpellBase classes implemented as abstract classes that extend from ScriptableObjects and have the guts (pulled from the original WarmthSpell) stuffed into a WarmthSpell2 class (for now). I am trying to pull similar functionality down into the base classes (getting targets based on the cast type, handling cooldown timers, etc) to make adding the other spells much easier.

Next I need to work on getting the SpellCaster component figured out so I can actually try casting my new spell.

Fixing NavMesh Issues

First thing I wanted to tackle today was the weird "delay" when generating the NavMesh where the last removed tile would still be accounted for when rebuilding the NavMesh. When looking online for an answer, I ran across this, which corroborated my assumptions. I did try several other possible solutions, though, so it wasn't like I just went looking for something that agreed with me!

Placeholder

I ended up adding a Coroutine that waits until the end of the current frame/update cycle to rebuild the NavMesh. This allows the old tile game object to be cleaned up before rebuilding the NavMesh. Everything seems to be working as expected now.

Here is the original behavior: Placeholder

And the corrected behavior Placeholder

First Pass at End Game

Today I started working on getting the end game loop hammered out a little. I mainly wanted to focus on getting a game over screen when the caravan reaches the end of the final path.

In order to actually reach the final path, I needed to make some changes to the Game Manager class to stop spawning tiles after a certain number of them. Instead of just endlessly spawning tiles, I added a configurable limit to them and changed it to where the first and last tiles are always an Outpost with the ones in between pulling from a pool of forest tiles (even though we currently only have one forest tile).

Unity inspector showing new level config

I reworked the whole system to load whatever the next tile should be and made it more configurable. In addition to the number of Tiles to keep loaded, now we can set the total desired number of Tiles and how many Tiles should be loaded initially.

Now that we have a final Tile being loaded we can determine when the Caravan has reached the end of the line. When the Caravan gets to the end of the final path, we fire off an event that starts the end game process. After a configurable delay, the game moves to the End Game scene, where the Player can either restart or exit the game.

Placeholder

It is set up to show Game Over for when we get to doing the Player death. It is configurable on which one to display by default. More logic will need to be added to dynamically change the state when it is loaded.

Placeholder

When the Player restarts, it will display a loading screen while the main game scene is being loaded. This will become more important once we start getting more assets into the scene.

Placeholder

Here is it all in action.

Placeholder

Caravan Crew Management

After getting the basic end screen added in, I started working on getting the crew being spawned in.

Andrew did a good job of getting the basic crew prefab made up with a few animations, so I was able to drop that in, almost as is! The two things I needed to add were:

  1. A CaravanCrew script for controlling the individual crew members
  2. The material for the crew so they aren't just white

I also added an overall Caravan Crew Manager that is responsible for actually spawning the crew into the level. The idea for the crew spawning positions is that each sled has a number of points around them that the crew will be spawned on, and eventually use those points as "tethers" when they follow the caravan.

Placeholder

Because we can have a variable number of sleds in our caravan, we want to make sure that each point has an equal chance of being picked. To accomplish this, I added all of the points from each sled into a singular list, then pick a random point from the list. I also wanted to ensure that multiple crew aren't stacked up on the same point (unless there are more crew than points). To account for this, whenever we pull a random point from the list, we remove it from the original list and add it to a "used" points list. Then, when there are no more points in the original list, we reset the used points list back to be the original points list. This will prevent multiple crew on the same point until we have exhausted all of the points.

You can see the spawning in action below. We have two sleds and three crew. Two crew got assigned to points on the second sled, while only one got assigned to the first sled.

Placeholder

While I don't have the crew actually following the caravan, I did start working on getting a NavMesh working with our dynamically spawned environment tiles. I found this tutorial by LLamAcademy that had a similar setup to what we are doing. While most of the video doesn't apply to us, it was still helpful. I am still working through that video but got it (mostly) working as expected. When I generate a new tile, the NavMesh is extending to the new tile but it is still including the last removed tile. If you move far enough along where multiple tiles have been removed, it does remove the ones older than that last removed tile (i.e. there is always one "ghost" tile).

Placeholder

I think this has to do with how destroying game objects in Unity works. While we call the Destroy method before regenerating the NavMesh, I think it is still being included because it hasn't been cleaned up by Unity's system, since it is still the same frame. This is all just a guess and will need more investigation on.

Icons

Andrew has been passively working on the designs of various icons. I threw some ideas at him, based on the direction he was going with them, mainly the Warm and Hypothermia icons. For the Warmth mechanic, eventually we will need three icons: Warm, Hypothermic, and Freezing.

Placeholder

There was quite a few ideas that were thrown out but (at least for the Warm icon) we settled on some type of fire surrounding a thermometer.

Placeholder

Teaching and Learning

Andrew is still learning Unity and C# in general. I spent some time answering his questions with some examples. We also got the chance to do some pair-debugging to figure out why his player suddenly stopped accepting input. It wouldn't move or look around. Luckily, this turned out to be an issue with some left over code he had added at some point. Once we got that cleared up it was back to working as expected.

Caravan Manager

Started looking at using splines in Unity. I found this tutorial by AnanDEV which seemed to be exactly what I needed. I used his custom script but stripped down, since I don't care about the rotation (since the sled will lerp towards the target independently).

You can see the sled following the target that moves along the path.

Sled following the target

Because the target and the sled are independent, this should ease any wonkiness if the target has to jump (for instance, if the next path isn't perfectly aligned). The sled will (with it's own smoothing) will catch up to the target. There might be slight speed changes but unless the target jumps an incredible distance, I don't think the players will notice.

In the gif below, the sled starts quite a ways away from the target and you can see it catch up, then slow down as it reaches the target. Hopefully, we don't have nearly that big of a gap in the final game!

Sled catching up to the target

One thing to note: I did have to move the GameManager in the Script Execution Order for the project to ensure that it was initialized before any of the other things. This will help ensure that the base manager for the game is ready and available to all of the other scripts.

The sled is working pretty well on straight paths but what happens if we put some curve into the path? Well, frankly, it looks goofy.

Sled following a curve without adjusting rotation

But, after adding some logic to point in the right direction it looks pretty decent!

Sled following a curve with adjusting rotation

The next thing to get working is getting the sled target to jump to the next tile's path when it reaches the end of the current tile's path. This was a little trickier than I had originally thought. It sounded simple when I first thought of it, something like:

  1. Starting at index 0, grab the Path off the first tile out in the list
  2. Move the target along the path
  3. When the target gets to the end of the path, increment the index and grab the new path
  4. Rinse and repeat

However, I immediately ran into a problem with using the index. Because the list of loaded tiles is constantly evolving (new tiles are loaded, old tiles are unloaded) I can't guarantee that the current index still represents the same tile in the list when I go to check it again. This means that I can't guarantee that if I increment the index that it will point to the "next" tile. I pondered a few ways to do this but ultimately settled on using a Linked List. This way, I could get easy references to the next tile in the sequence. It also makes it easier to remove the tiles at the beginning.

This was pretty easy to refactor, I just had to account for the fact that the list holds a list of nodes that have the actual tile values in them, rather than the tile itself. In the code example below, you can see the use of the .Value property on the node pulled from the list

public void LoadNextTile(Tile tilePrefab)
{
    var newTileOrigin = Vector3.zero;
    if (LoadedTiles.Count > 0)
    {
        newTileOrigin = LoadedTiles.Last.Value.transform.position + _tileSpawnOffset;
    }

    var tile = Instantiate(tilePrefab, newTileOrigin, Quaternion.identity);
    LoadedTiles.AddLast(tile);

    while(LoadedTiles.Count > _maxLoadedTiles)
    {
        var oldTile = LoadedTiles.First;
        LoadedTiles.RemoveFirst();

        Destroy(oldTile.Value);
    }
}

The code ended up working perfectly after the refactor and the sled transitioned to the next time really well.

Sled transitioning to the path on the next tile

Once I got everything tidied up, I wanted to add support for having multiple sleds in the caravan. This proved to be an interesting problem. How do you get the sleds to follow each other and not pile up into the same spot on the path? I had to do some creative checks to ensure that each sled did not start moving along the track until the one ahead had gotten at least some distance along the path.

This was achieved by adding a reference to the sled to the one ahead of it then checking to see how far it had gone on the path. Once it has moved far enough along the current sled's target will move to the path and start following it.

All the sleds falling into a single file line

Tile Spawning

Worked on finishing up the tile spawning functionality. I ended up having to go with using prefabs instead of scenes, like I had originally intended. Scenes don't allow you to position them at runtime (at least not without some hokey workarounds). Instead, we now spawn in prefabs that are the full tiles.

I also created a Tile Spawn Trigger prefab that allows the player to spawn the next tile in the sequence when they walk through it. This has a configurable number of tiles it will keep loaded in at a time and automatically unload the oldest tiles to get back under the max. I did run into an issue where the trigger would hit multiple times and just spawn a bunch of them if the player walked through it repeatedly. I fixed this by only allowing the trigger to be hit once. Since the game is linear, and the player cannot really go backwards, this should be more than adequate.

The gif below (slowly) shows the new tiles spawning in when a trigger is hit, then it shows the old tile despawning when hitting the next trigger. I probably should have made the gif before I made the tile size bigger but oh well.

Tile Dynamically Loading In

In the gif, you can see the tiles popping in and out pretty well, but this should not be an issue in the final game, since there will be fog and it will be dark.

Tile Forest Placeholder Description

There is probably a better way of doing this but it works for now!

Conventions and Wikis

I added a Wiki to the DevOps project. The main articles are about conventions. We now have a coding conventions article that outlines how the code should look and an asset naming convention article for how we should be naming our assets.

Azure DevOps Wiki Hierarchy

The coding conventions article is primarily just the style that I have developed over the years that seems to work well for me. It is more on the "standard" C# side, rather than the Unity C# side, because that is what I am more used to from my day job.

The asset naming conventions are primarily based off this Unity Style Guide I found online. We mainly took the actual asset naming styles from it, but may incorporate some of the other styles as well. I don't agree with some of the stuff in it but there is obviously a lot of thought put into it.

We still need to figure out our folder structure, so that'll be one of the next things to tackle.

Caravan Manager

Got the sled and other models pulled into Unity and put into prefabs. I was able to get the sled spawning using a spawn point. The difficult part is that the sled needs to persist/exist between prefabbed tiles, so I spawned it in the main scene. This presented a challenge because I had to put a spawn point where it would need to be in the first prefab. I was able to temporarily add the starting Outpost prefab to the scene to get things lined up. This worked pretty well but I had to add a configuration field to the Caravan Manager to offset the rotation of the sled when it was spawned, to make sure that it pointed the right way down the road.

As you can see, when you are just looking at the main scene, it is hard to tell where the sled spawn point should be. Why there? Who knows!

Shows player and spawn point in empty void

However, once you pull the starting tile into the scene, it makes much more sense. Ideally, the starting tile would actually have the spawn point on it and the Caravan Manager would look for that and pull it in. Because the starting tile is being dynamically spawned in that makes trickier. However, now that I think of it, I could have a property exposed on the Tile to hold a reference to the spawn point (if it has one) and when the Caravan Manager goes to spawn the sled it can grab the reference. I think there might still be some timing issues with that but may be something to explore.

Shows player and spawn point with level prefab loaded in

This is the spawning in action. A nice mix of terrible programmer art and much nicer models. You get to see my full range of art skills, from the hideous to the moderately decent!

Nice Sled with bad level placeholders

So far today, the code has been pretty straight forward, but you can see the coding conventions I alluded to earlier in action. I like to use the Header to organize the types of serialized fields I have. This has made it much easier to determine where data should be coming from and how it is expected to be used. I don't remember where I first heard this suggestion but so far it has worked the best for me. If only Unity supported sub-headers, then it would be the perfect setup!

using UnityEngine;

public class CaravanManager : MonoBehaviour
{
    [Header("Prefabs")]
    [SerializeField]
    private CaravanSled _sledPrefab;

    [Header("External Dependencies")]
    [SerializeField]
    private Transform _sledSpawnPoint;

    [Header("Config")]
    [SerializeField]
    private Vector3 _spawnRotationOffset;

    private void Awake()
    {
        var spawnRotation = Quaternion.identity * Quaternion.Euler(_spawnRotationOffset);
        var sled = Instantiate(_sledPrefab, _sledSpawnPoint.position, spawnRotation);
    }
}

Unity inspector showing headers separating types of fields

Brainstorming

I need to figure out how to get the sled to move along a path. I know that I'd like to make a spline of some sort that the sled will travel along. This will allow us to play with the shape/contours of the path, like winding it around the terrain. However, this presents a problem. We are using tiles for our environment, so we can dynamically adjust how long the "run" will be and also slot in different random events and such. Because of this, we cannot just have a singular spline that goes through the entire run. We want to have more variety in the environment tiles, otherwise we could just move the sled in a straight line.

Before we get into the rest of my thoughts, regardless of the spline implementation, I'd like to have a target that is moving along the spline then have the sled move smoothly from its current position to the target (probably just using a simple lerp). This should give us more flexibility in how we move the target because any jolts to the target won't necessarily reflect in the sled, assuming that the jump isn't too big. I think this will also make the halt mechanic more interesting, since the sled will slowly come to a stop naturally, but that is a feature for another day.

There we a couple of options that Terra and I thought of while discussing it over our dinner break:

  1. Could we have multiple splines (one on each tile) then somehow reparent the target to the next spline when it reaches the end of the current spline
    1. Trigger to detect the next tile coming up and grab a reference to its spline, then reparent to it when the target reaches the end of the current spline
      1. This was the initial thought. It is more complicated, since it has trigger volumes that have to be placed physically in each tile prefab.
    2. I already have the list of loaded tiles, when the target reaches the end of the current spline, just reparent to the next spline in the list
      1. This came to me while I was typing all of this up. Don't know why it didn't occur to me earlier, as it seems like the simplest answer to the problem. It relies only on an existing data set, so it should be really solid. That only leaves the challenge of reparenting the target but that should be fairly trivial (famous last words...)
  2. Could we somehow "append" the next spline onto the current spline, recalculate the current percentage (since if we were 90% of the way through the original spline but we add another 100% onto it, we'd be at around 40% of the new spline), then we only have to deal with "one" spline.
    1. The main problems with this one are:
      1. I don't know if you can append/truncate splines after they are created
        1. Frankly, I don't even know if Unity supports splines out of the box
      2. The percentage needs to be recalculated and I don't know how accurate that would be
        1. When I worked with splines in Godot, I used a function to find the closest point on a spline to a given position. I don't remember if that was something built into the spline object in Godot or if there was a mathematical equation to determine it

I think I will pursue to having one spline per tile, then using my loaded tile list snag the next spline in line when I reach the end of the current spline. Sounds simple enough! Now, to figure out how to move an object along a spline and tell when you are at the end!

Other Stuff

I worked with Andrew to get him more familiar with Git, since this is his first time really using it. He is picking it up pretty well. I made this silly diagram to help explain what is going on. It is a little simplistic but it helped me explain the flow of everything. Whether it helped anyone else? Who knows!

Example Git workflow

Overall, as a team, we seem to be getting more into the flow of things and are figuring out how to work with Unity and git. It is definitely a learning experience. We spent quite a bit of time hammering out workflow issues and conventions today, which goes a long way. Moving forward things should be much smoother sailing!

Pre-Jam Beautiful Corner

We decided to each make a "beautiful corner" to show the other developers how we envision the game to look.

I decided to focus on creating several "hero" assets, since those would need to be custom-made, since we probably wouldn't be able to find them in assets packs. These would also drive the overall style of the game, since it would need to be in a style that we could realistically make during the timeframe we have.

I tried to focus on a "suggested realism" style, where the models aren't too high poly but should have enough to have some character and the textures should be real-ish without having to go as far as making them super realistic.

The Sled

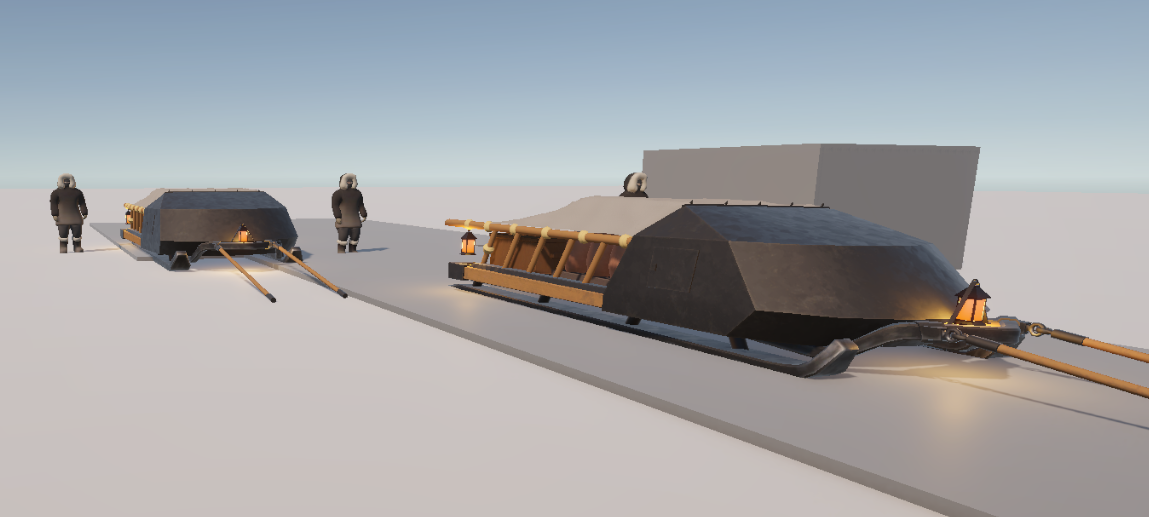
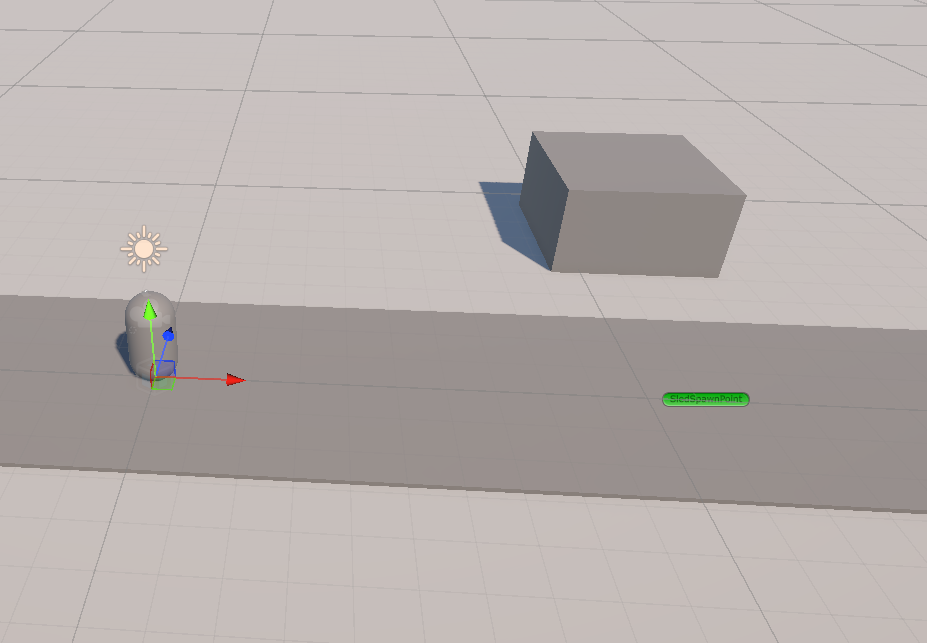
The main asset I wanted to work on first was the sled, since that will be a primary focus during the game and would probably need to be the most "custom" asset we have.

Inspiration and Initial Design

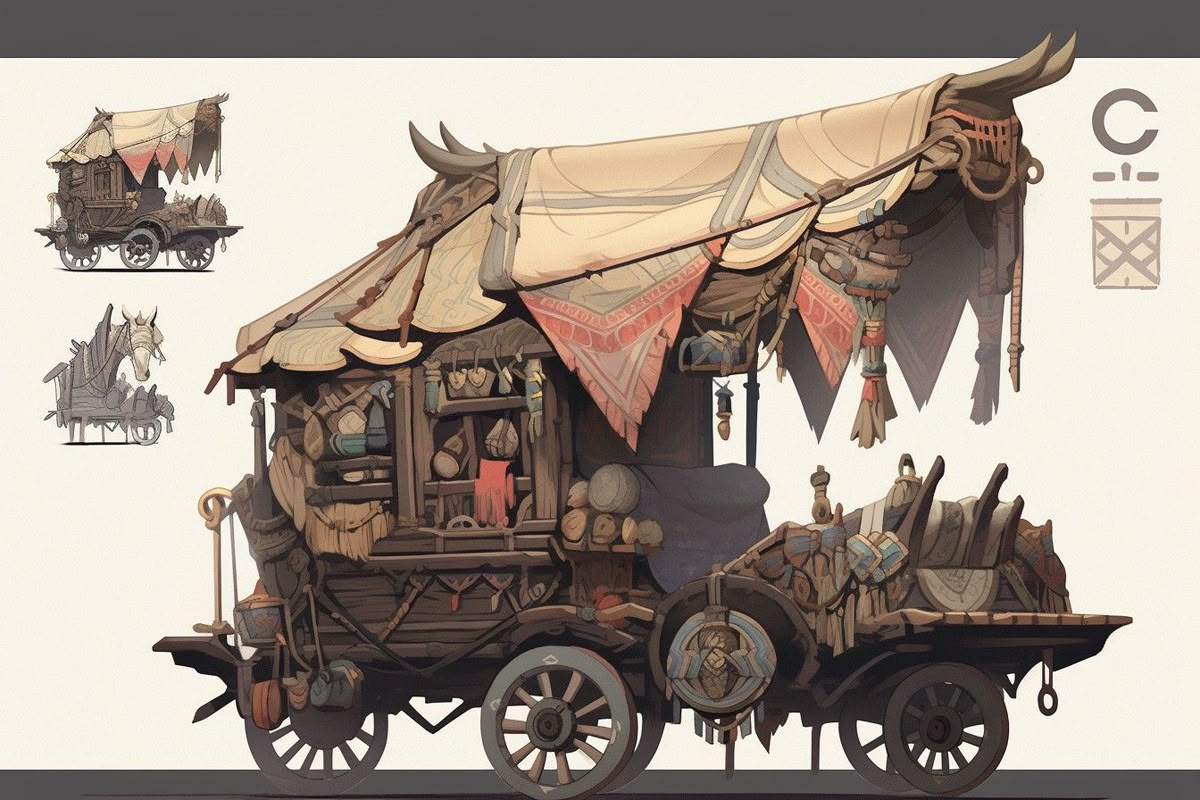
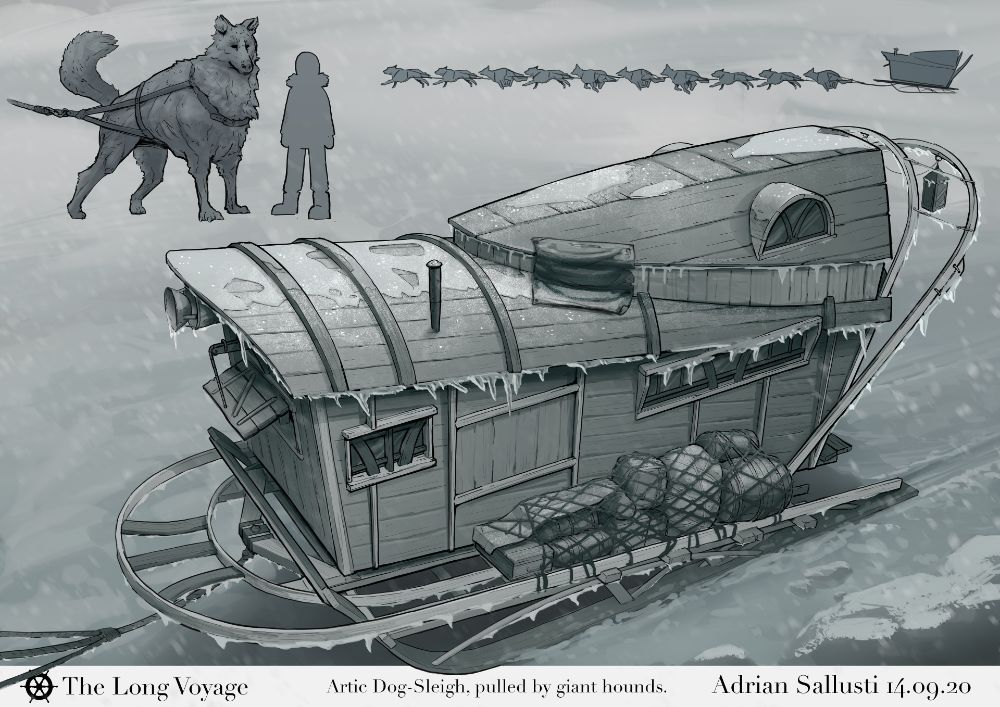
Scrolling through Pinterest for inspiration, I ended up looking at both wagons and sleds, since there were not many interesting references for sleds that weren't small dogsled or Santa-inspired. Since this cart would be packed with goods, I wanted it to be more wagon-like than dogsled.

Two that stood out to me the most were this wagon design (even if AI generated with really, really wonky wheels) and the "micro-home" sled.

I liked the wagon due to the top part of the wagon, with the fabric draped over a wooden frame and the overall shape. I thought I could use something like that shape as the cover for the goods (well, at this point in the concepting phase, it was actually a large soulstone being carried).

Placeholder

The thing I liked about the dogsled was that it looked more "solid" design and it looked much larger than a regular dogsled (with the scale of the dogs being larger than a person).

Placeholder

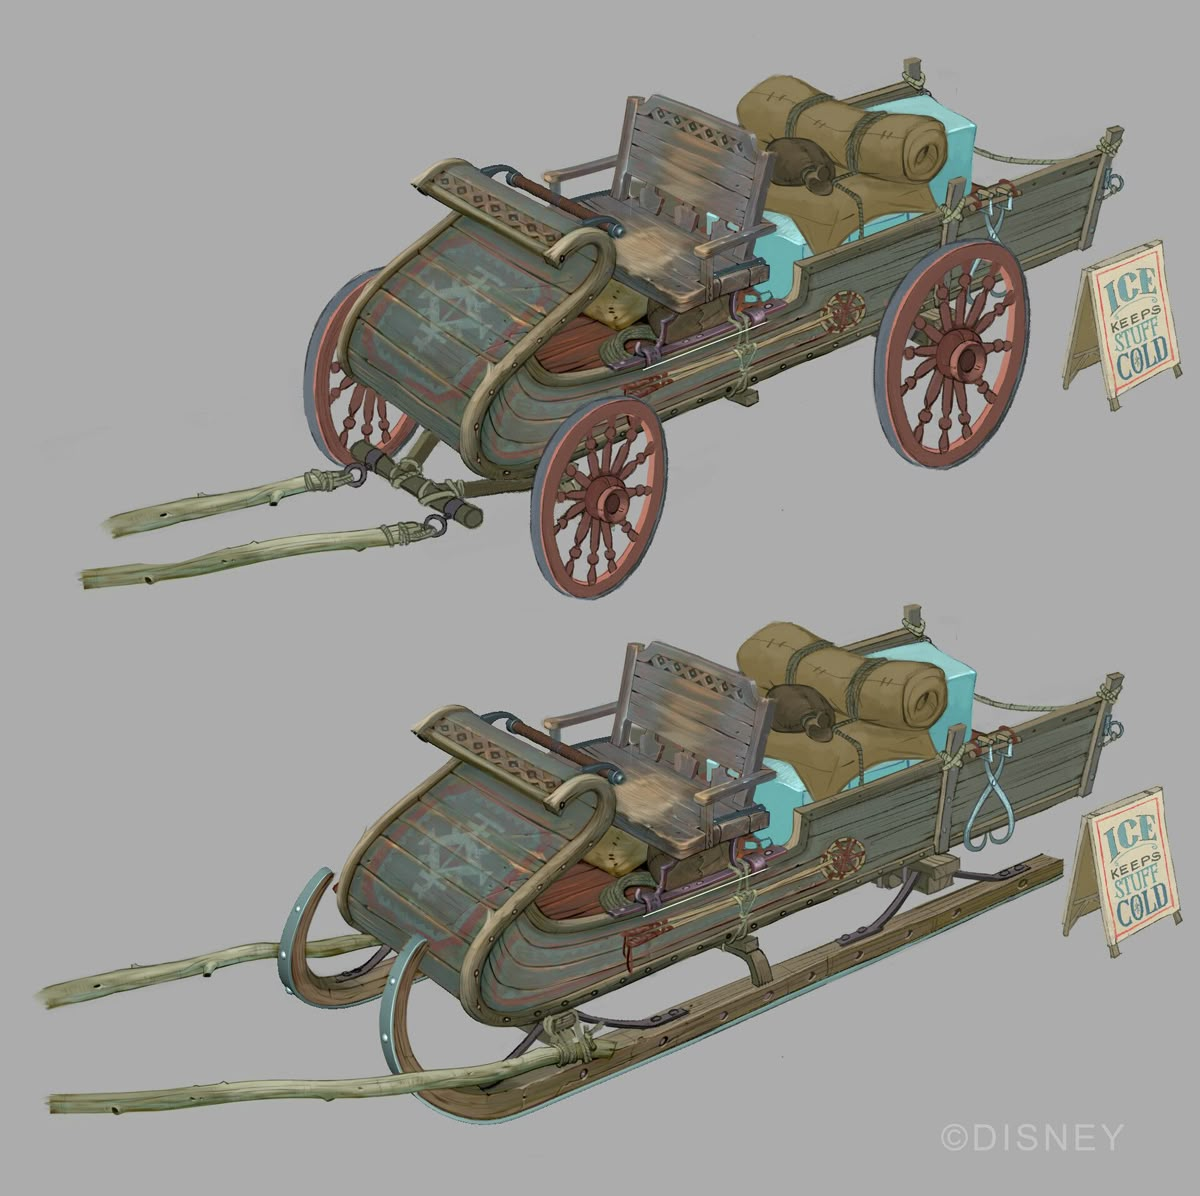
I attempted several times to get a decent shape in Blender, using the wagon above as the inspiration but I could not get the overhanging frame looking right. I ended up seeing several references for sleds that looked like this and liked the overall shape of the front.

Placeholder

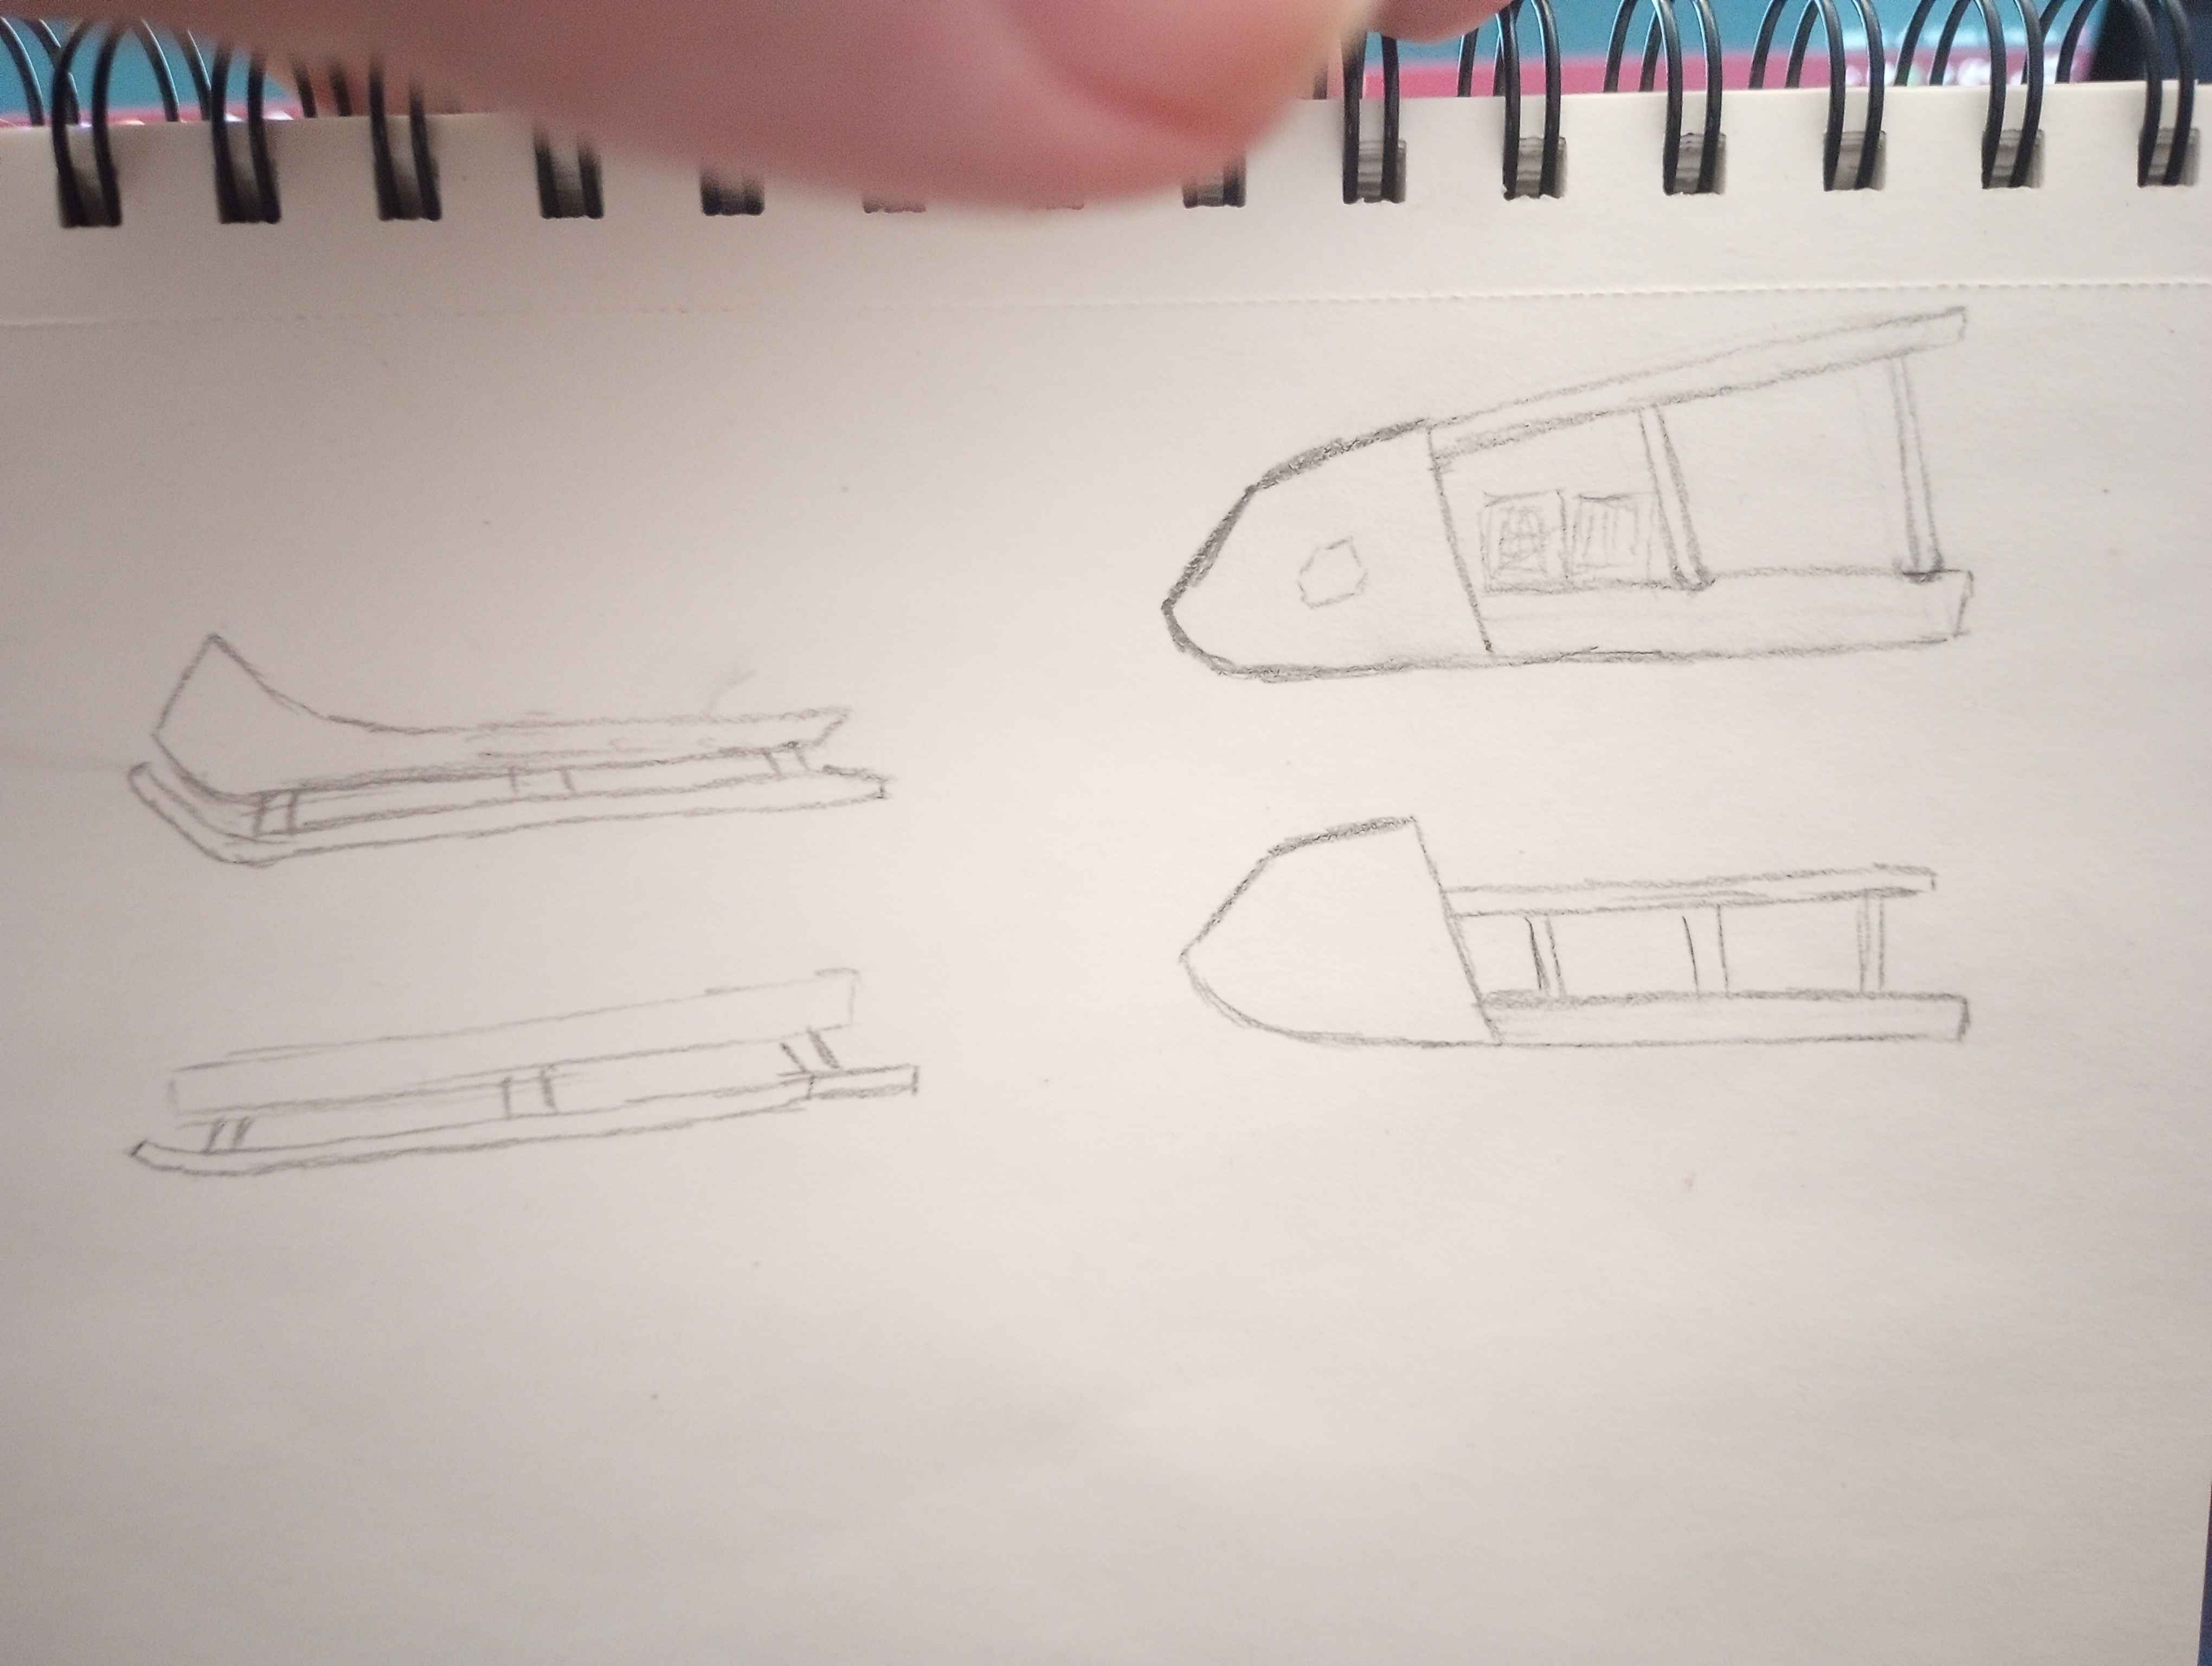
I decided to try sketching out some ideas because I felt stuck in Blender trying to make the original design working. After the first two sketches, I really started thinking about what the sled would be carrying and what the Frostwood Conclave would value. It was also around this time that I was talking with Terra, trying to figure out what the motivation/story of the game was. One of the things that occurred to me during this discussion was that:

  1. They would probably work the soulstones into more convenient shapes, as opposed to leaving them in the raw "crystal" shape
    1. This opens up a lot of avenues for transporting or representing the soulstones
  2. The soulstone would have been more locked down to prevent unauthorized access/theft
    1. This would mean that the soulstone would need to be on the smaller side (to make it less of a target for thieves) and would need to be more "secure"

This led me to exploring adding a "lockbox" of sorts onto the front of the sled to house the soulstone and leave the back of the sled open for cargo. I tried to incorporate the lockbox into the vaulted frame/canvas idea but I didn't like how that looked. Working on another shape, I found a concept that I liked the look of.

Placeholder

Defining the Final Shapes

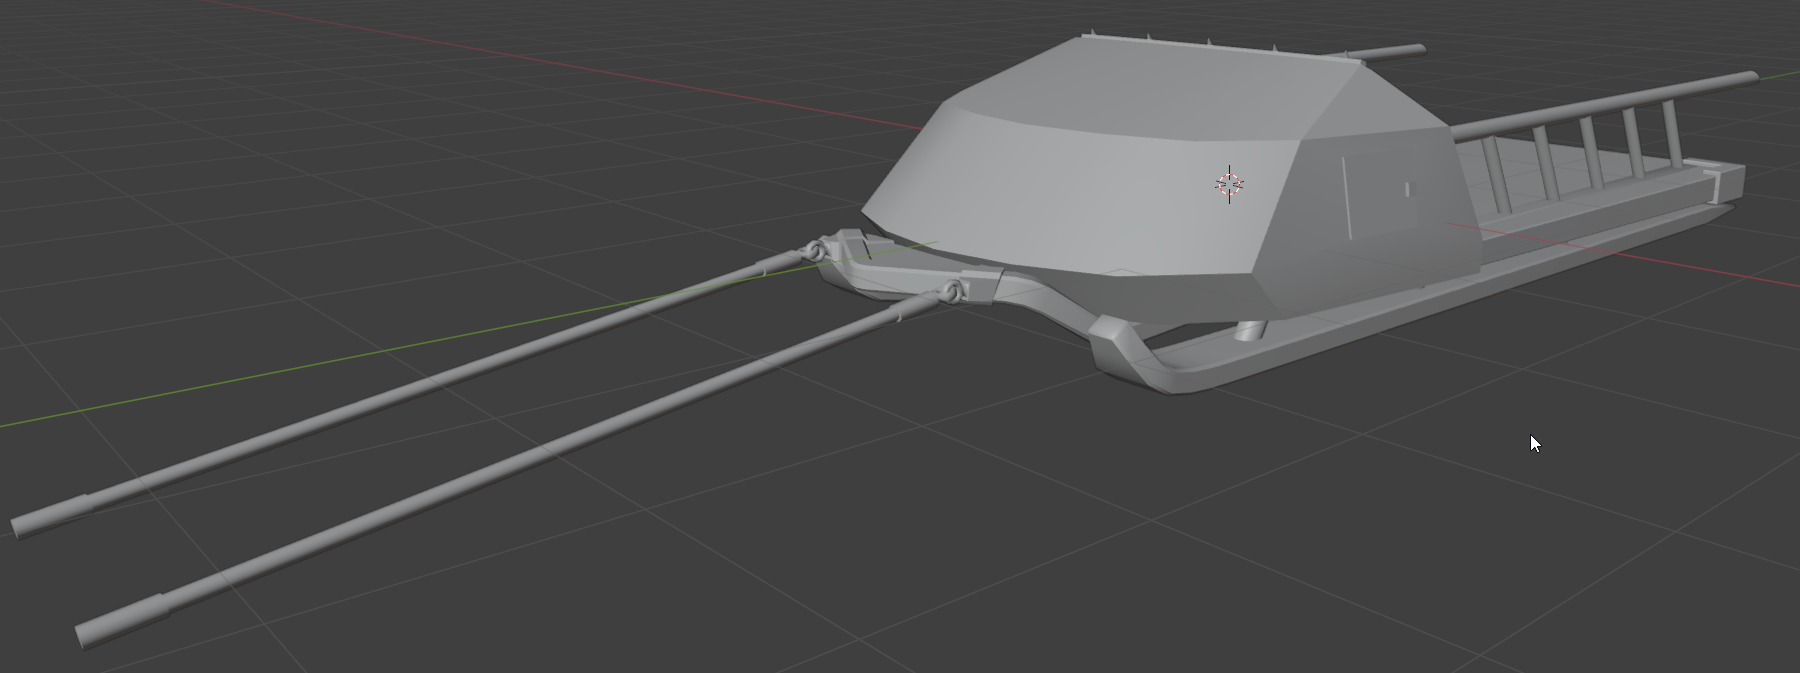
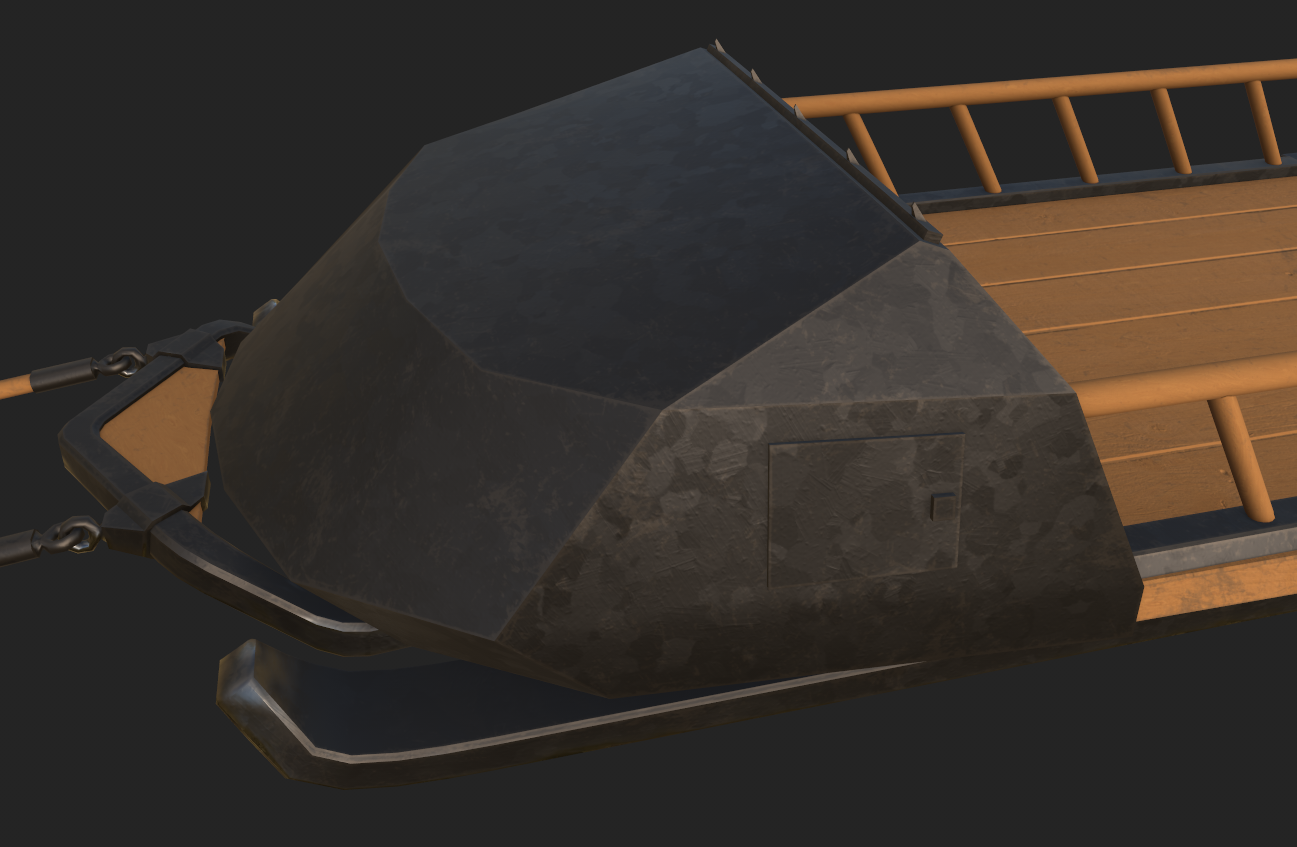
I went back to Blender to explore the shapes more and really liked the look. This was the final look I ended up with, after some exploration and testing (didn't think to grab screenshots of that). The idea was that the front of the sled would be a steel lockbox that houses the soulstone. It would have three doors on it: one large one on the back where the soulstone could be removed/replaced and one smaller door on each side that would provide access to a Conclave member so they could touch the soulstone to recharge theirs. These would be small enough that the soulstone inside could not be extracted but large enough to fit a personal soulstone in, along with someone's hand/arm.

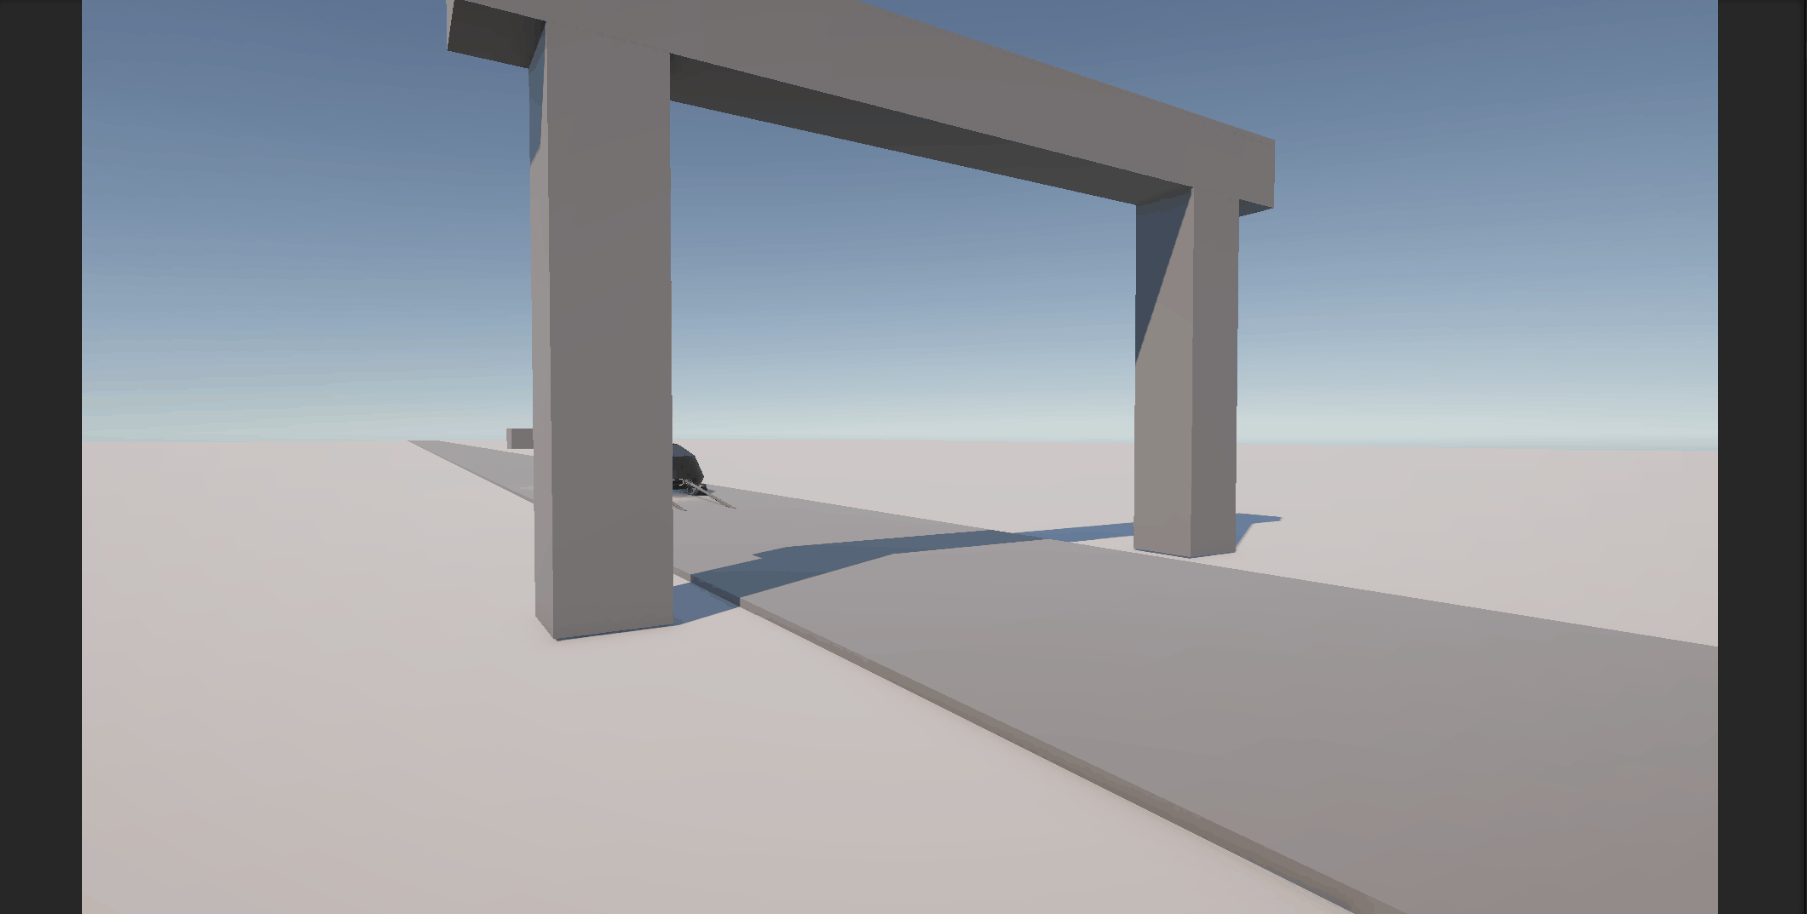
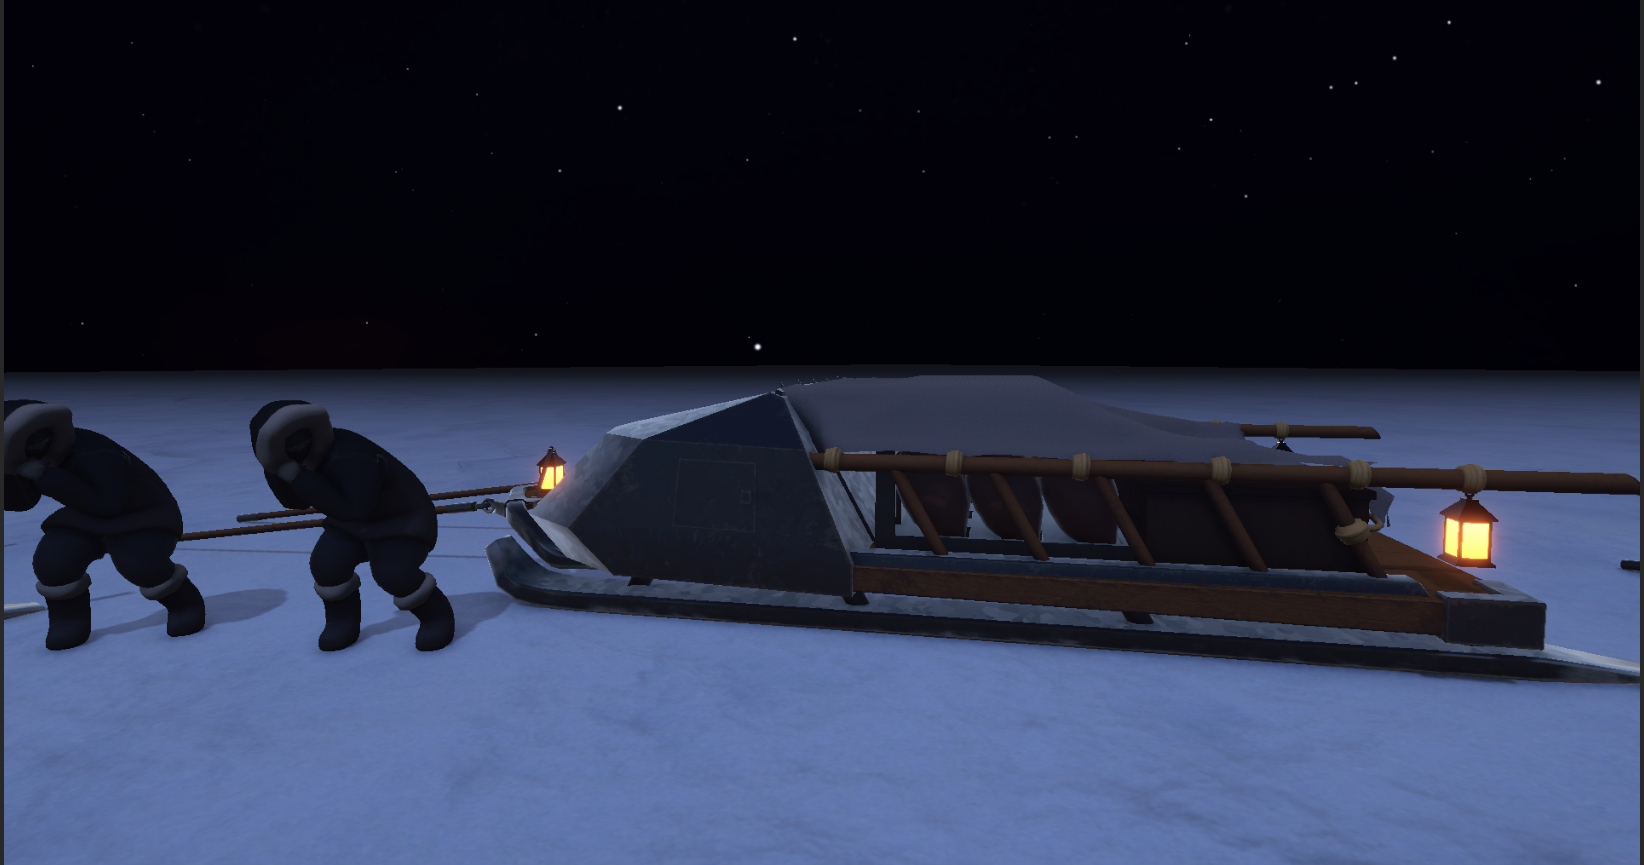
The initial sketch did not include any way for the sled to be attached to an animal. I ended up adding a whole front mount to the sled that comes up from under the main body and between the skis. This has eyeloops that (currently) have poles attached to them, which seem very common with horse-drawn sleighs and wagons.

Placeholder

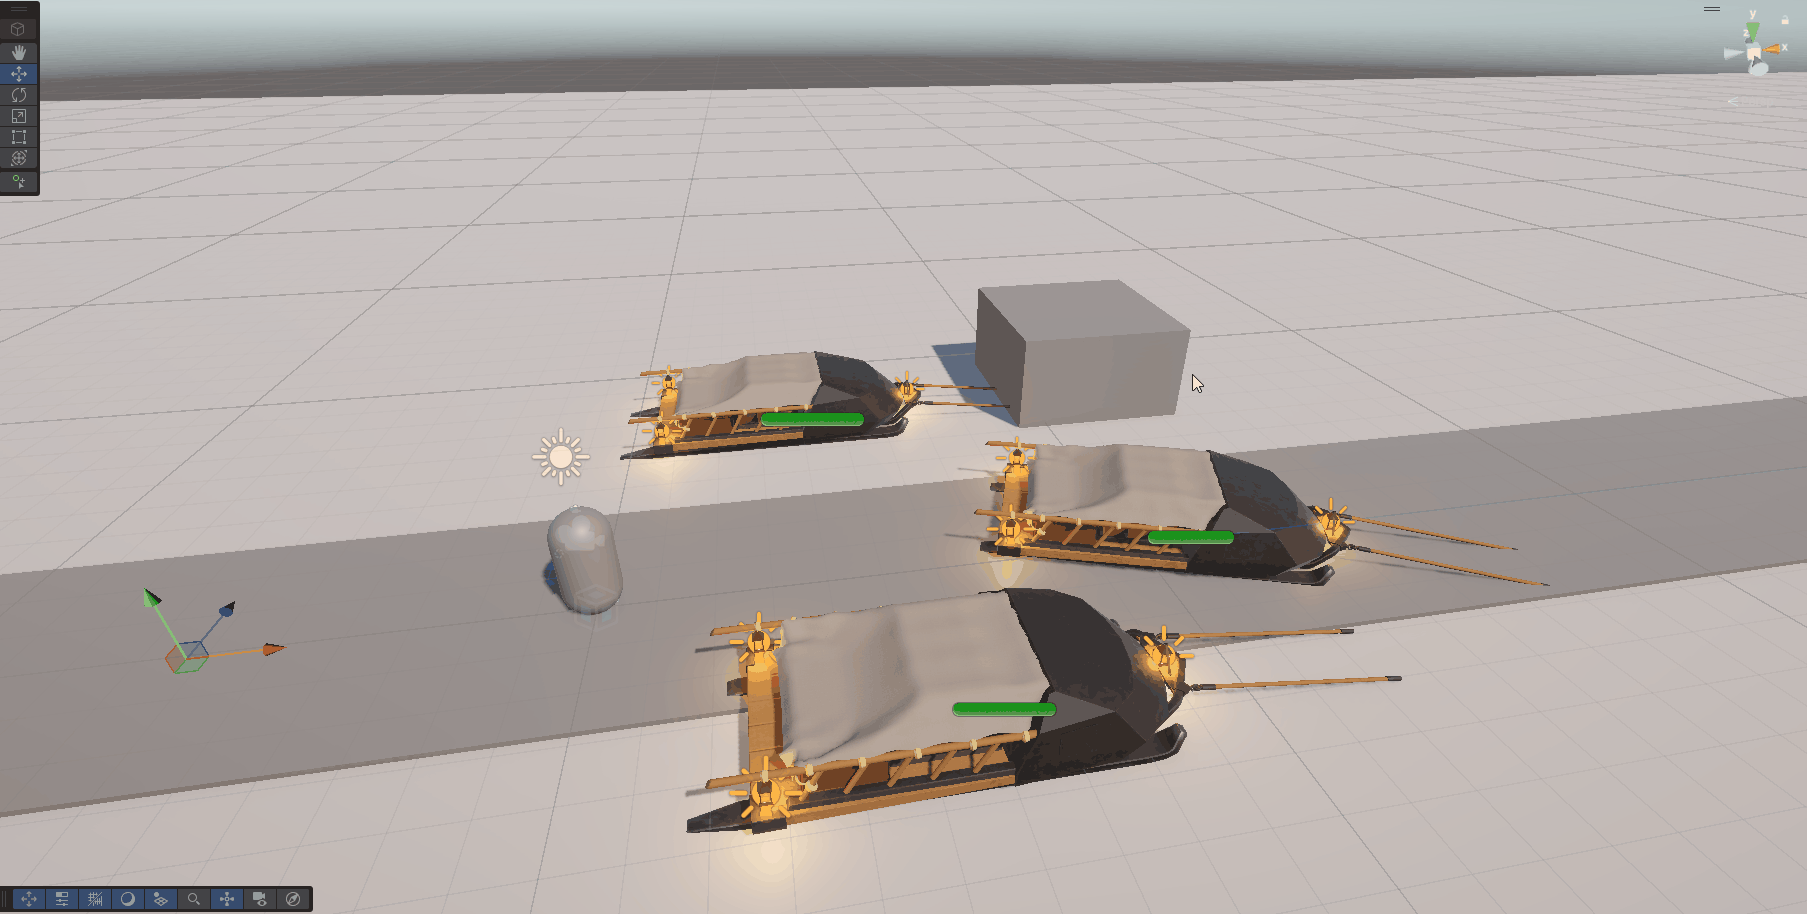
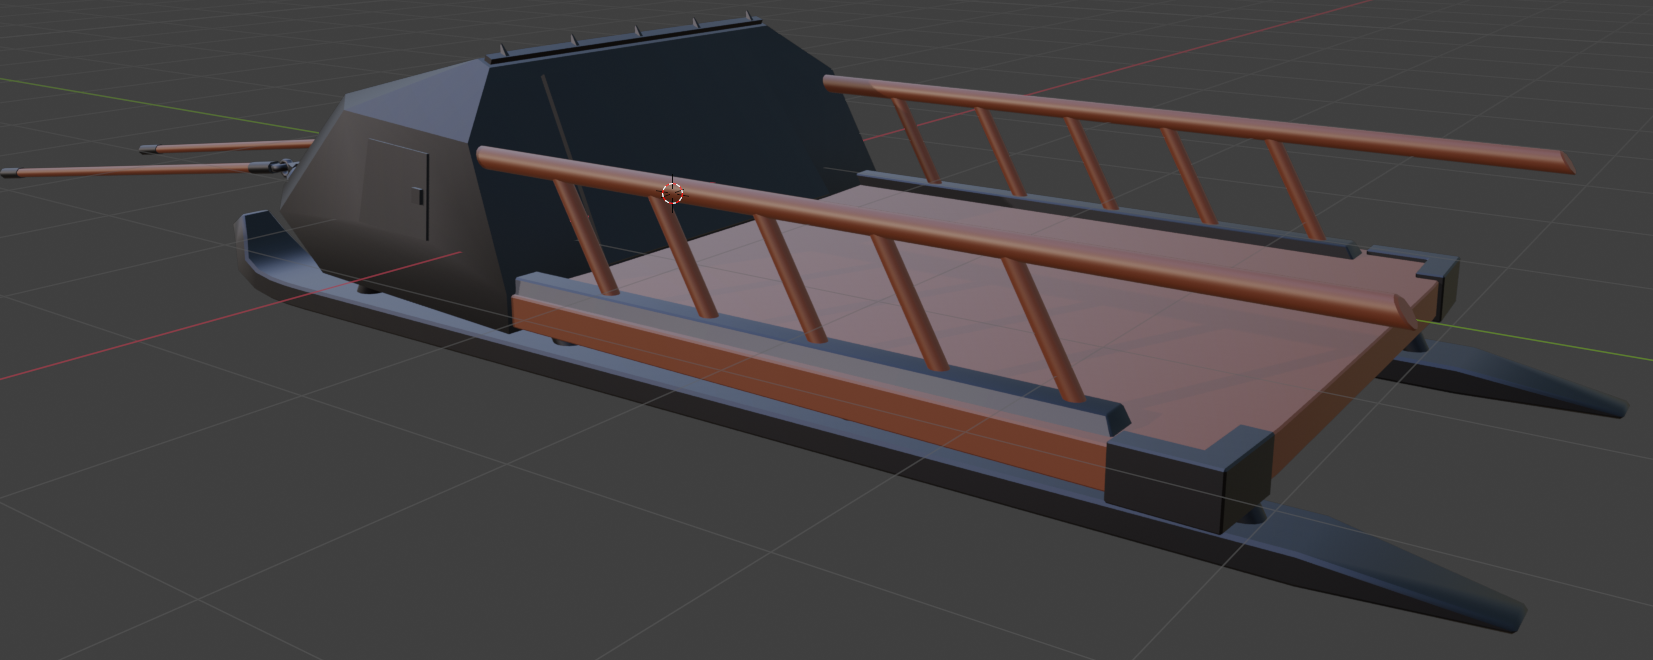
Here is the back with blocked out colors to get a feel for what materials I would need. Placeholder

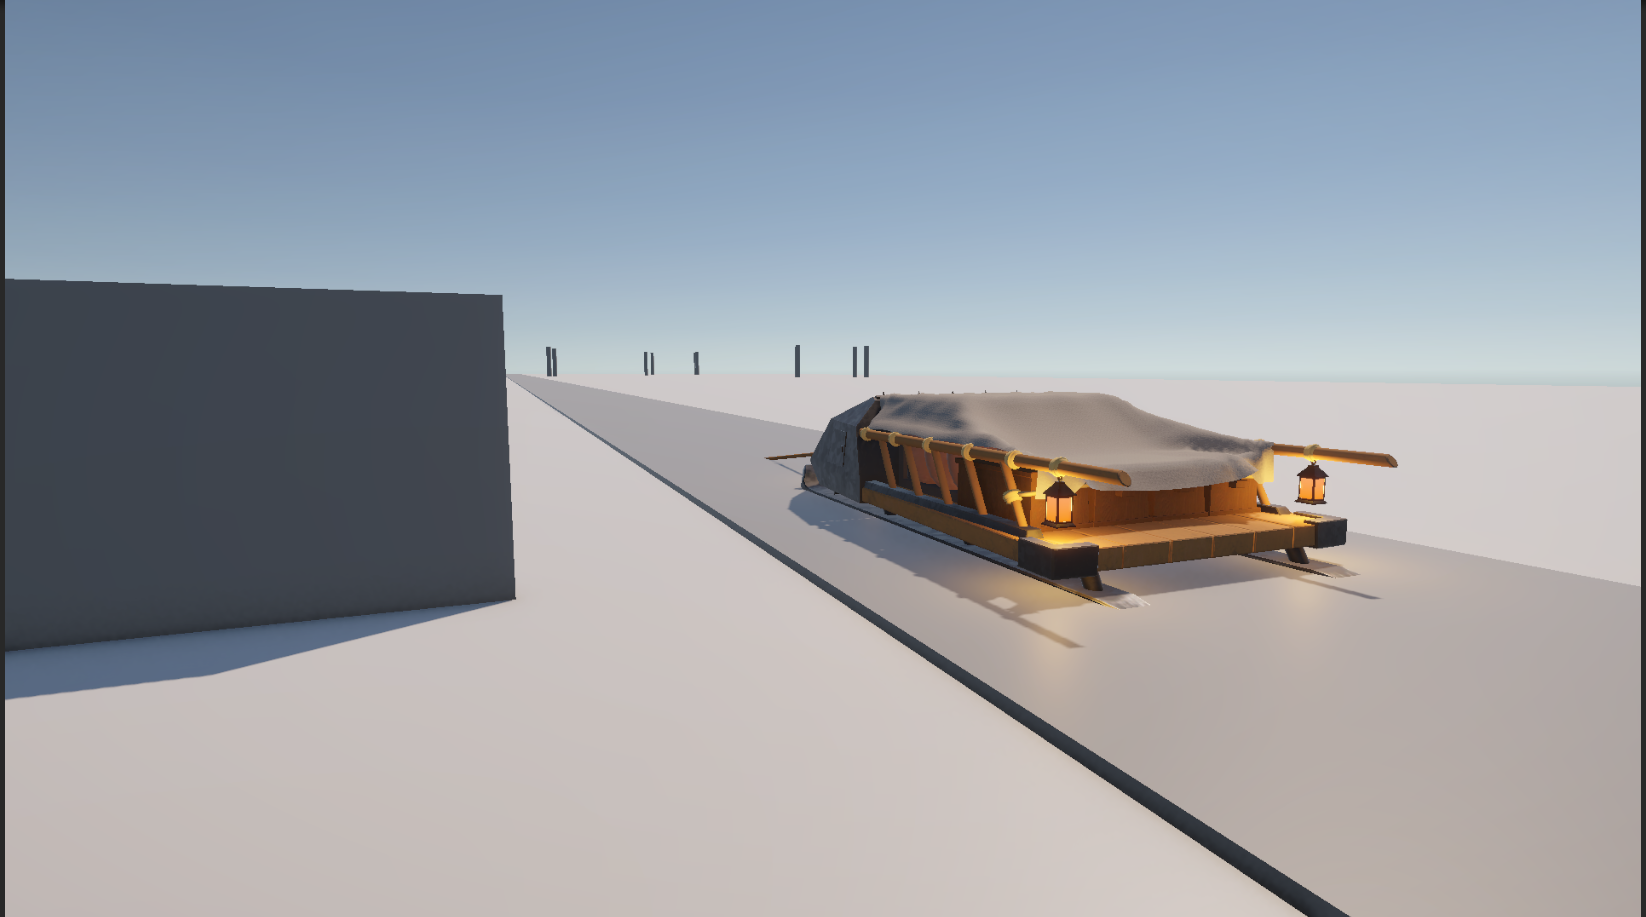
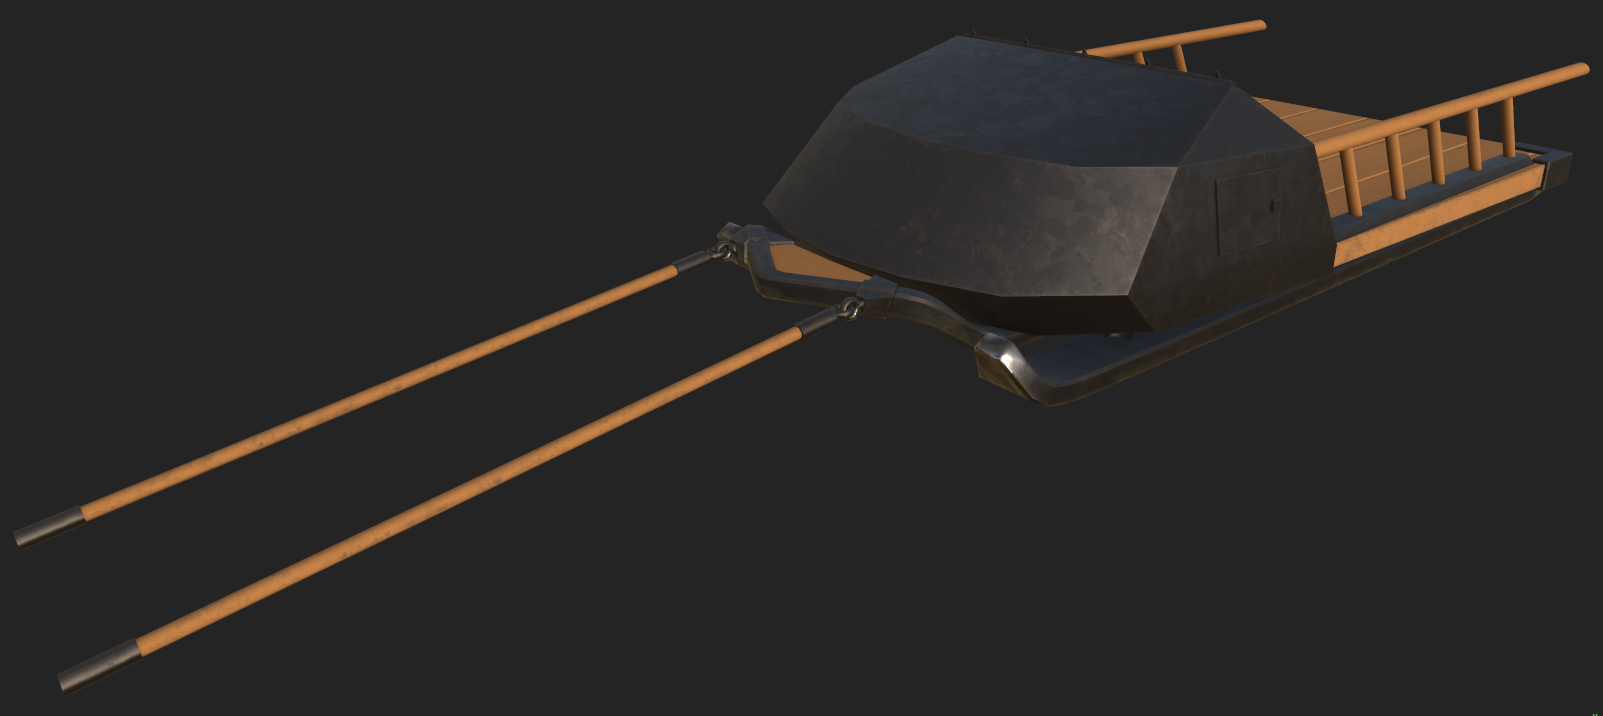
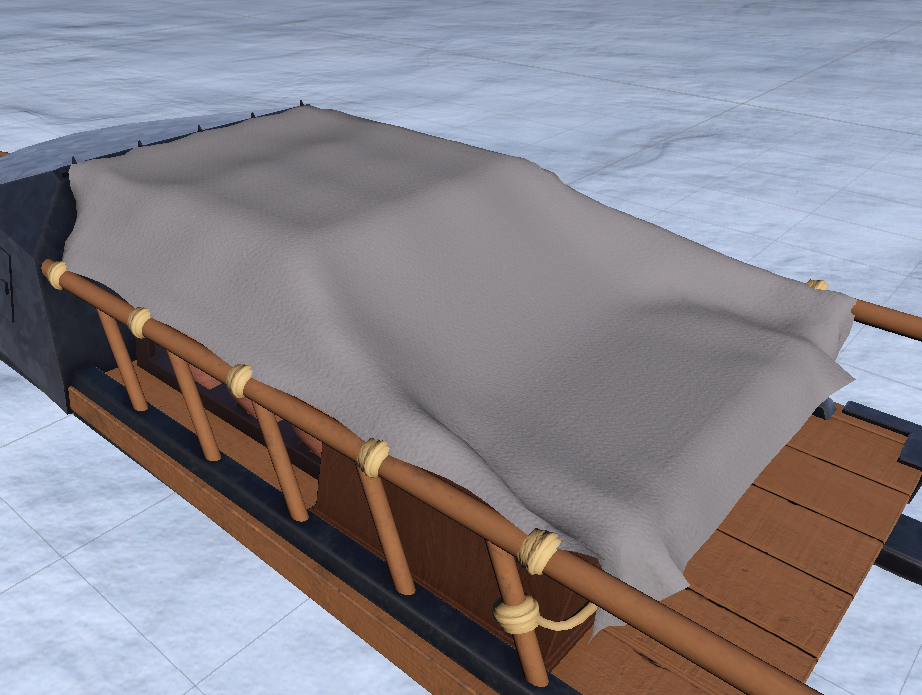
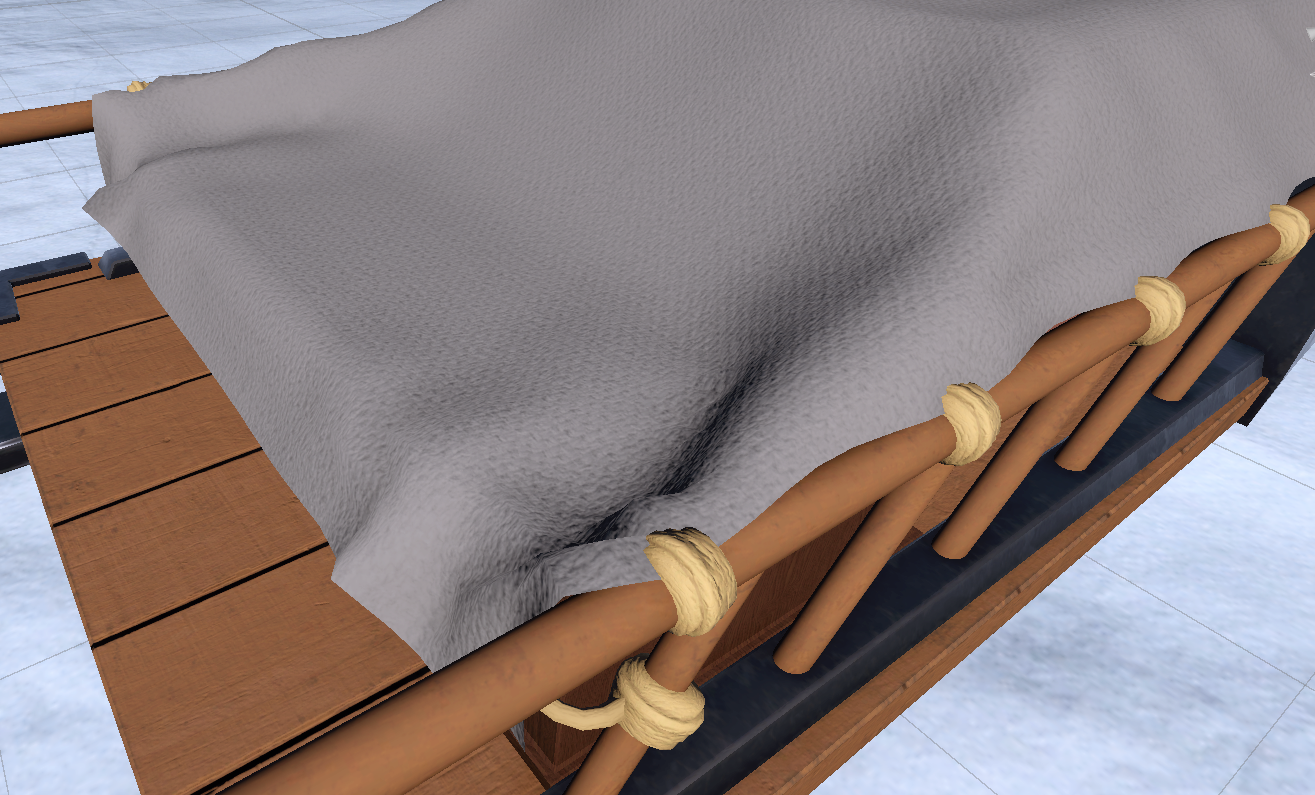
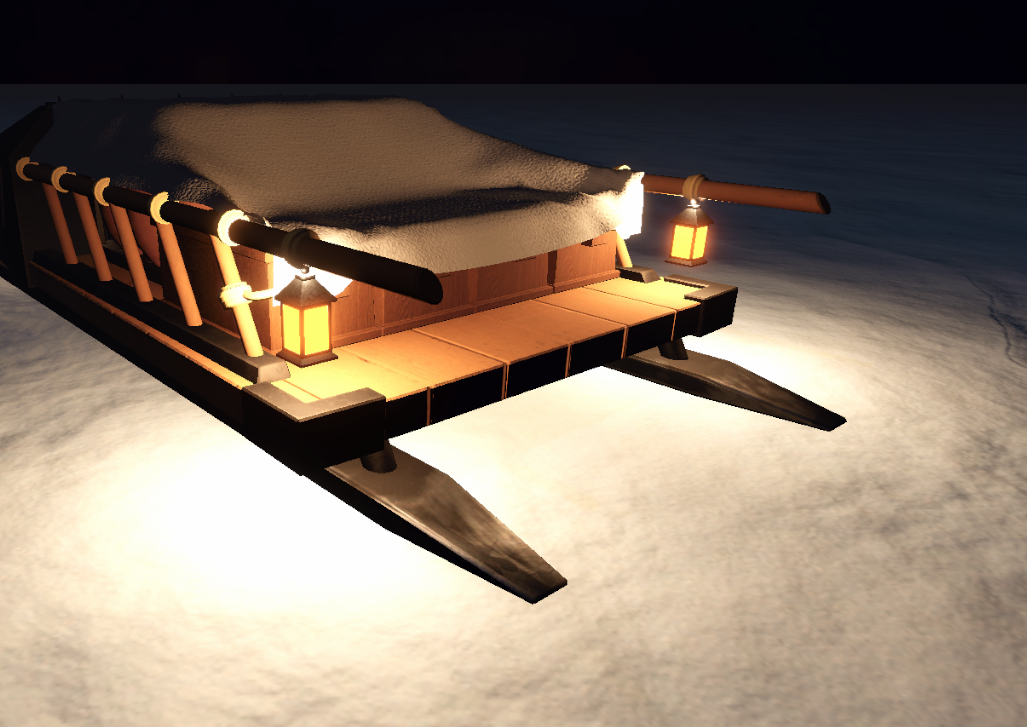
Here are some final shots of the sled after being textured in Substance Painter Placeholder

Placeholder

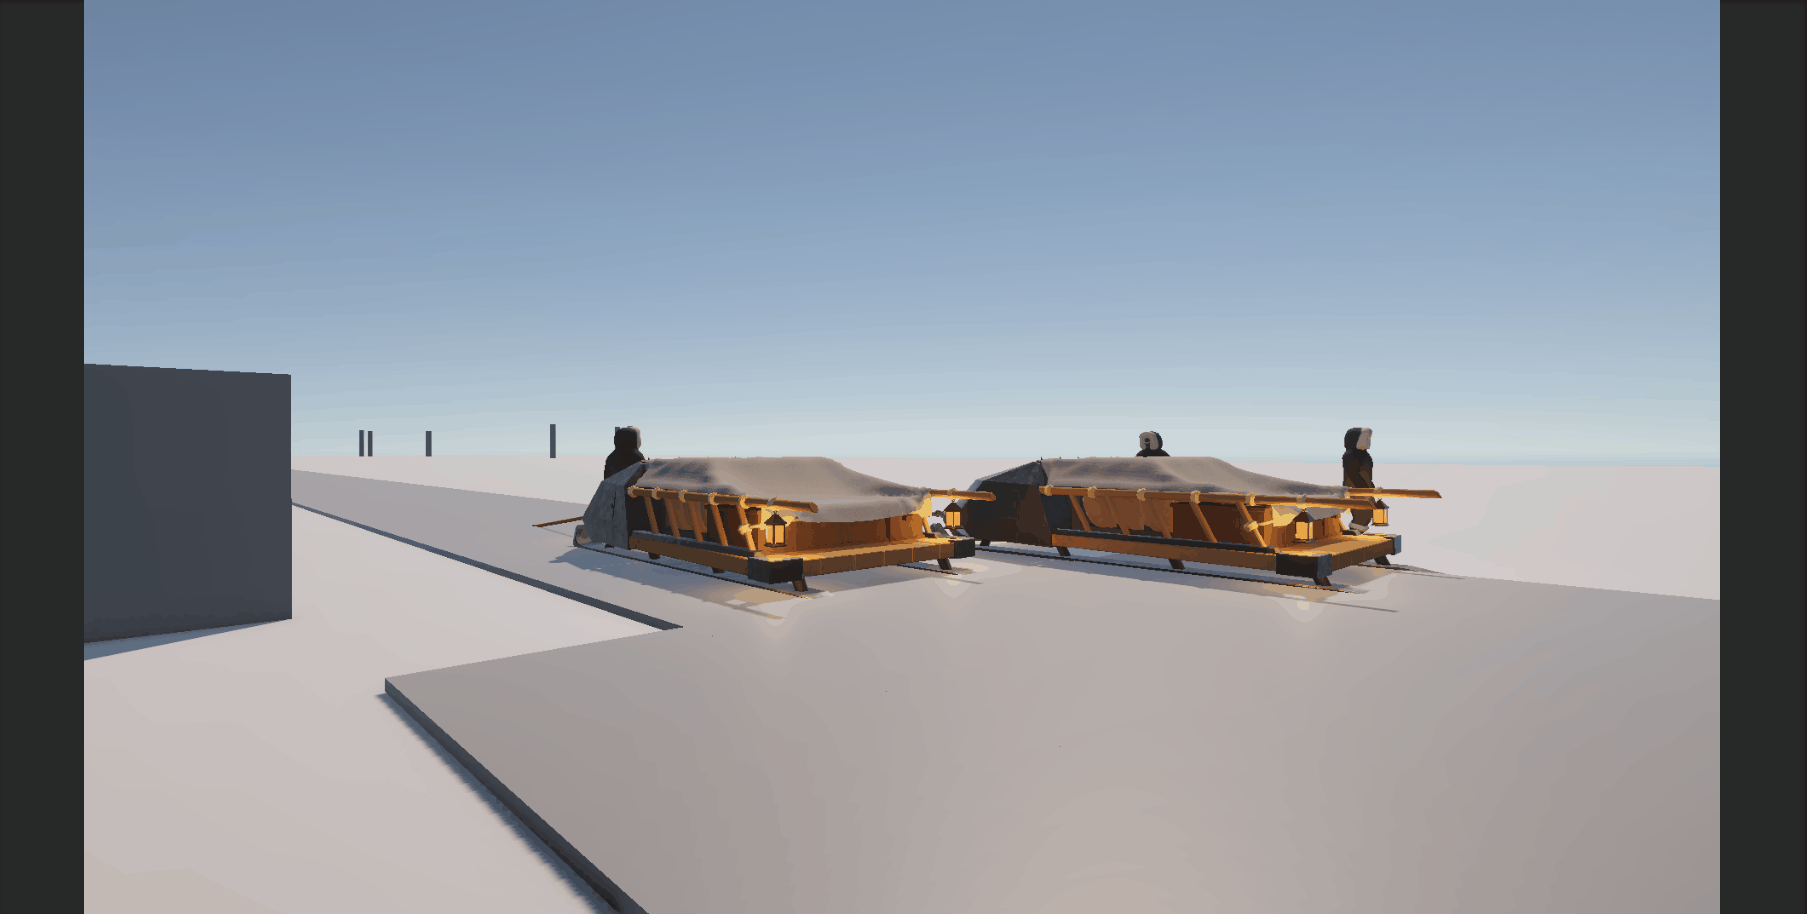
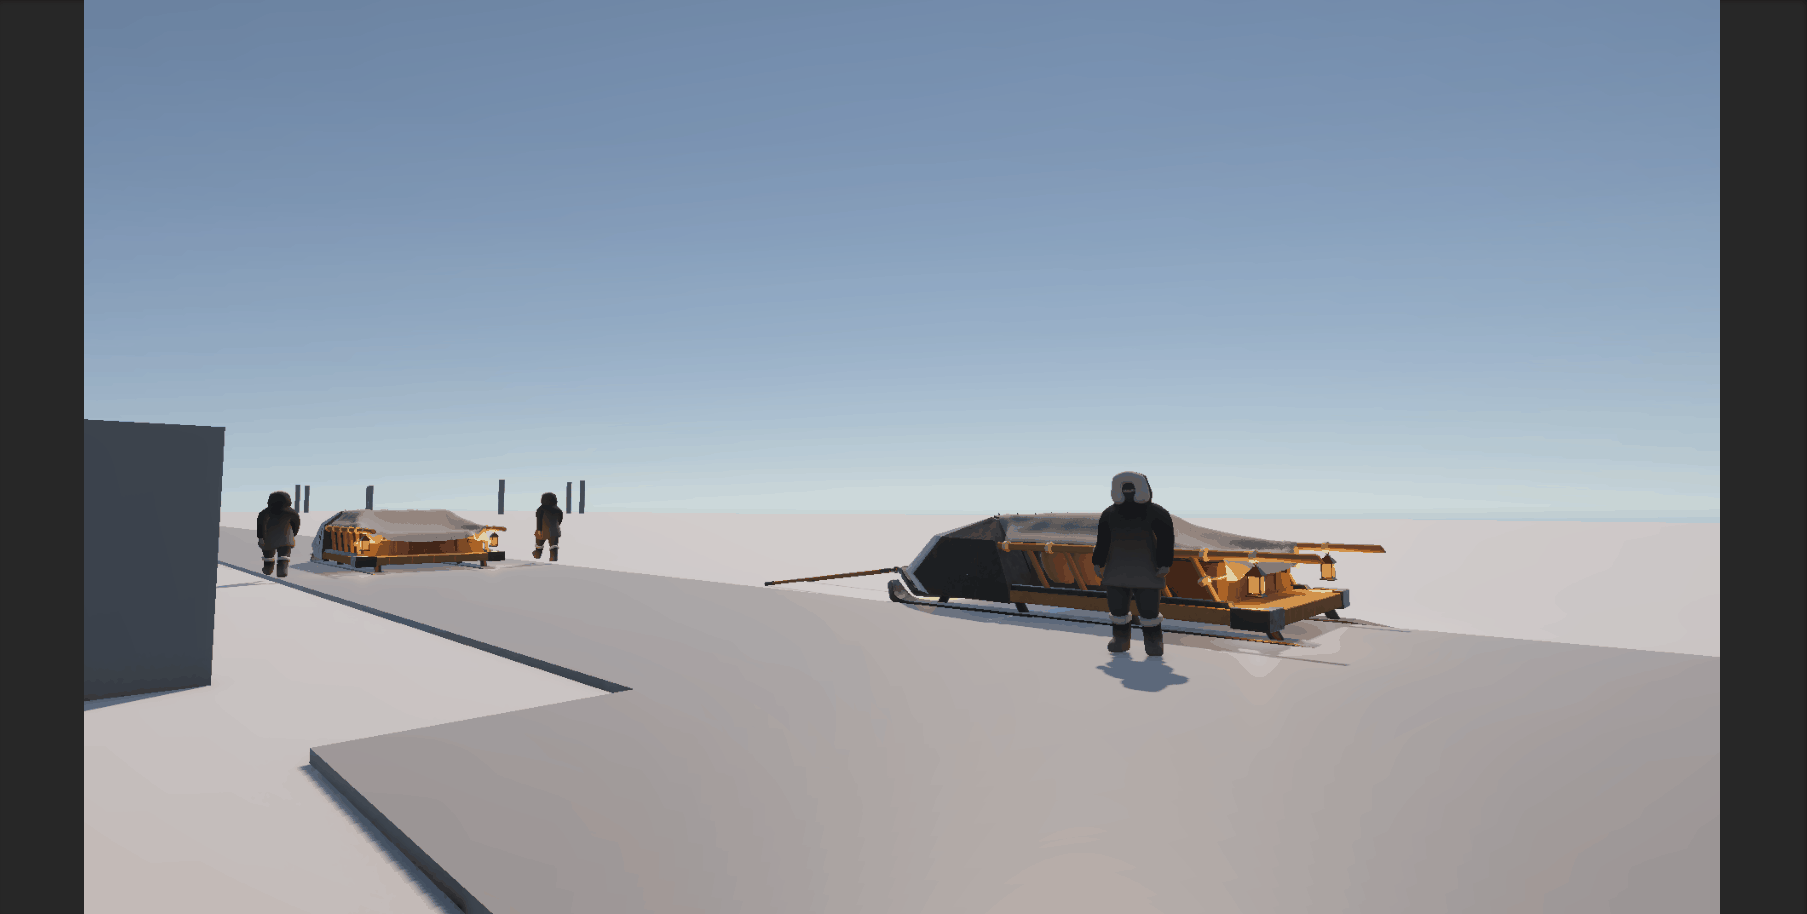
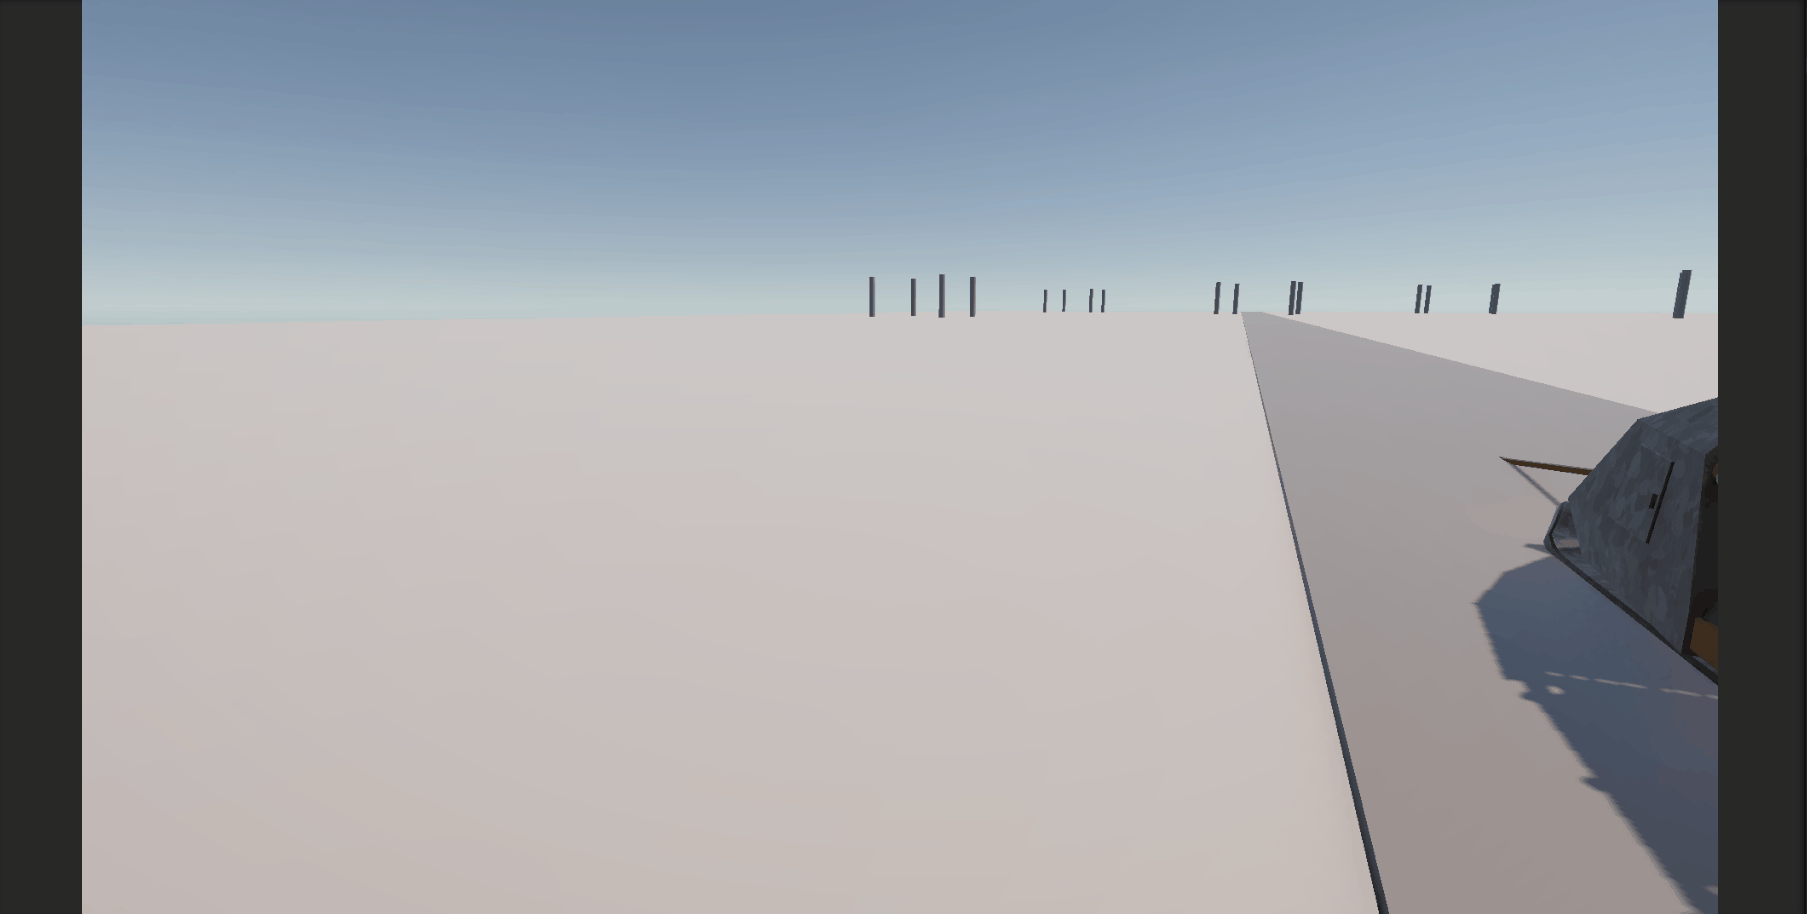
And in the final scene in Unity Placeholder

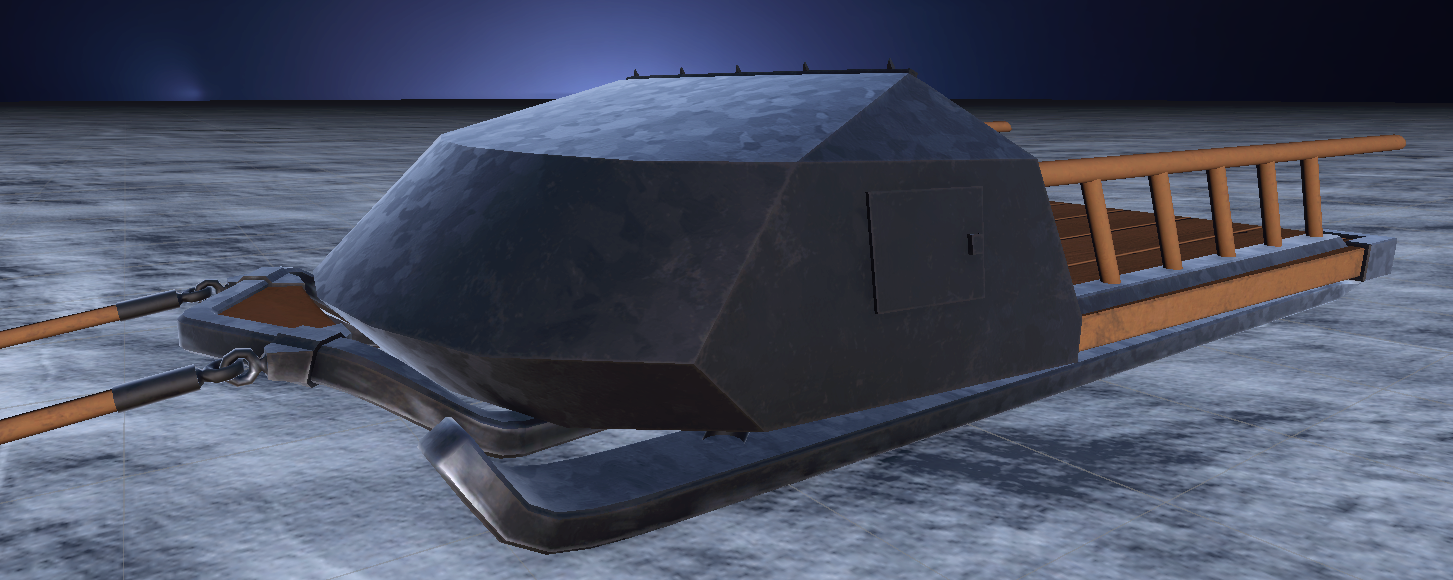
I wanted the rails to extend further past the edge of the sled to allow someone to hang on while standing on the last section of the ski.

The Cargo

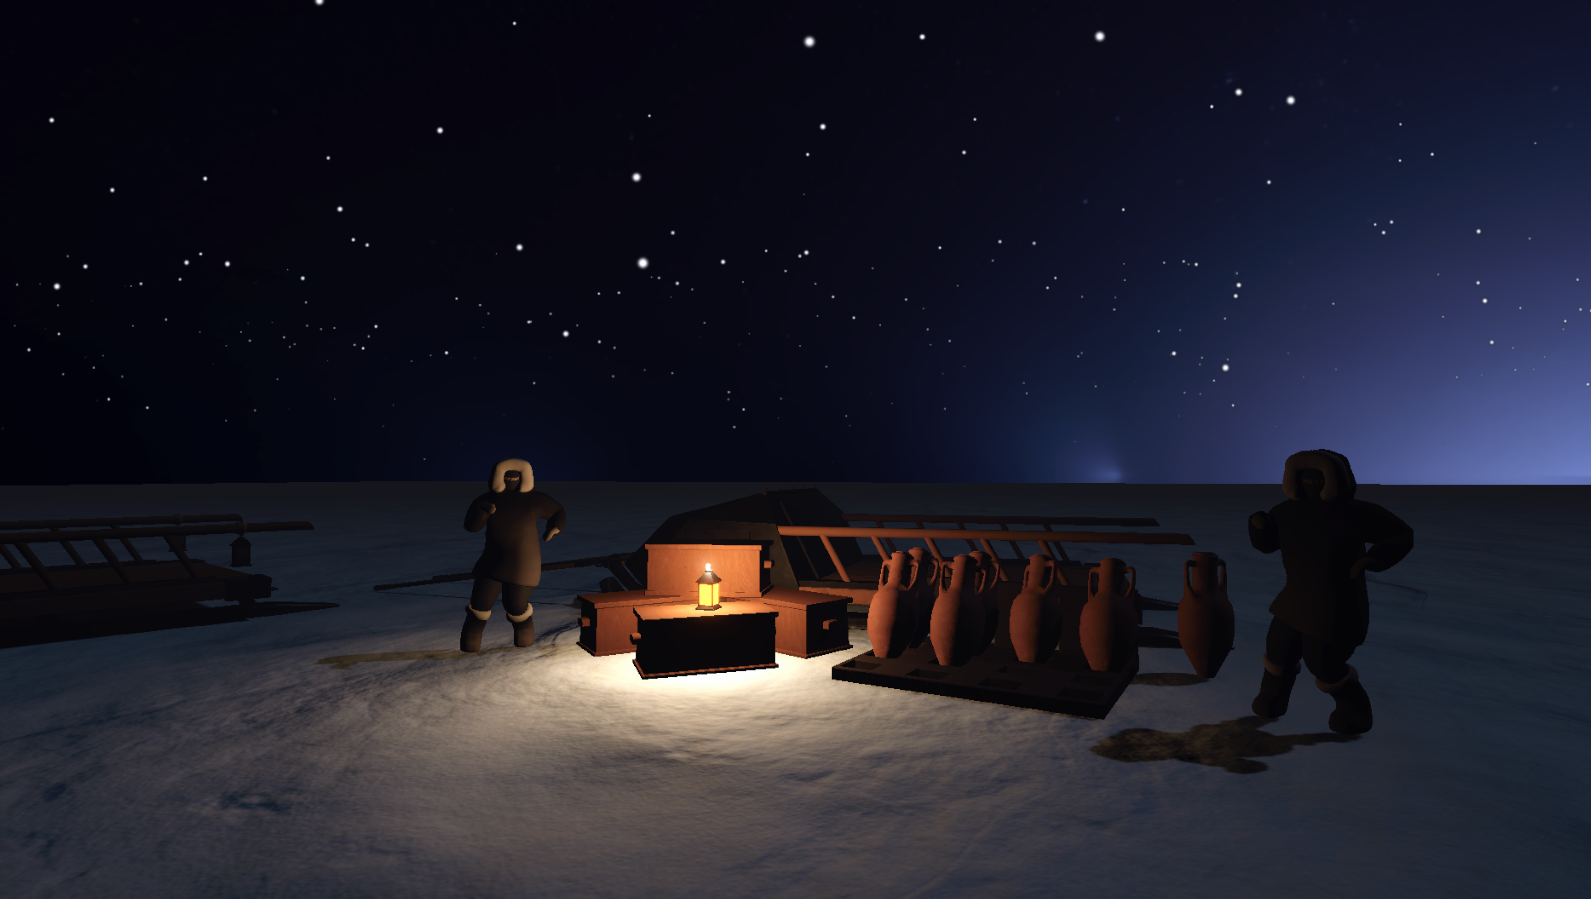
I also needed some cargo to go in the back of the sled, since the premise of the game was you are escorting a full sled to a research station. I researched how people transported stuff in early history and liked the idea of them using amphora and chests as their main storage mediums. The amphora was typically used more by seafaring traders but I thought the idea of sticking them in the snow to keep them standing (instead of sand) was an interesting idea and went with it.

Amphora Pallets

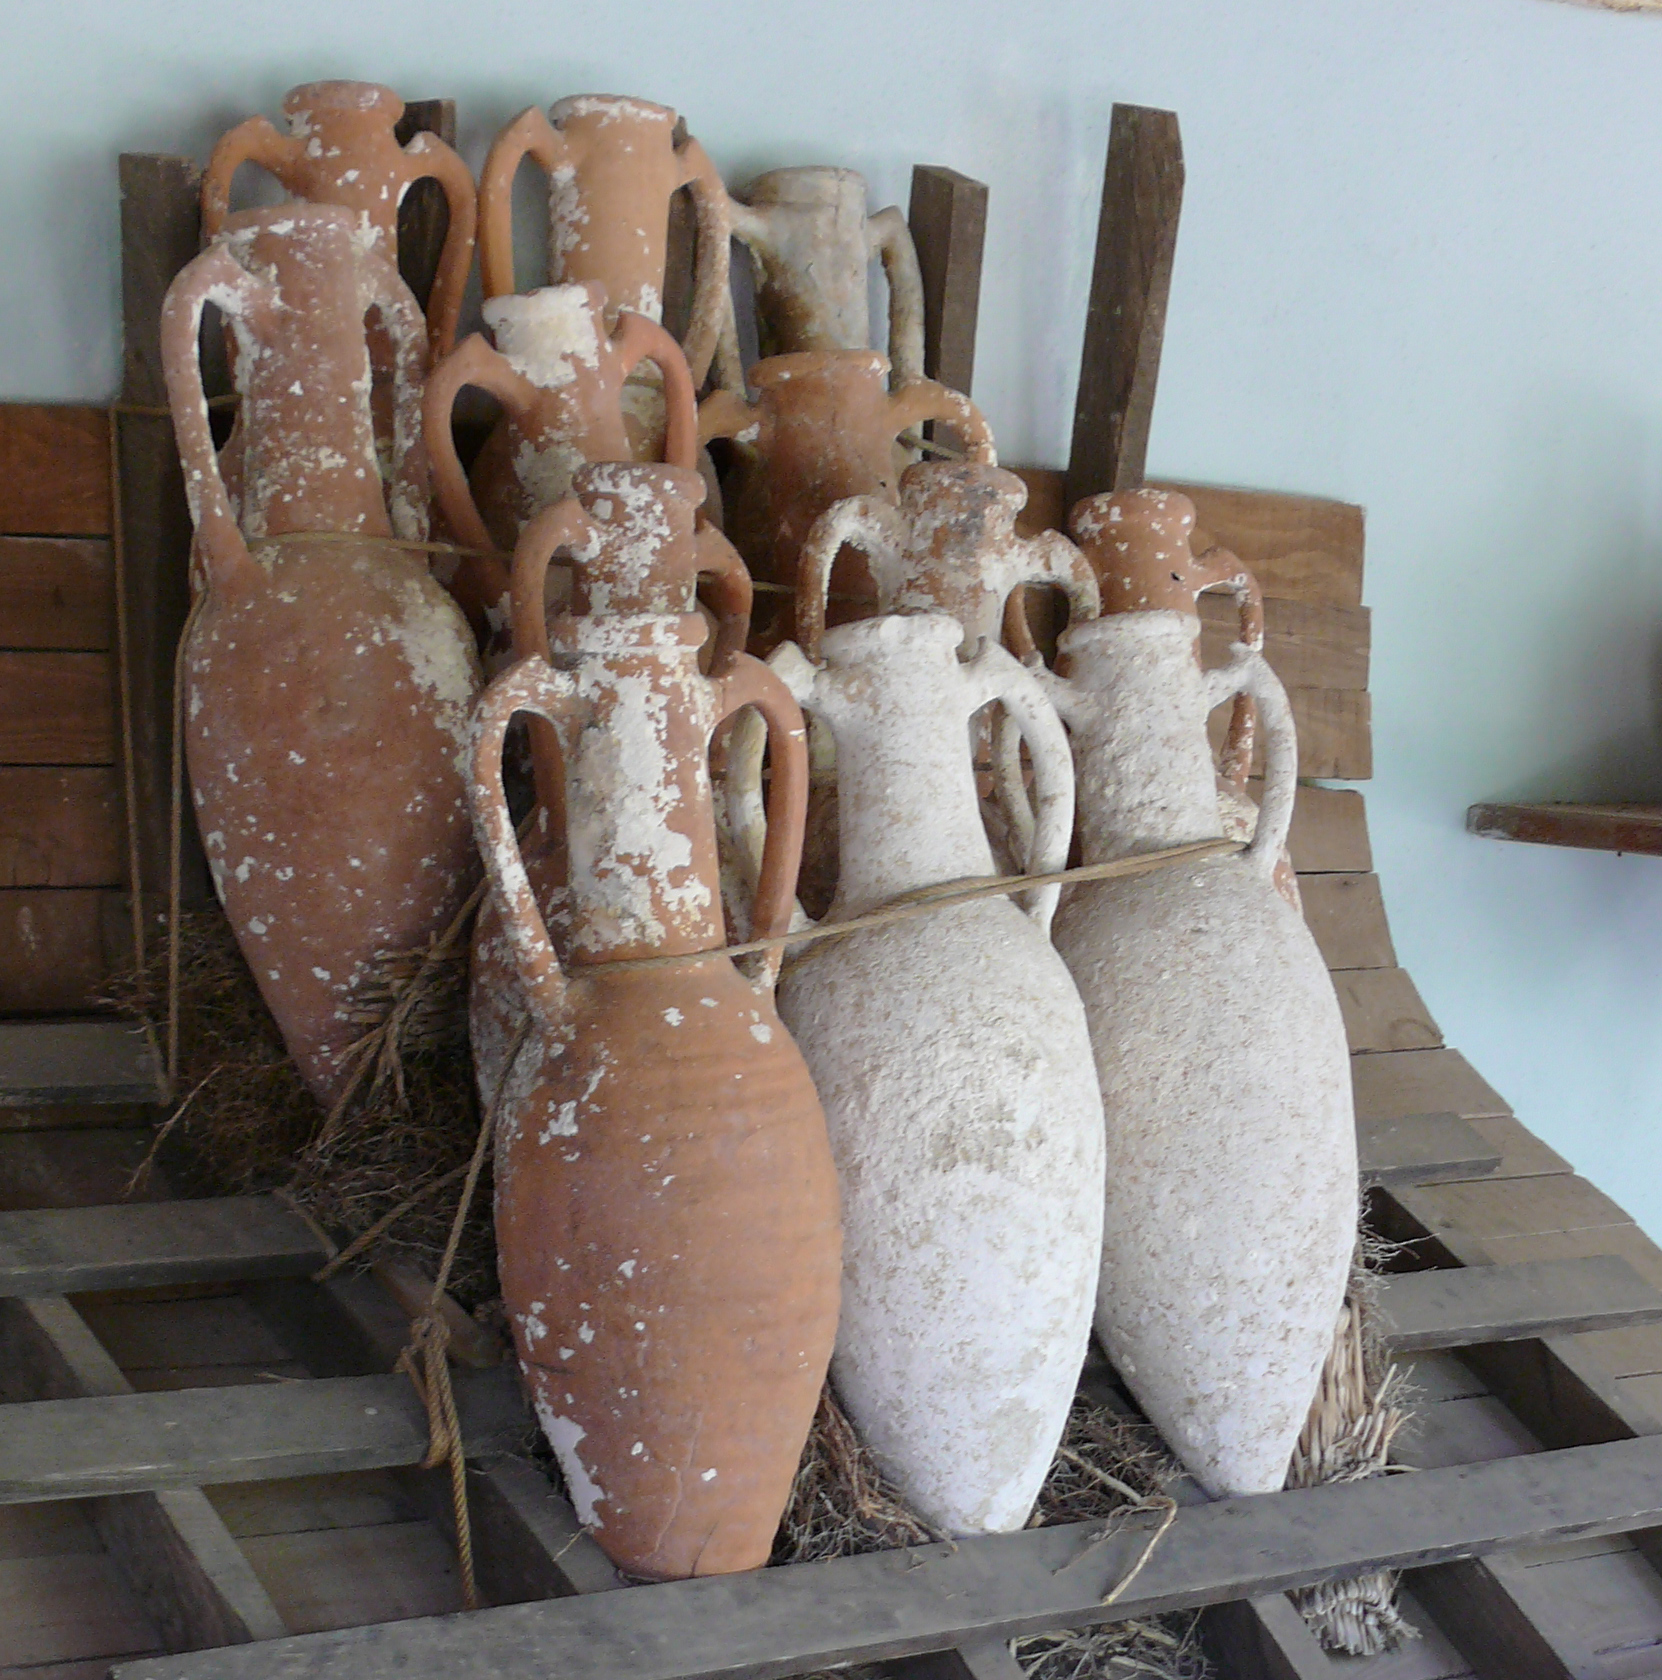
I found this image of amphora being stored in a cutout of a ships hull and thought it would be really interesting if they loaded up "pallets" of them to transport.

Placeholder

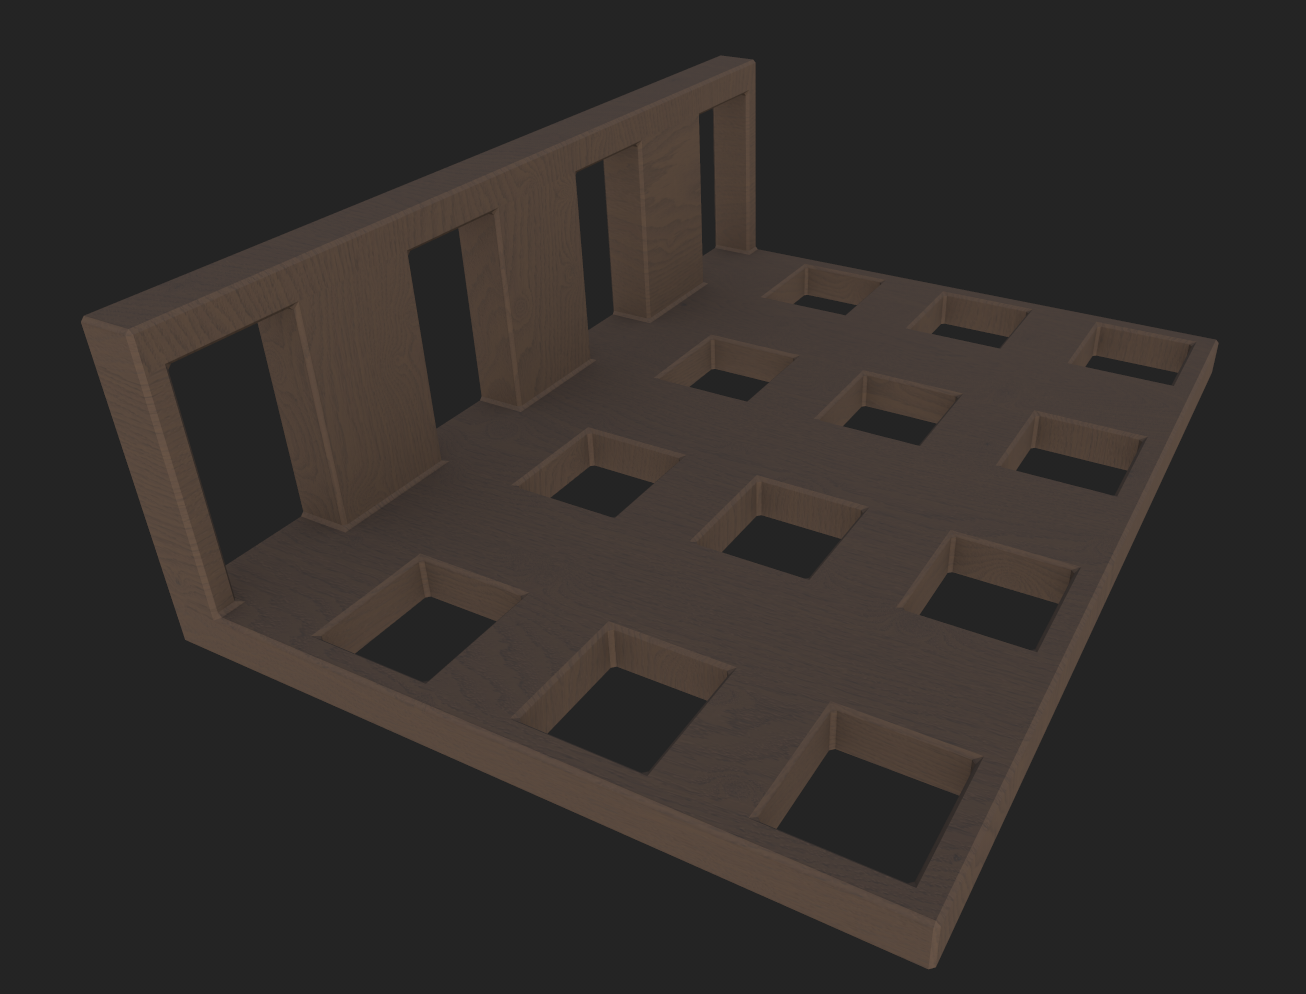
I ended up with a simple stand that looks like this, for storing 12 amphora in.

Placeholder

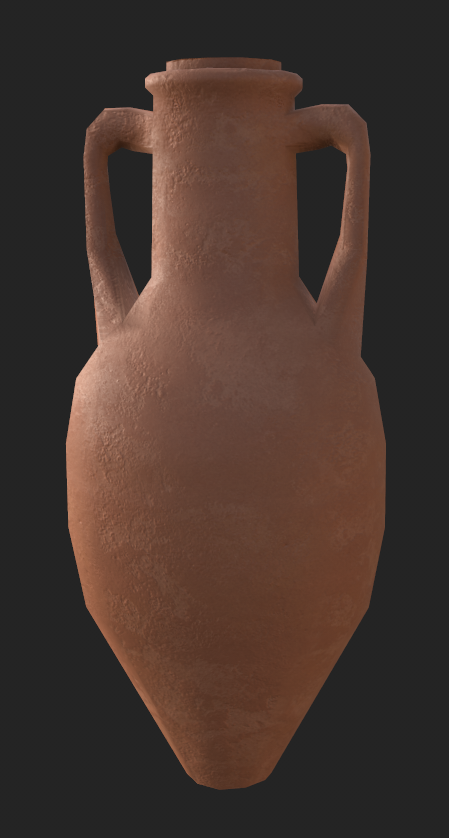
This was the amphora I came up with. I decided to make it more or a terracotta toned clay.

Placeholder

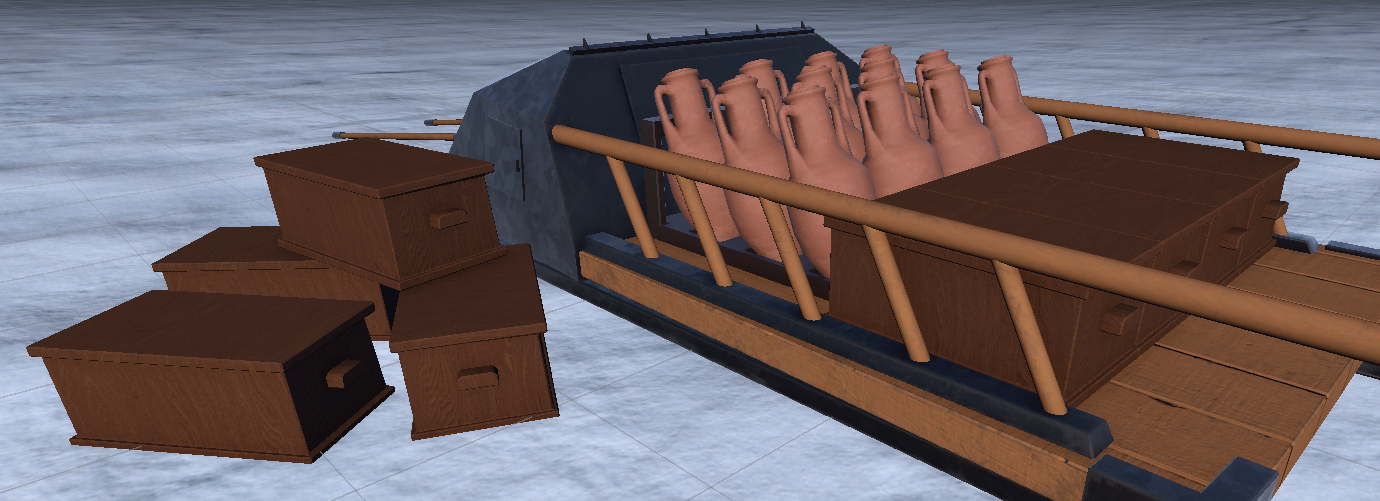
Here is a pallet in Unity partially filled with amphora, along with a full pallet in the back of the sled

Placeholder

Placeholder

Chests

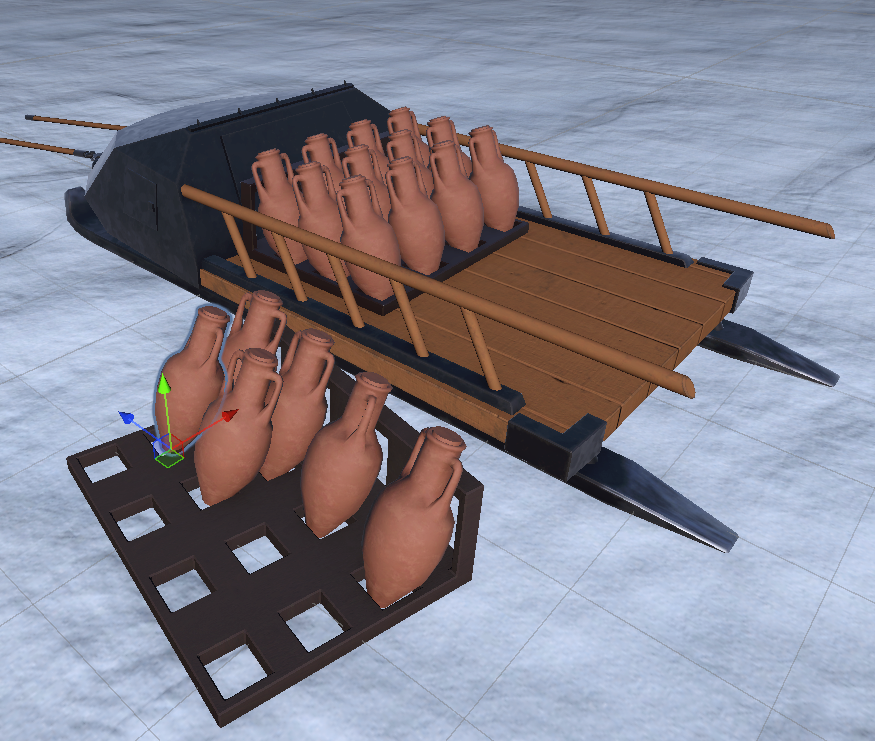
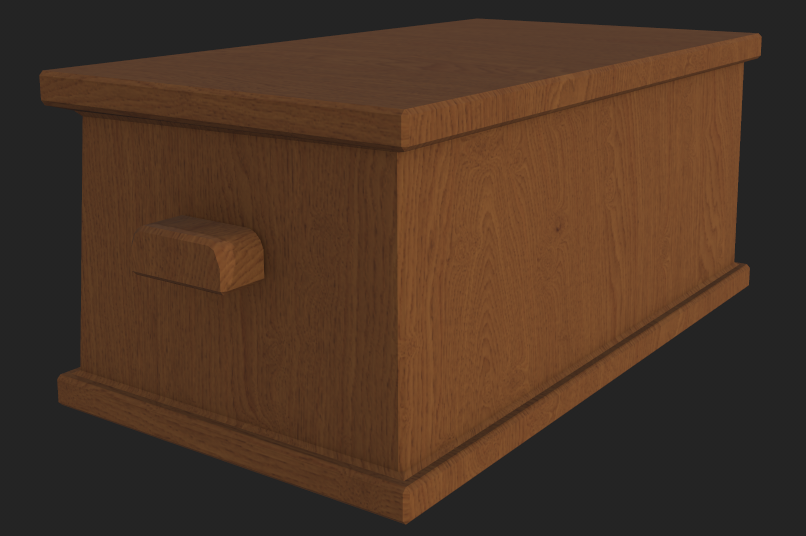
In addition to the amphora, I wanted something for transporting items that may not fit/work well in an amphora. I decided to go with a chest over a barrel because I liked the aesthetics more for this particular project. I settled on a simple, utilitarian-style chest.

Placeholder

Placeholder

The Tarp and Ropes

Now that I had some cargo to haul, I wanted a way to protect it. I thought of a canvas tarp, harkening back to both the original wagon inspiration as well as using tarps in my own past for transporting goods (sometimes even on sleds!).

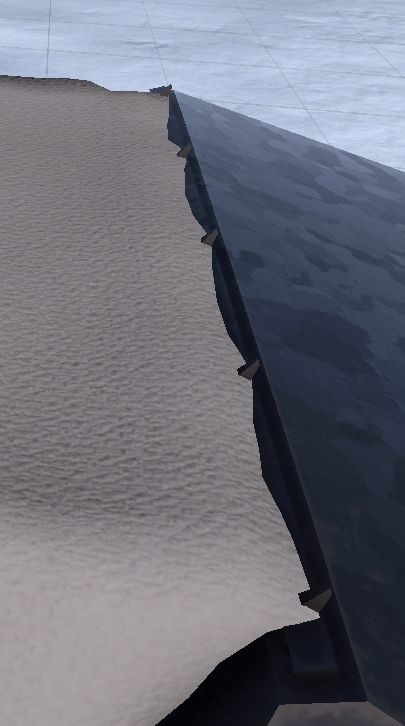
Thinking about how the tarp would attach actually adjusted the sled design some with the additions of the spikes along the top to hook the tarp onto along with adjusting the height of railings to make more sense.

For this, I ended up using the cloth simulation in Blender to get the drape more accurate on the canvas. This took some fiddling with the bend and associated parameters to get a good thickness/stiffness to the fabric. I also ended up using some vertex pinning to "hook" it to the top of the sled and the railing. This was a major breakthrough. Once I was satisfied with the overall shape of the tarp I took it into sculpting mode and used a combination of the smooth and grab brushes to work out some of the wonkiness from the simulation and to make it look more like it was being stretched/drooping from the anchor points.

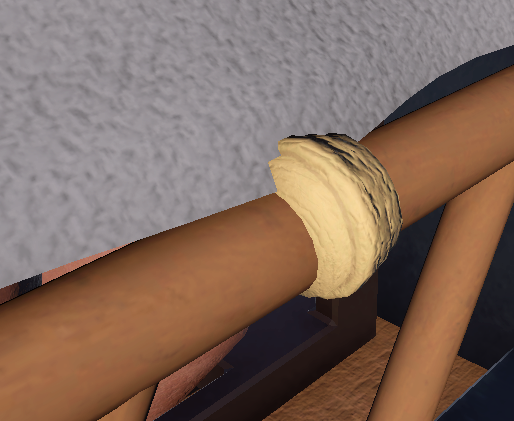
Speaking of anchor points, besides the spikes on the top of the sled, I needed some way to attach them to the railings. I decided to go with a rope wraps. They could have a slightly higher poly count to allow having sharper edges between the coils but it ended up not looking too bad.

Placeholder

In addition to the rope wraps, I also added a rope going across the back of the railings to secure the chests from sliding out the back.

Overall, I am really pleased with the end result.

Placeholder

Placeholder

Placeholder

The Lights

The last thing that I wanted to add to the sled, after yet another conversation with Terra, was some lighting. We threw around some ideas, like having the sled itself glow or to have lanterns somehow affixed to it. We decided we wanted to have lanterns somehow affixed to the sled and played around with using poles or similar to hang the lanterns off of. They all seemed "too much" and I ended up putting them hanging off the railing and that ended up looking really cool.

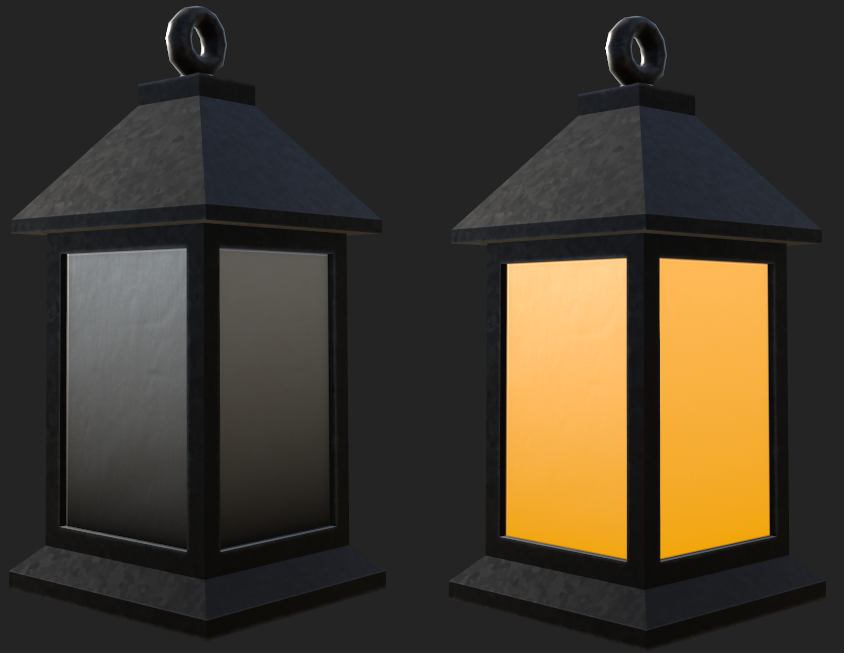
Before I could attach it to the sled though, I needed to actually whip up a lantern. I found quite a few references but ended up liking this one the best.

Placeholder

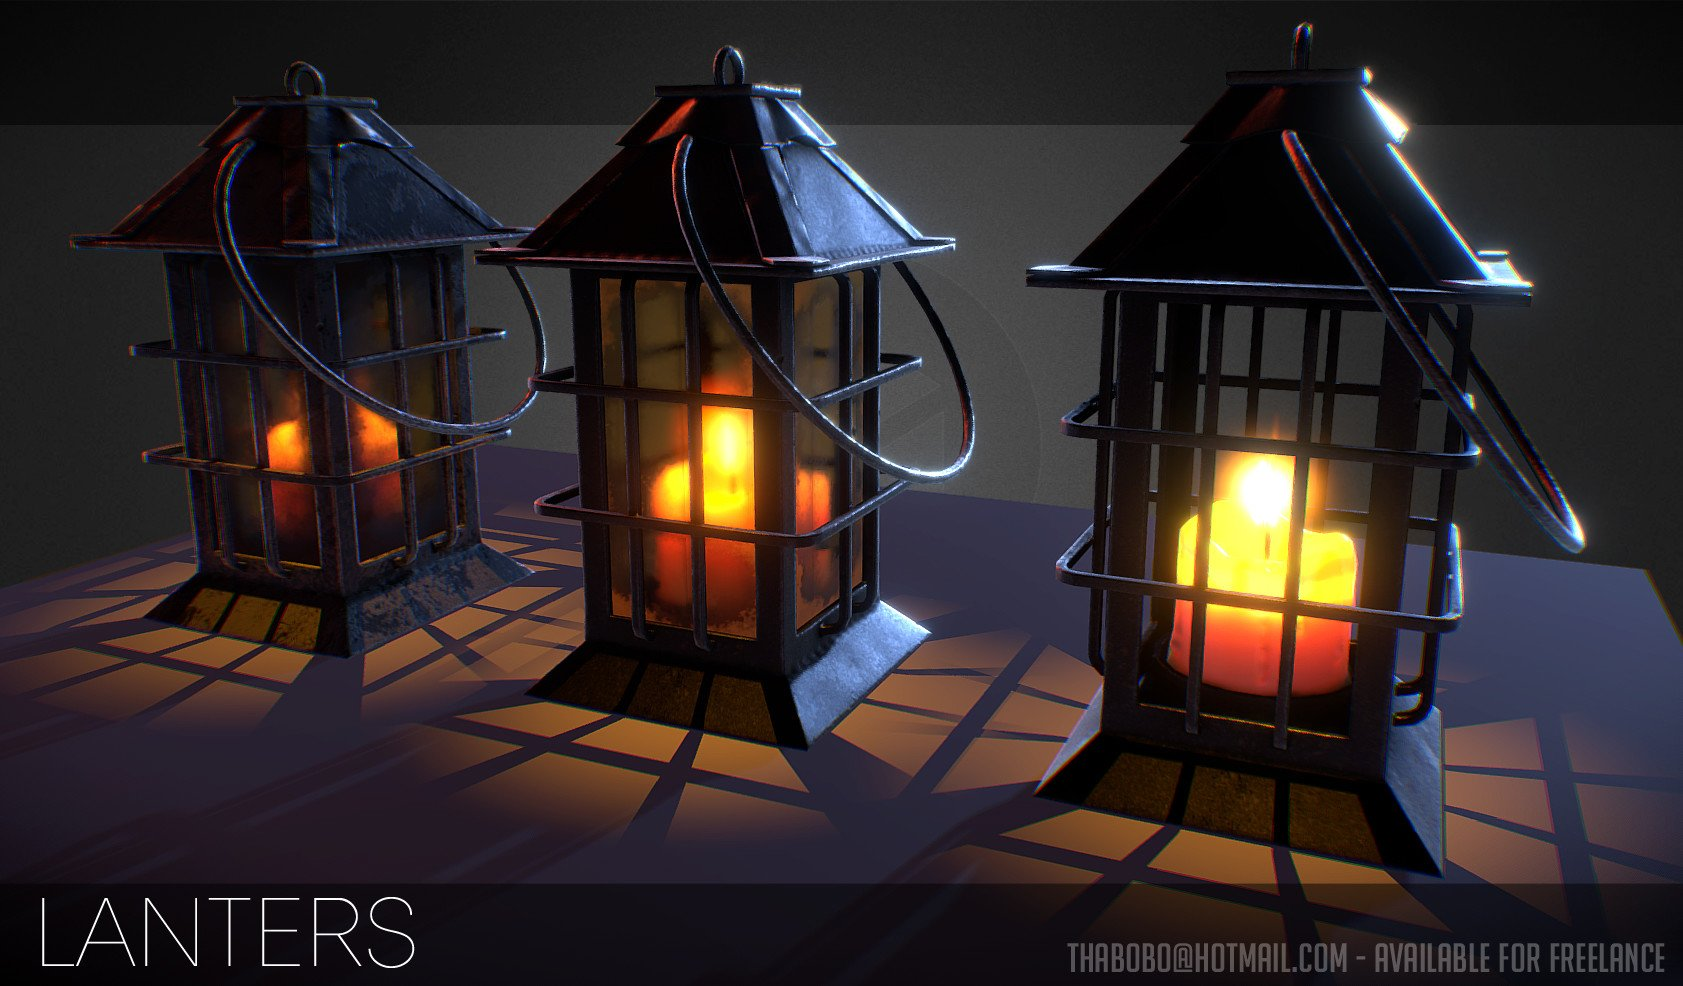
It was more complicated than I wanted to make but I enjoyed the overall style of it. I ended up making a lit and unlit version of it. I wanted to use the same dark metal that the sled did, to imply that they were forged at the same place, using the local metal.

Placeholder

Now that I had a lantern and the rope wraps, I could affix some lanterns to the sled rails.

Placeholder

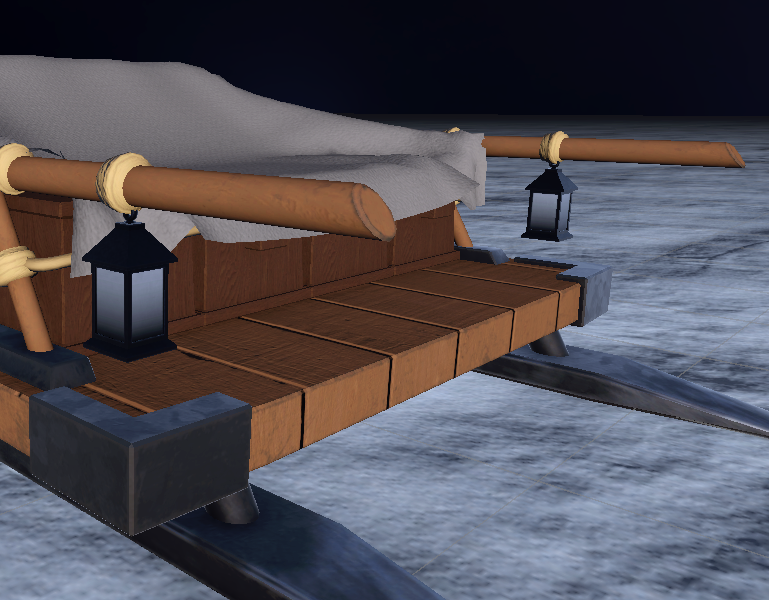
That worked for the back but we still needed something from the front. I thought about how many ships and similar had mounted lanterns on the front and decided to play around with that. Luckily, when I added the front mount for the animals, it included a flat, triangular space that I had intended to be used for storing miscellaneous stuff. Instead, I decided to put a lantern mounted on that platform.

Placeholder

After adding an actual light to the lantern and tying it in with my script that controls which texture (lit or unlit) is shown, the effect is really cool.

Placeholder

The NPCs

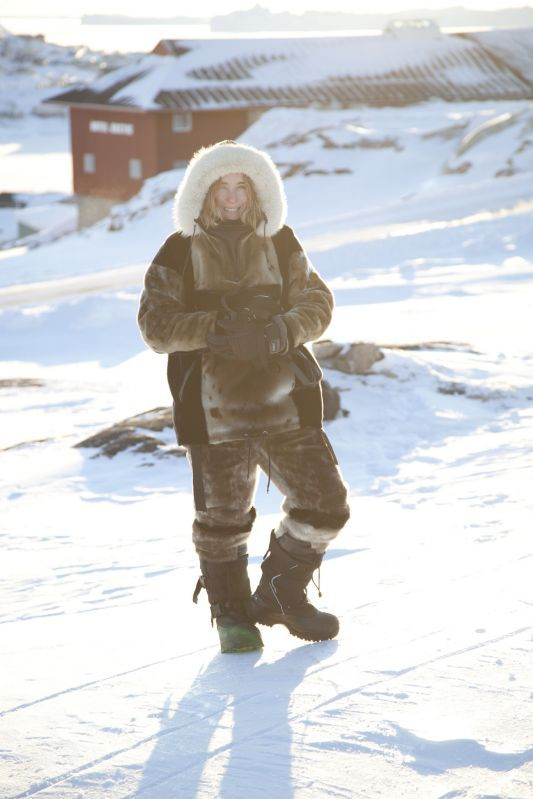
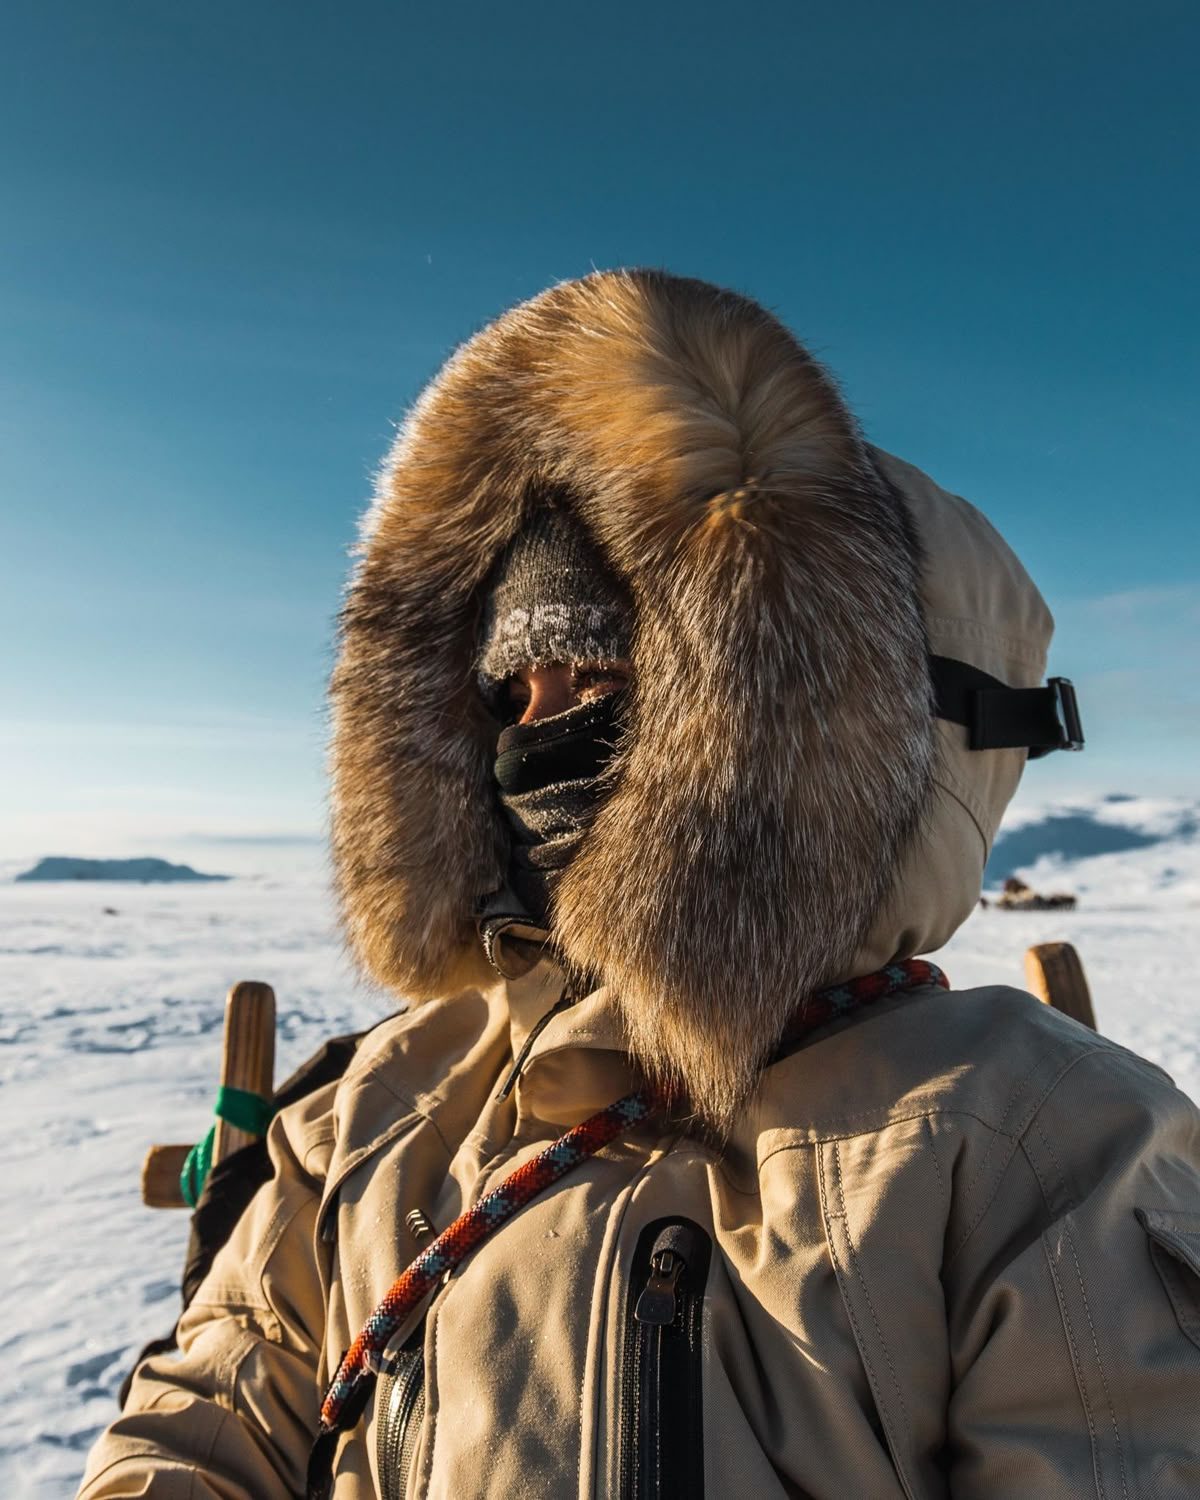
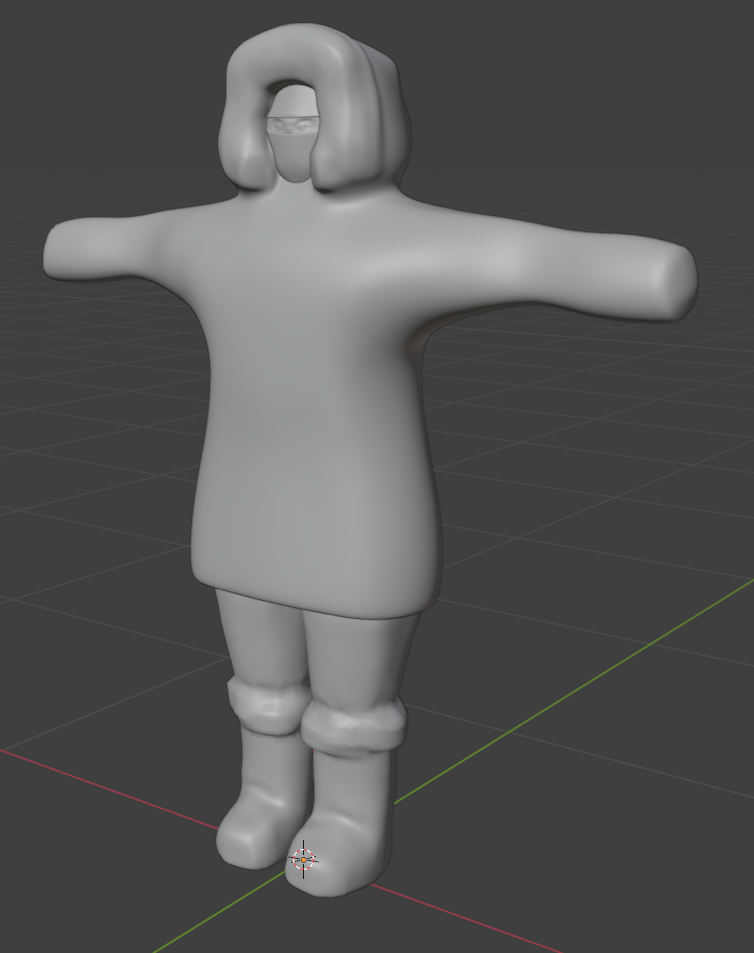
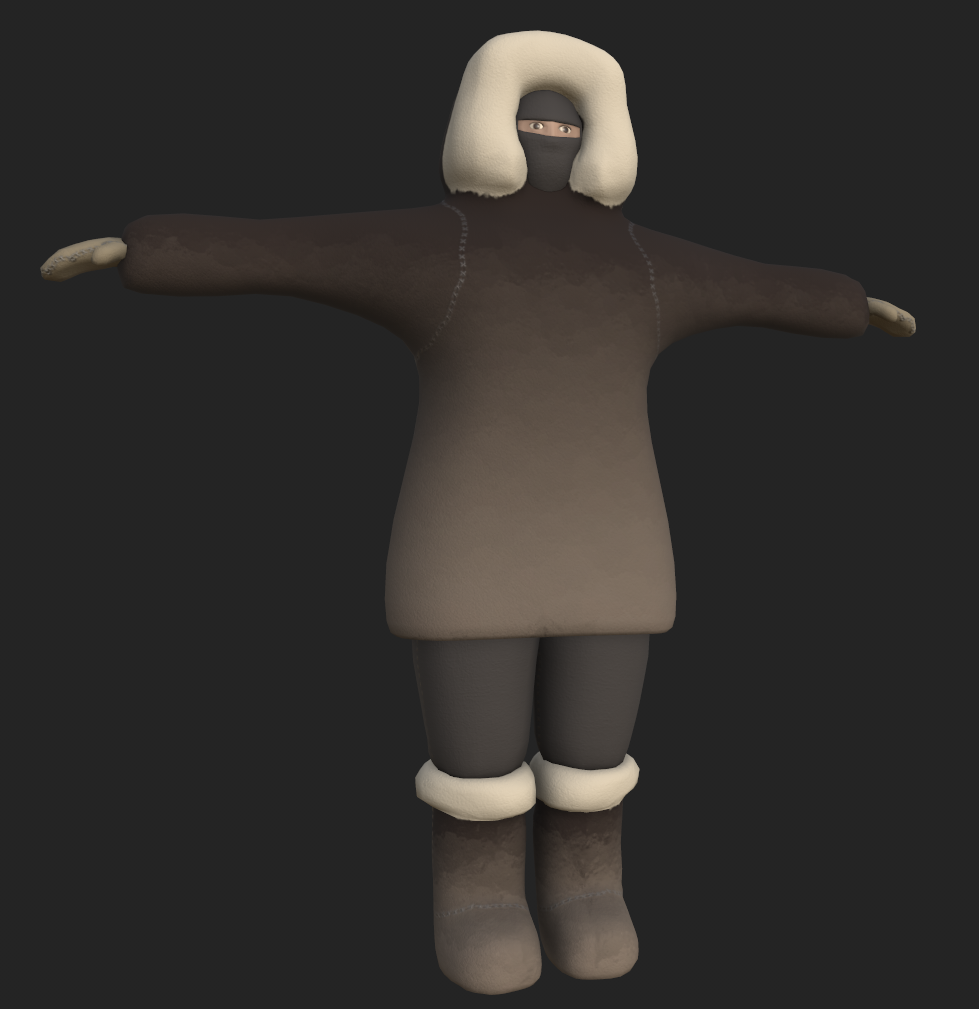
The next hero asset that I wanted to figure out was the characters. Since it is a first person game, we would mostly need the NPC characters. Since this is more arctic-type environment, I wanted them to be bundled up in furs but I wanted to stay away from too overtly Inuit designs.

Inspiration and Initial Design

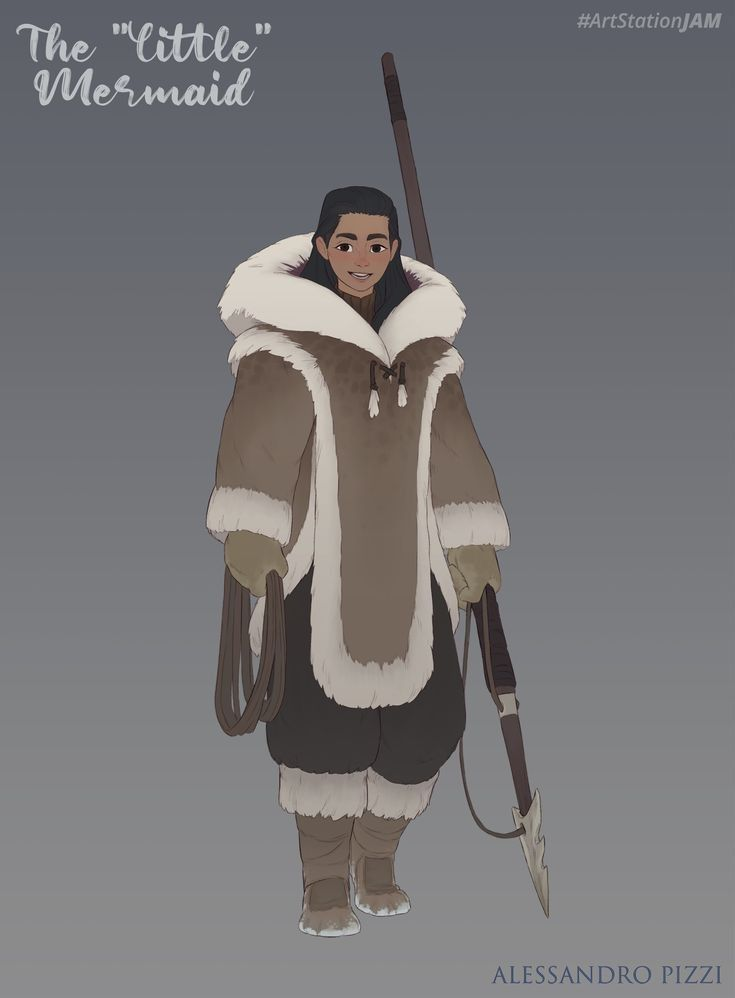
I had a few pieces that I found as inspiration but went with a combination of a couple to get the final result.

From this piece, I liked the overall mix of sleekness vs bulkiness of the clothing. Many of the references I would were either extremely bulky or fluffy jackets and "leggings". It also had the fluffy hood but did not have the fur along the wrists or the bottom of the jacket.

Placeholder

I really liked the way the hood looked along with the hat and facemask. Since this is a game jam, I also thought it would be a good way to not have to animate the facial features of the characters.

Placeholder

I really liked the coloring of this piece, especially how the top of the coat was darker than the bottom. It gave it an oiled/lived in vibe that I really liked. Overall though, it was a little too Inuit for what I was imagining.

Placeholder

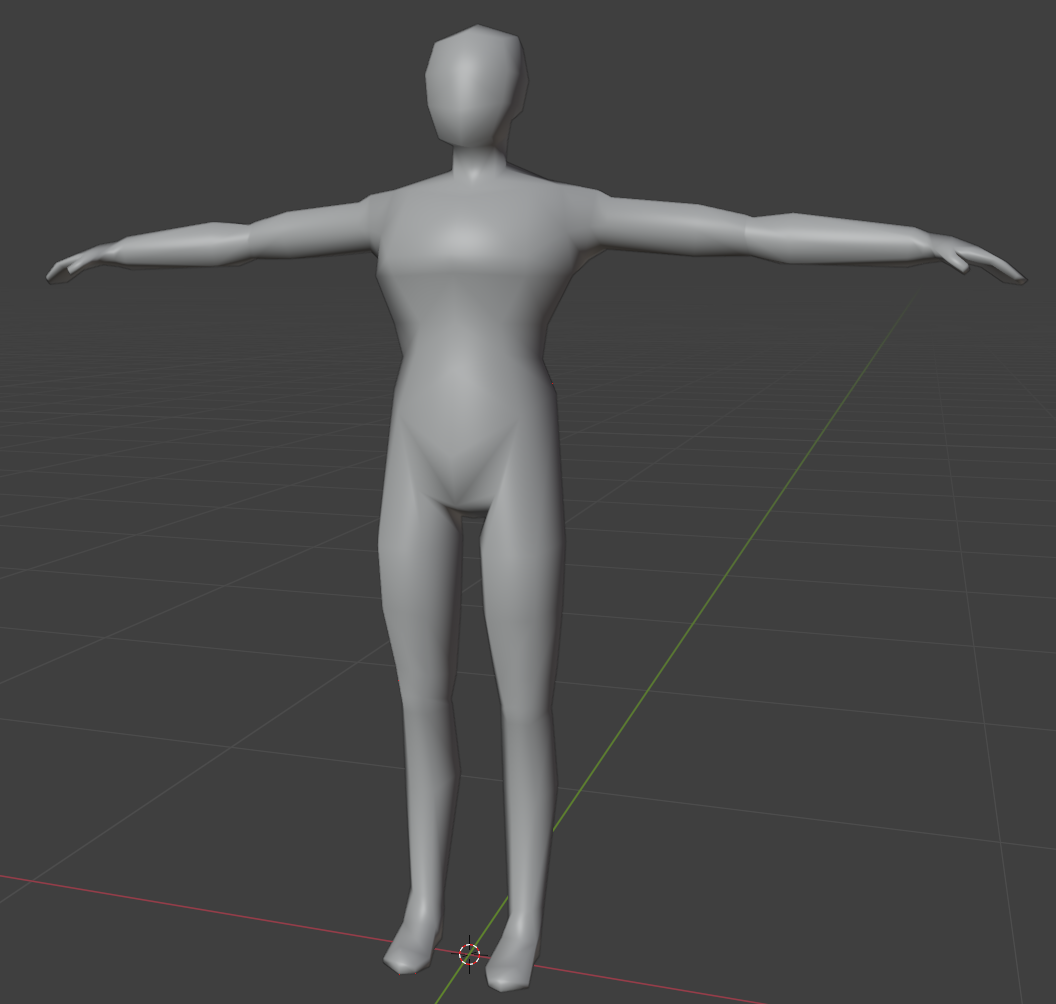
I also used a previous human model as the reference in Blender, since it had the correct proportions for a typical male (though it is unclear the gender of this particular character).

Placeholder

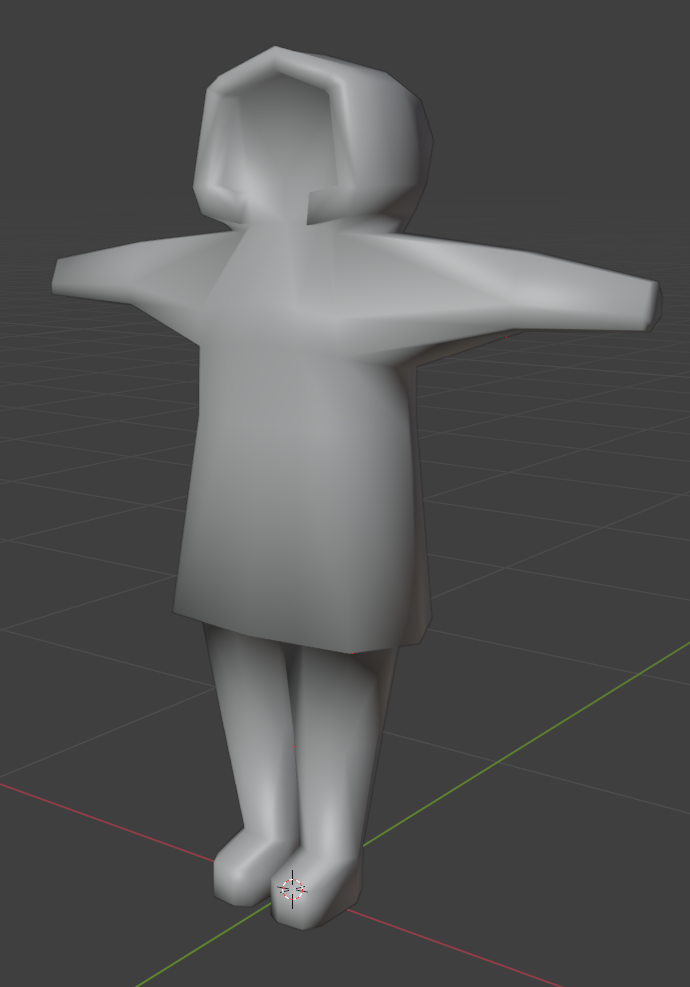
I ended up doing a mix of box modeling and sculpting to get the final result. I was having a really hard time trying to figure out the shapes that I wanted in the clothing. I hadn't locked down which reference I wanted to use as the primary reference yet and was getting frustrated with it. I ended up getting a base model mostly blocked out, then went over to begin sculpting it. This helped immensely. Being able to pull the shapes where I wanted them add clay where I needed bulk really helped me figure out what shapes I wanted.

Here was the initial blockout that I ended up liking the most. As you can see, it was really rough and the geometry was not the best. I was having a hard time getting the polygons to go where I wanted them to be but it worked well enough.

Placeholder

Sculpting the Final Shapes

As I was sculpting, I decided to break the upper and lower bodies apart, as it was incredibly difficult to work on the legs because they were so close to each other and when I would remesh it would create "webbing" between them. There was also a big problem with how the sculpting was reacting to some geometry between the legs that led to some NSFW-looking shapes... Breaking the legs out made the process much easier and overall the rest of the shapes just came together much faster. With the legs separated, I could remove one (well, replace it with a mirror modifier) which allowed me to have full access to the whole leg.

Don't tell anyone, by I was actually modeling the character's left leg initially but it ended up looking more like a right leg, so I just moved it over and it looked great!

I didn't want to spend a bunch of time sculpting the model, so I mainly focused on refining the big shapes I had and adding the shapes that would affect the overall outline. As you can see, I did not spend a lot of time really defining the edges between different pieces. I knew I would need to retopologize the mesh and would be breaking it up and refining it more during that process.

Placeholder

To do the retopoing, I followed the beginning of this tutorial to get the gist of what to do, then continued on my own (because my geometry was so different from a normal head). Essentially, it was using the Shrinkwrap modifier on the new mesh, targeting the original mesh, and the snap to Face Projection mode. The rest was just trying to figure out what edges needed to go where to make it all match up.

This is the final result after retopoing everything. I ended up with the following meshes:

  • Coat (including hood)
  • Facemask
  • Face/eyes
  • Eye balls
  • Gloves
  • Pants
  • Boots

Placeholder

Texturing the Character

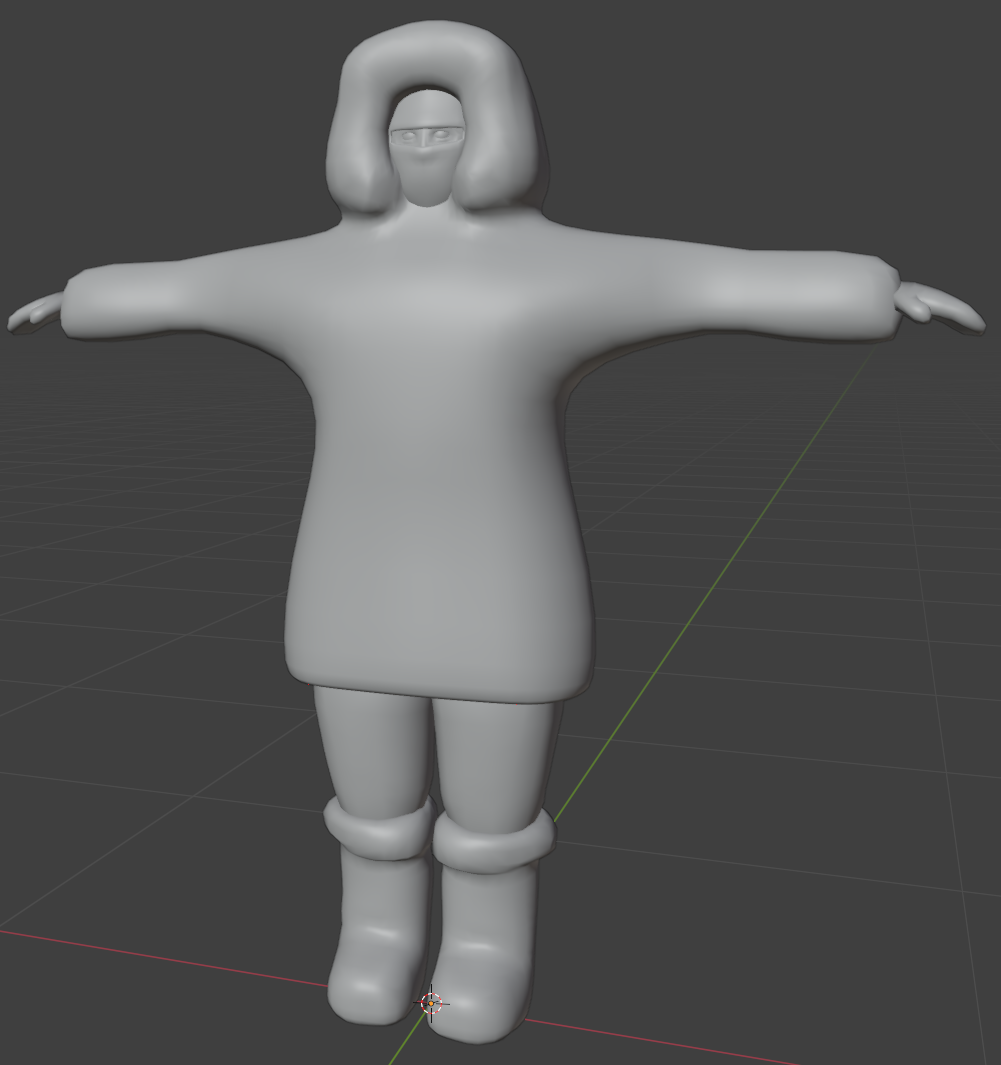
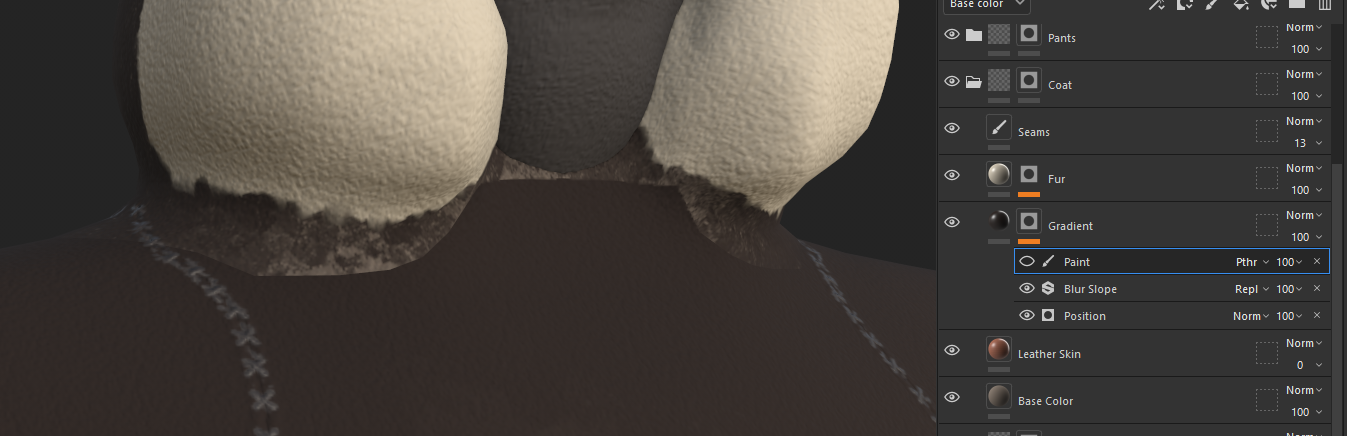
Once I had the final model, I was able to take it into Substance Painter and work on the textures. I color sampled from the third reference above because I really liked the colors they used. I got to play with some generators and filters in Painter, which was cool. This was definitely more complex to texture than the other assets I did so far.

My favorite was using a combination of the Position generator (inverted) and the Blur Slope filter to create the effect of the coat being darker along the top and fading down into the lighter color. I also got to play with a stitch brush to do the seams.

Placeholder

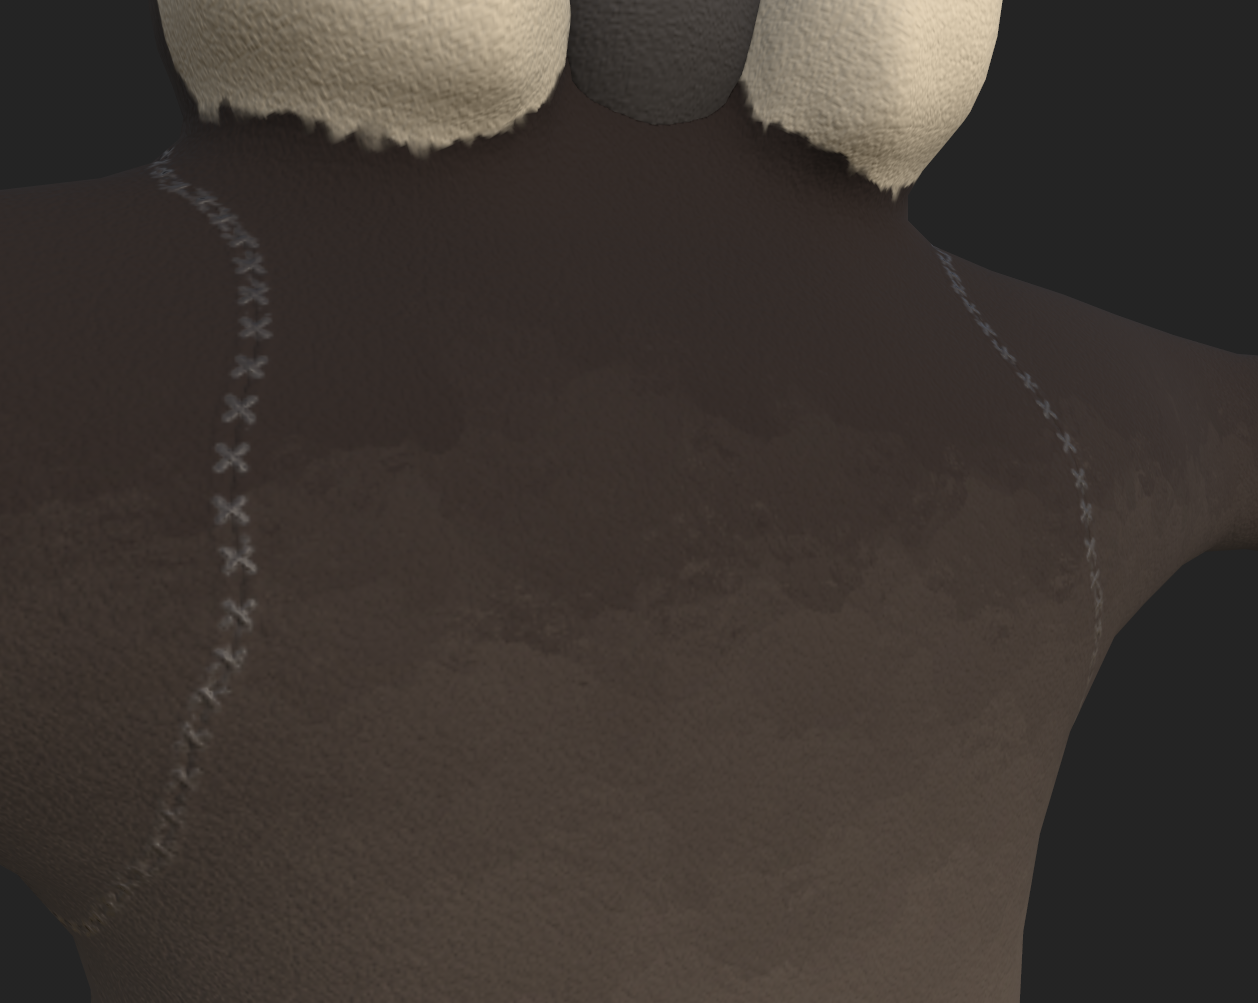
One problem I ran into with the Blur Slope filter is that it doesn't respect seams very well. Evidently it works by only looking at the 2D texture and applying the blur on that. This means that there was some color bleeding which looked pretty ugly. Luckily, after reading some forum posts, I found that I was able to add a paint layer to my mask and paint in the missing mask. Note: The paint layer needs to be set to Passthrough for this to work.

Here is the seams with the paint layer turned off. Pretty ugly stuff! I got pretty lucky because the mask at this part was all black, so it was easy to fill it in.

Placeholder

I also had to do something similar for the boots. This one was not as simple because the value of the mask wasn't pure black where I needed to fix the seams. For this I was able to use the Smudge tool to "mix" the mask colors. This worked pretty well (though there is still a bit of the seam at the top).

Placeholder

The final result looks like this. Overall, I'm pretty happy with it.

Placeholder

Rigging and Animation

The final step was to rig and animate the character. I didn't want to spend a bunch of time on making the character move. For one, this is for a game jam and two, right now this is for a beautiful corner and may not even be used in the final game. I ended up using Mixamo to rig, as they have an auto-rig feature, which was quite handy. The other reason I went with Mixamo is that they have a large library of free animations too, so we could source additional animations as needed.

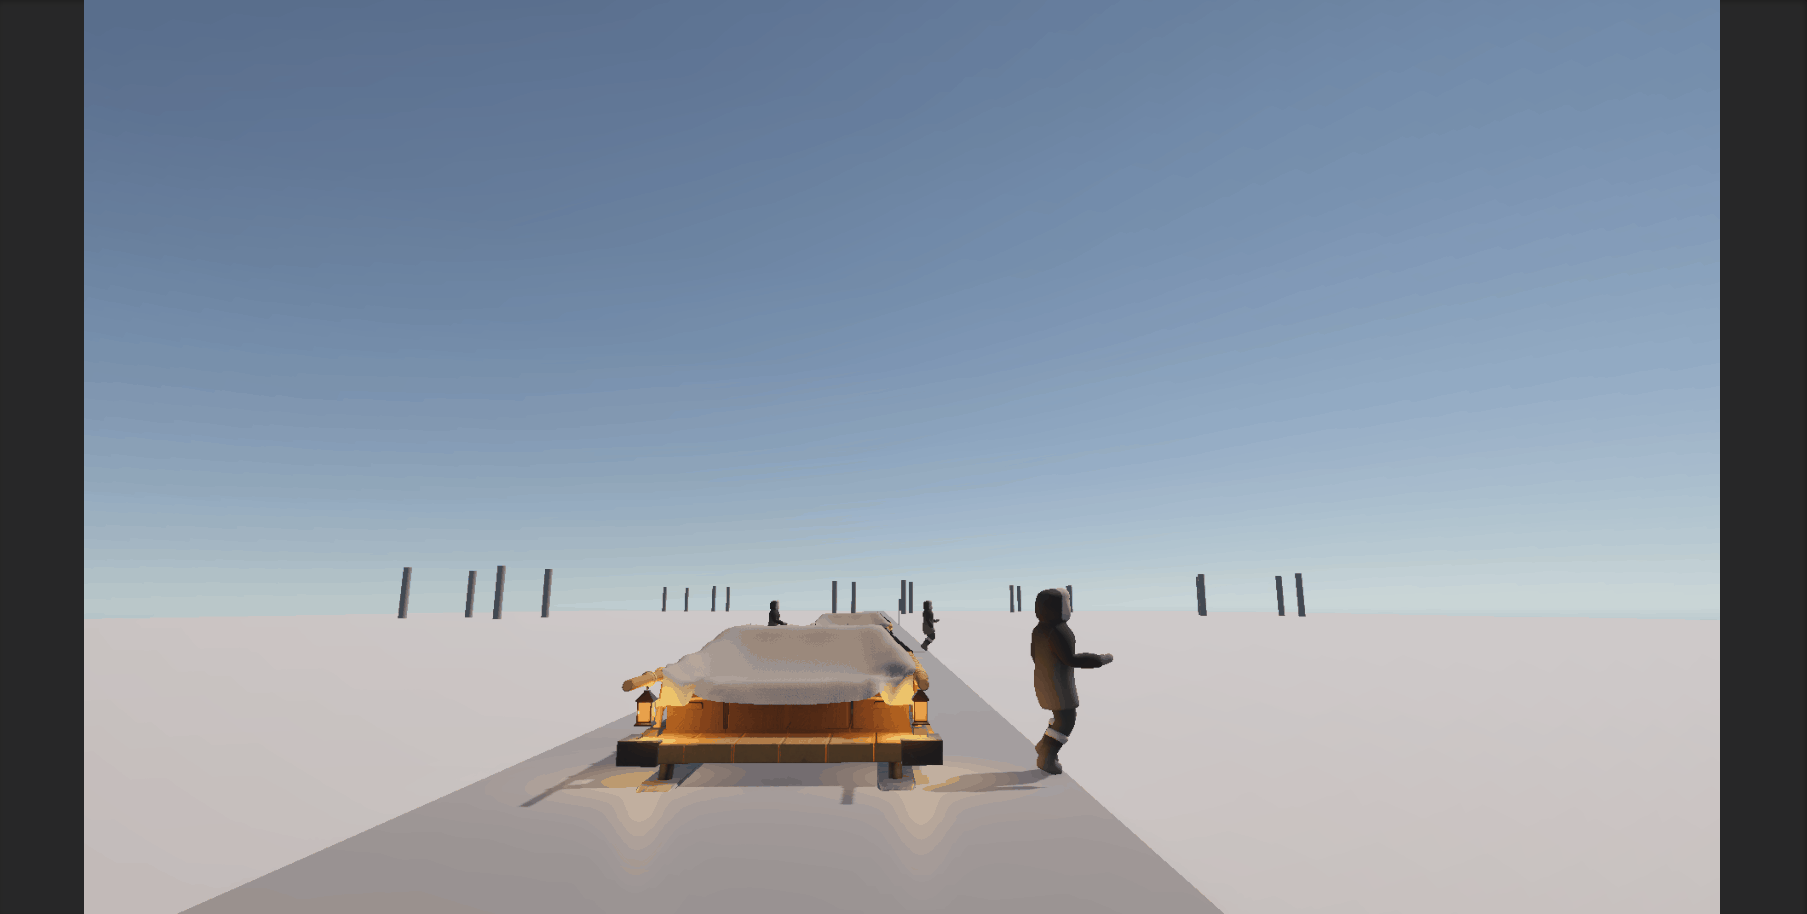
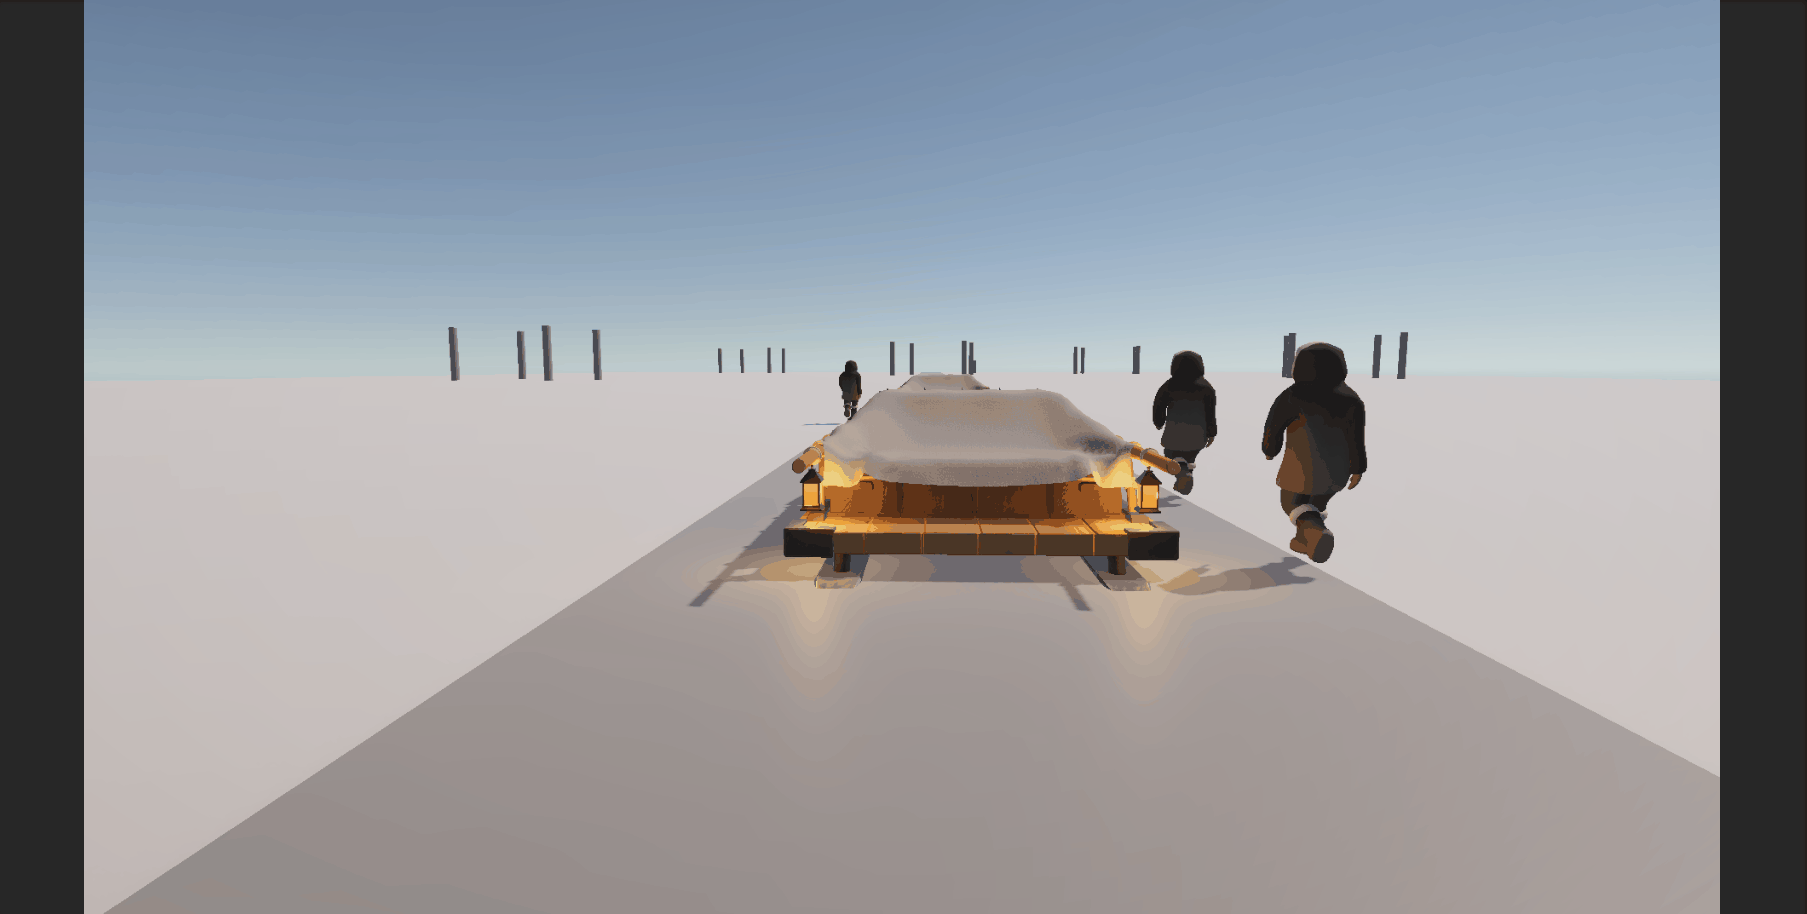
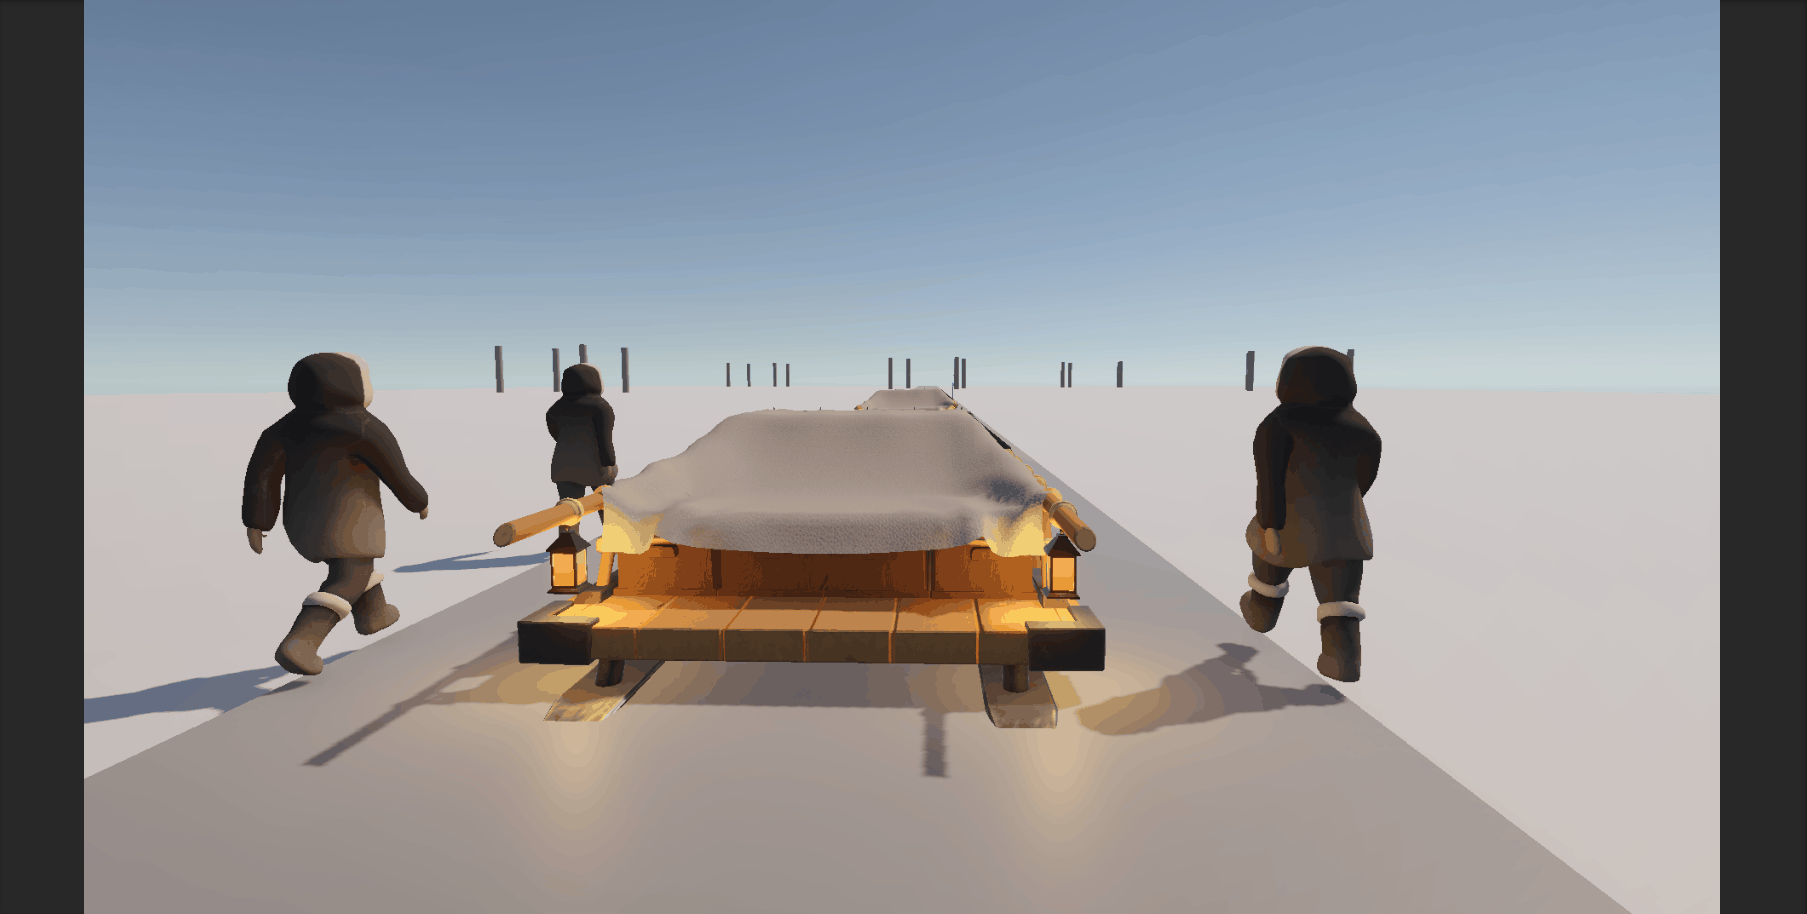
Surprisingly, the model geometry works well enough for it's purpose and way better than I expected, to be honest. In the examples below, you can see some weirdness around the neck/hood, as well as in the hands.

Placeholder

Placeholder

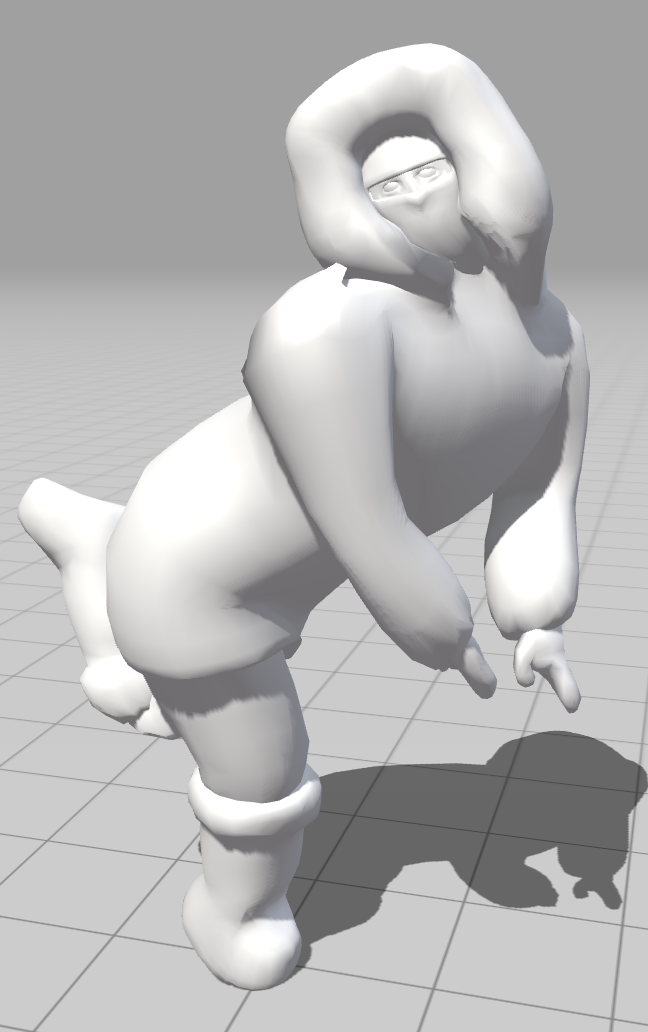
As long as the movements aren't too extreme, the mesh deforms well enough!

Placeholder

The Final Scene

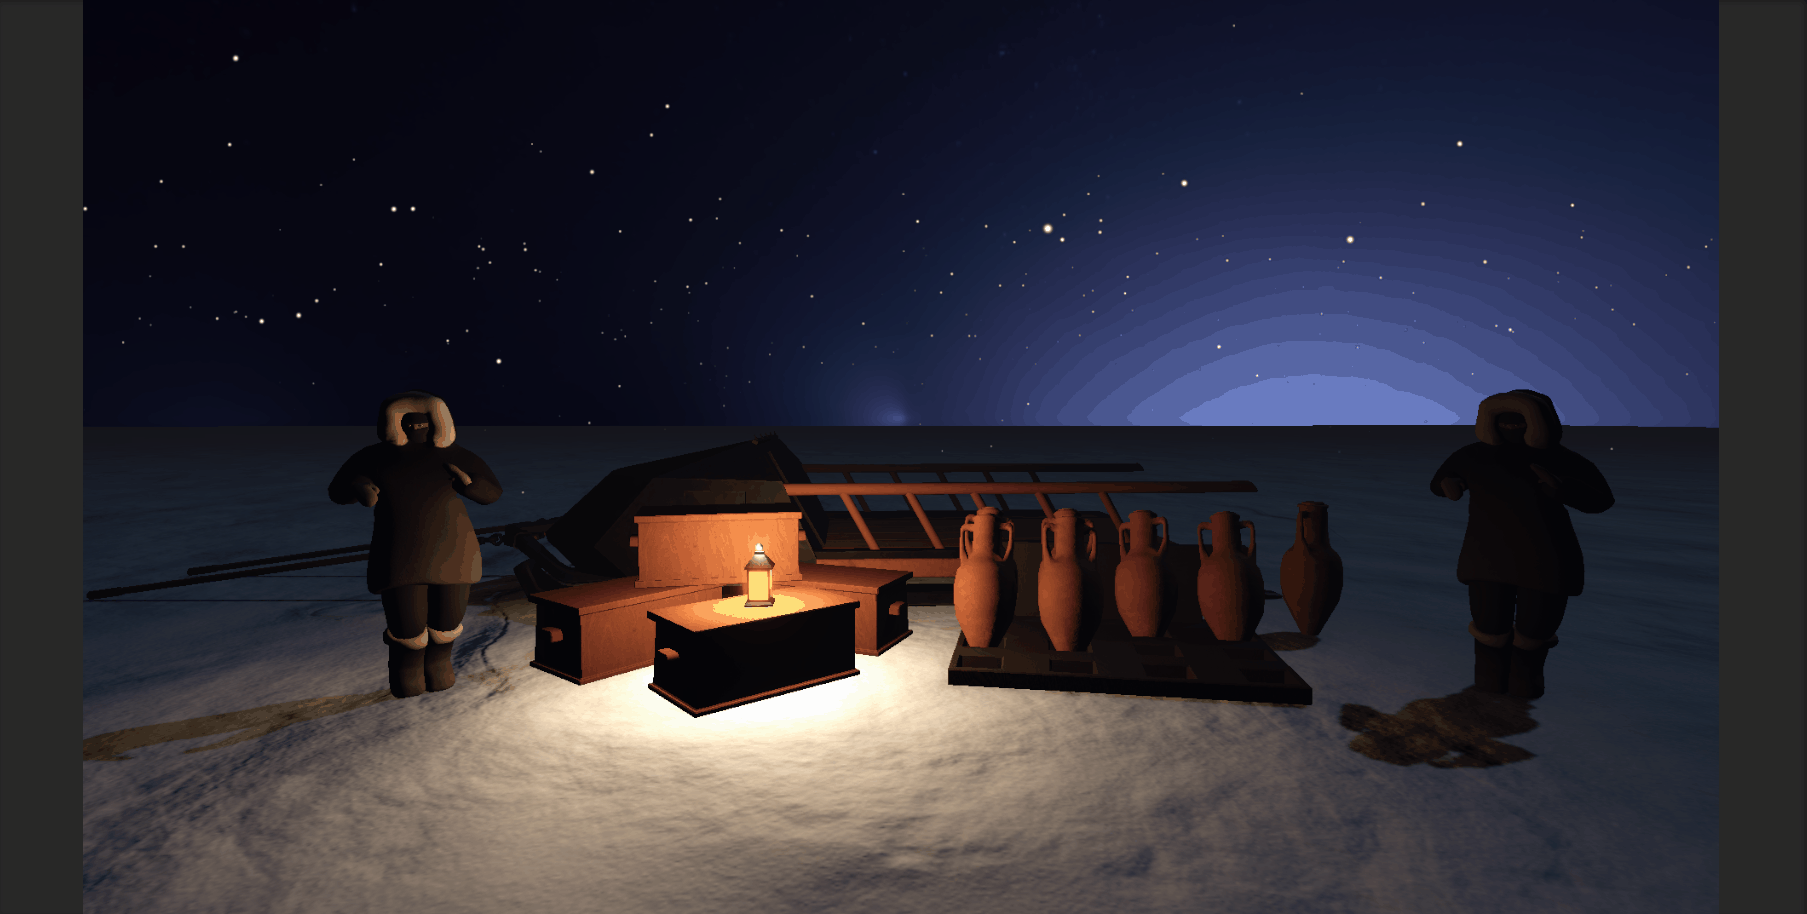
The scene in Unity was looking a little too...daytime for me. I slapped in a night sky HDRI, dropped the light levels way down, and fiddled with some post processing settings (following this tutorial). It looks pretty decent, though if I could figure out how to make the ground a bit darker and the props/characters a bit brighter, that would be cool. It seems like I have to crank the light down a bunch to get the ground to be darker but then lose all of the definition on the other objects (especially the characters' faces).

I also added a snow particle system following this tutorial. Overall, the lighting and snow has some wonk to it that will need to be adjusted if we end up using this as the base for the final game.

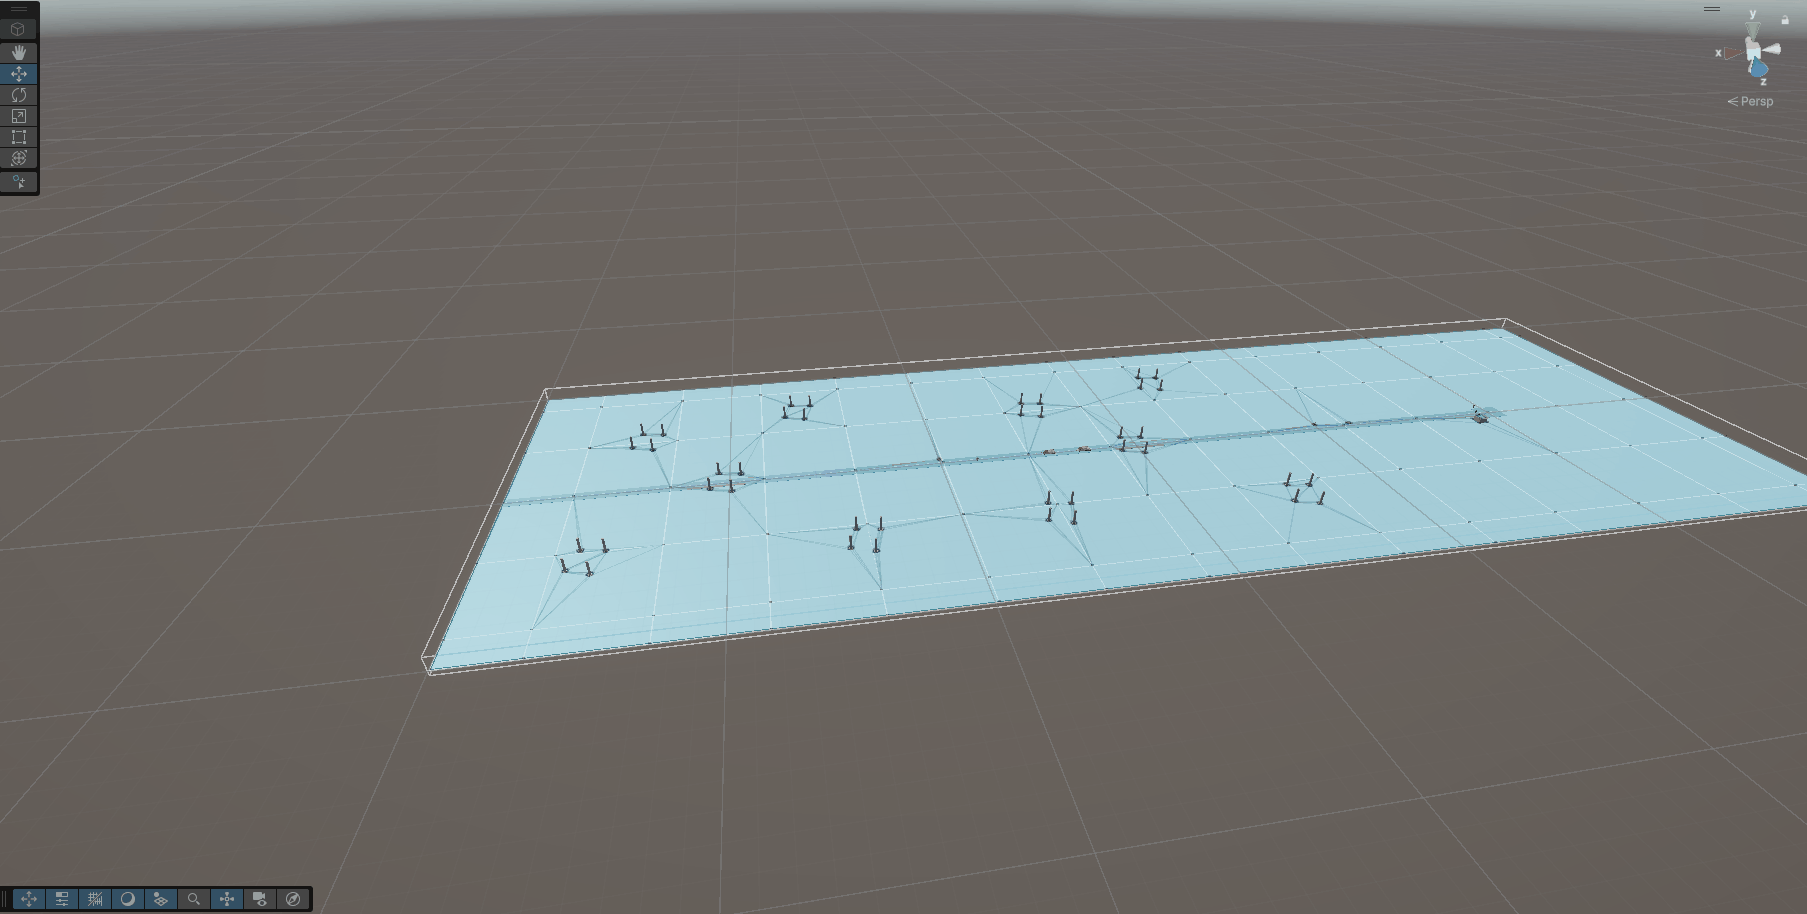
I wanted to add deformable snow as well, but it was getting out of scope for the beautiful corner and it will have to wait for the actual jam to start.

Placeholder Placeholder

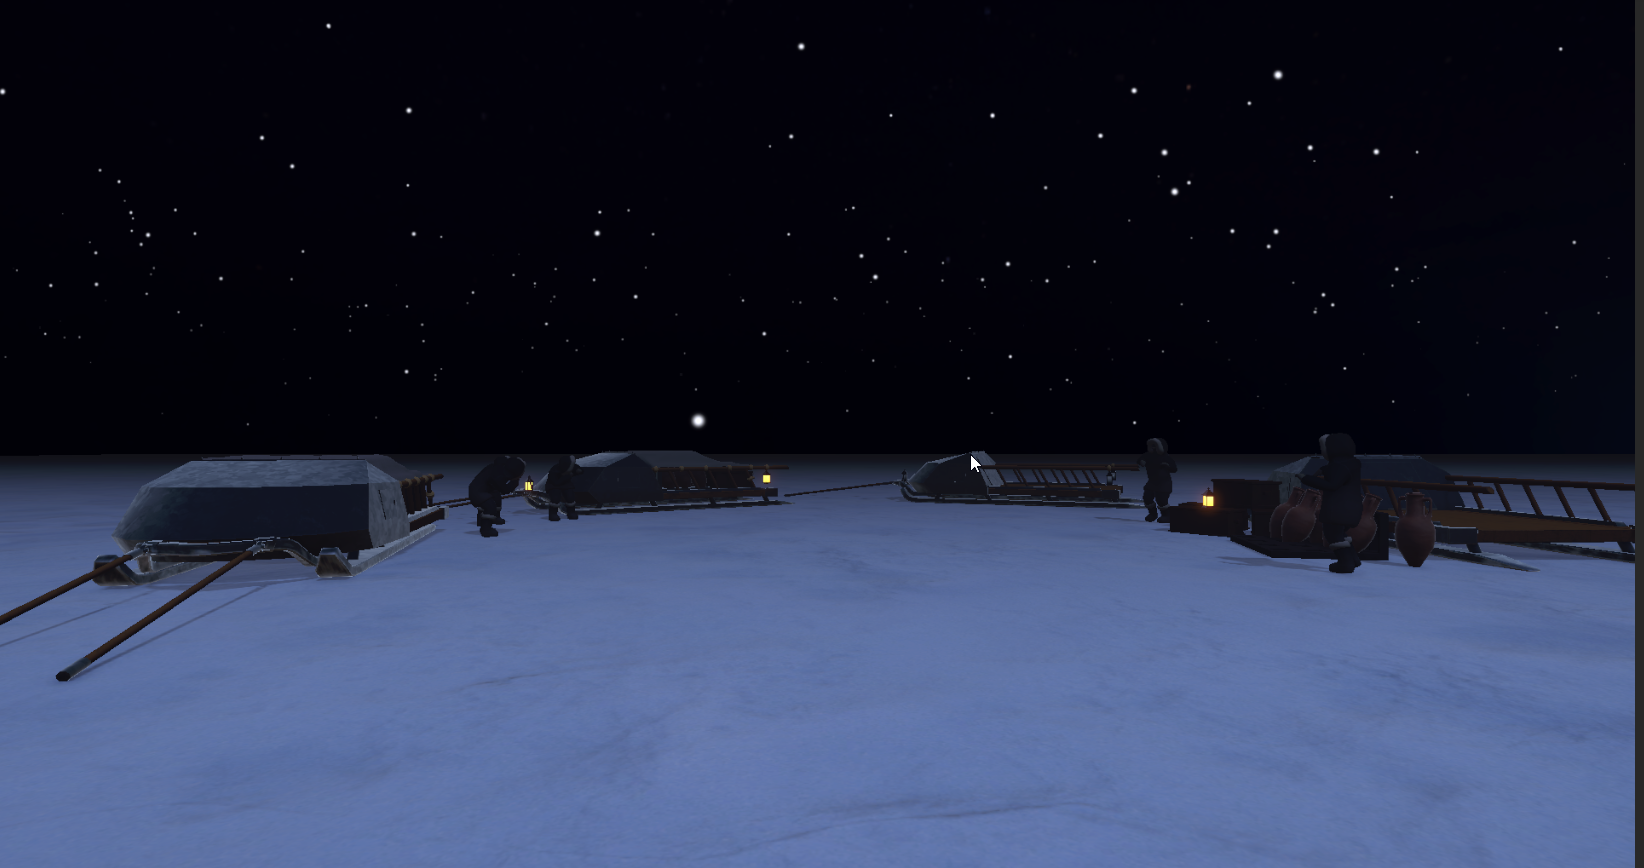
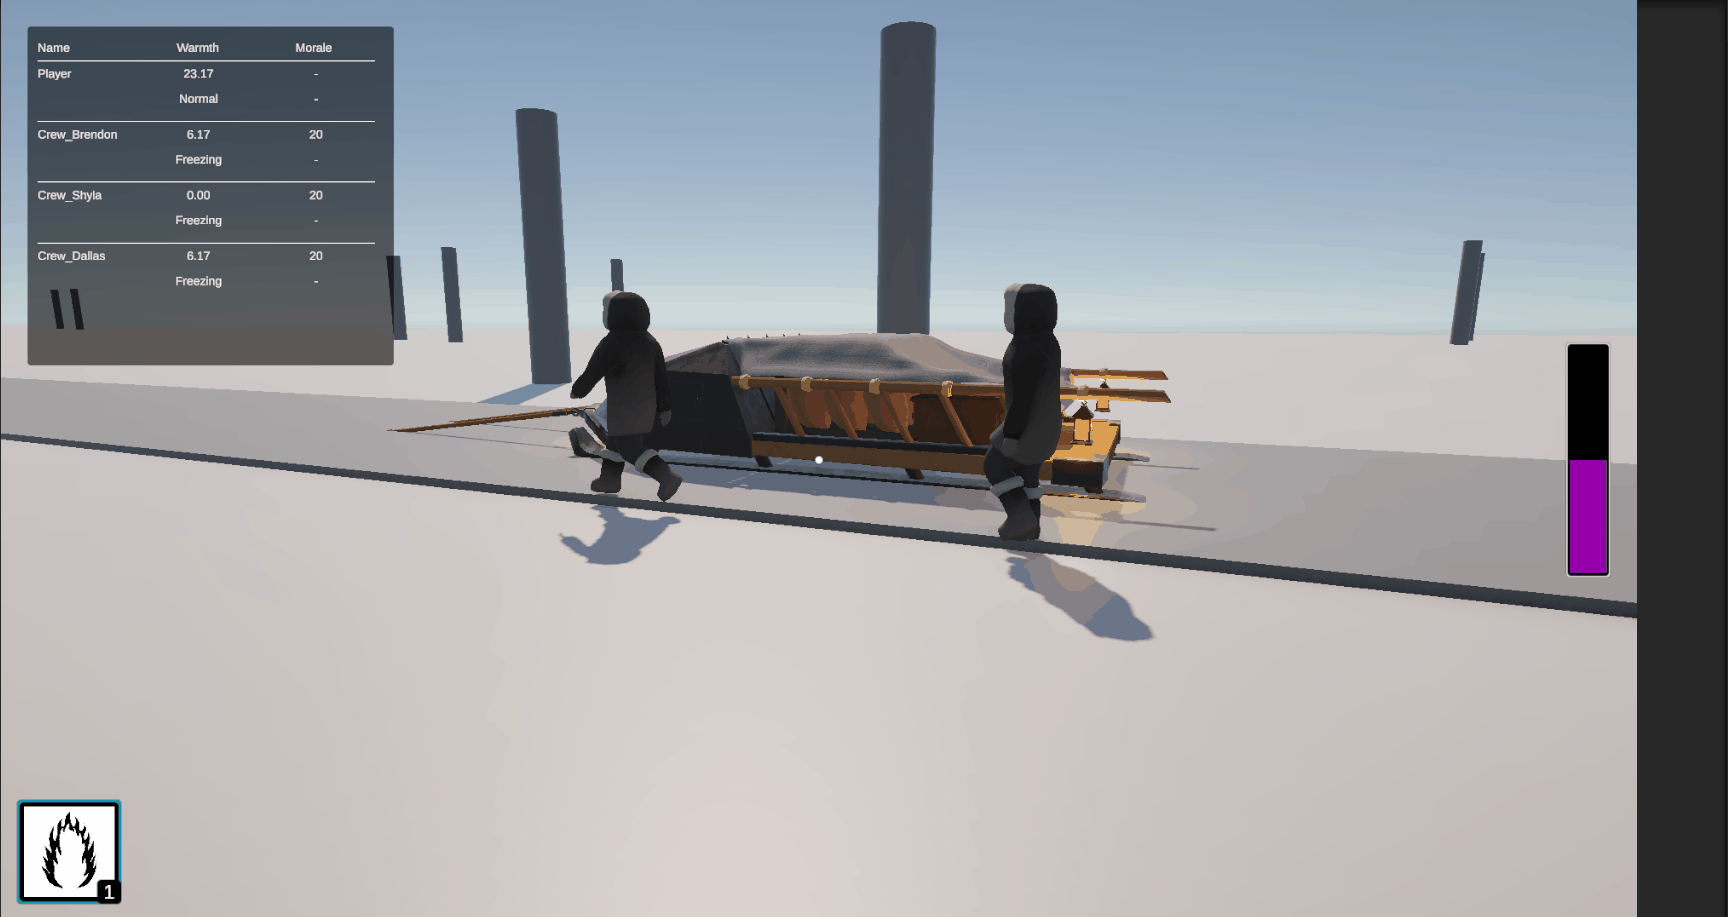
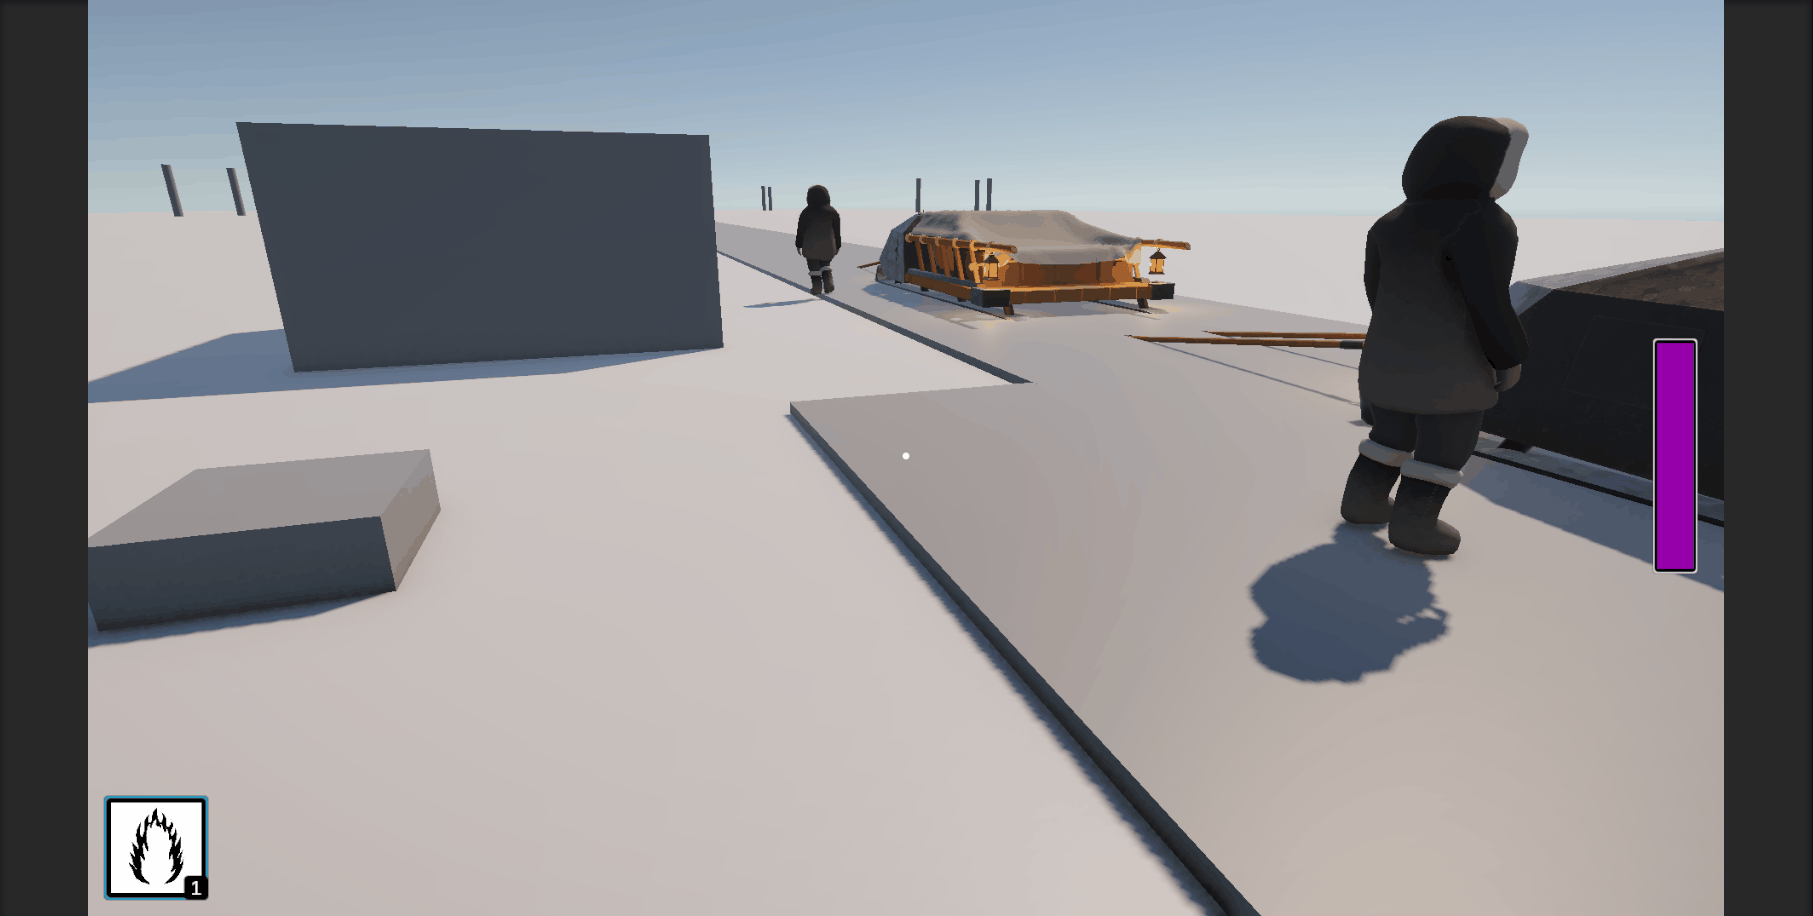
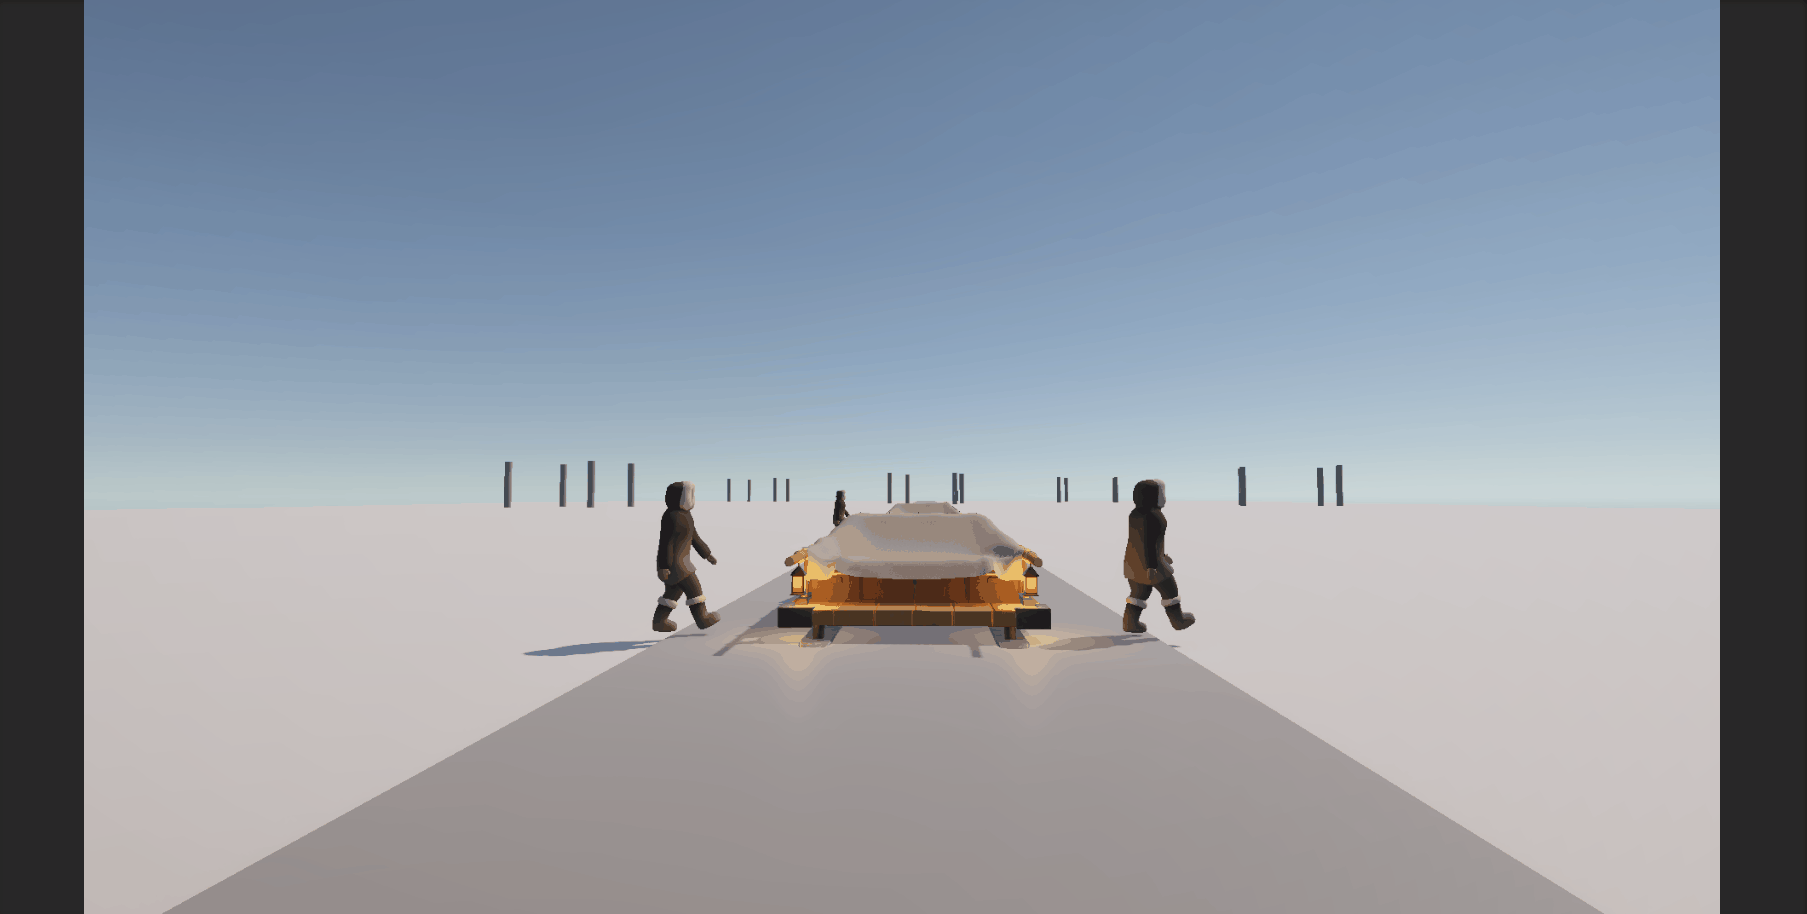
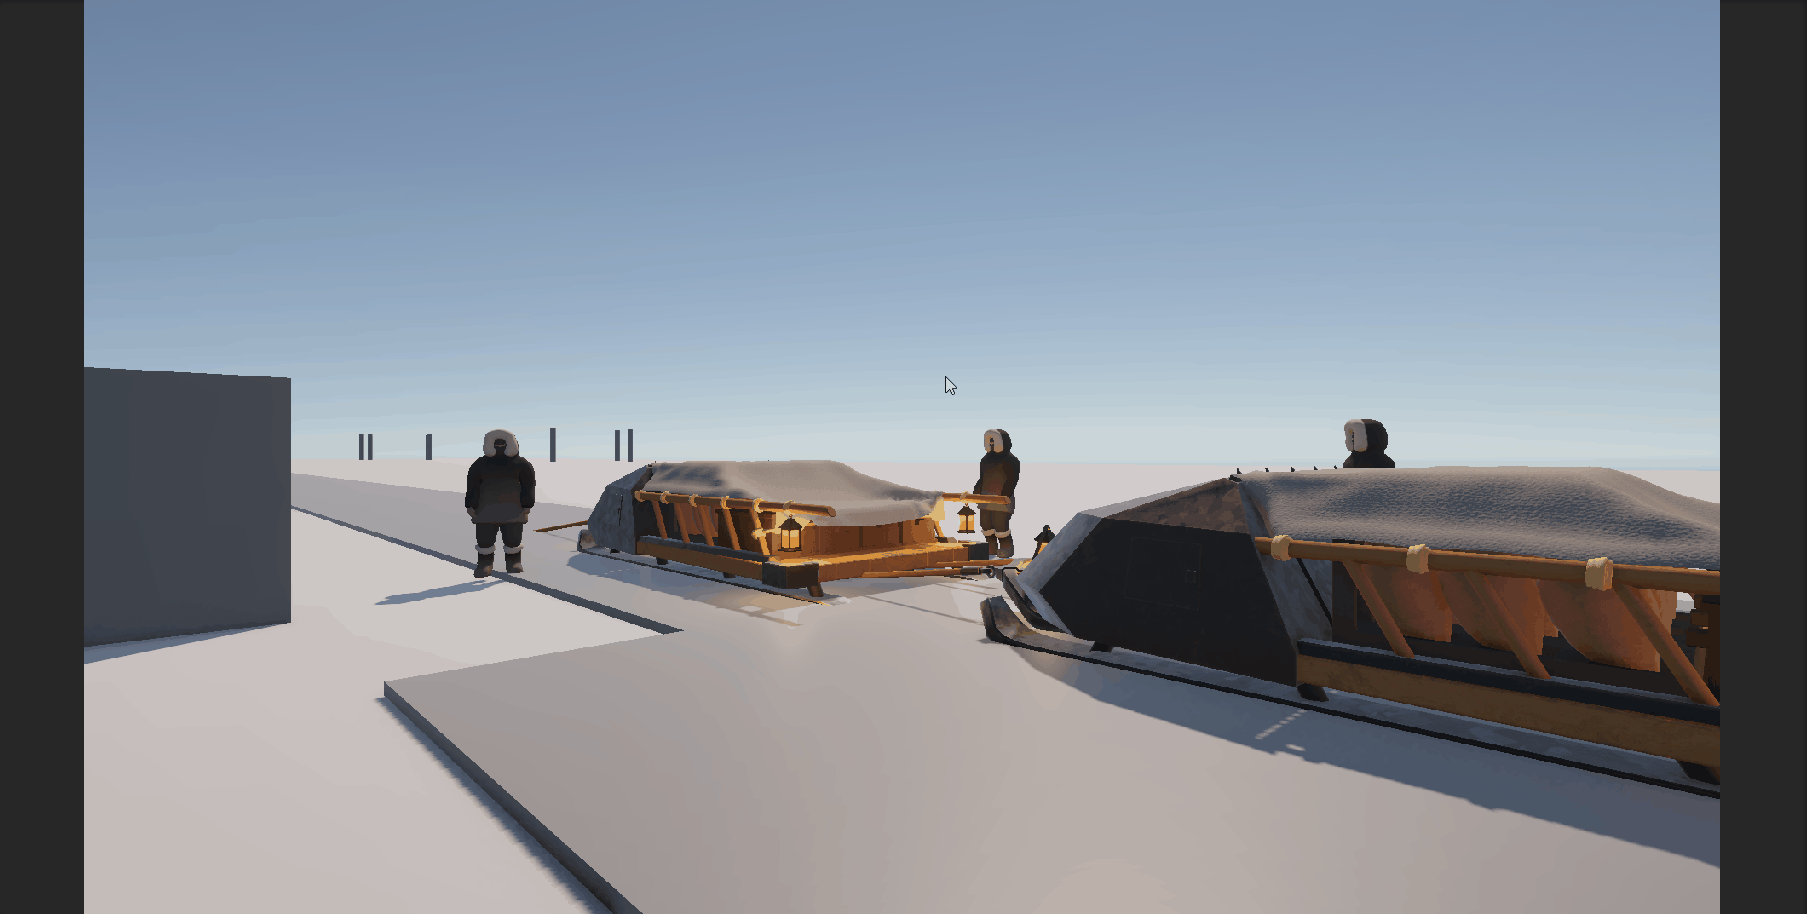
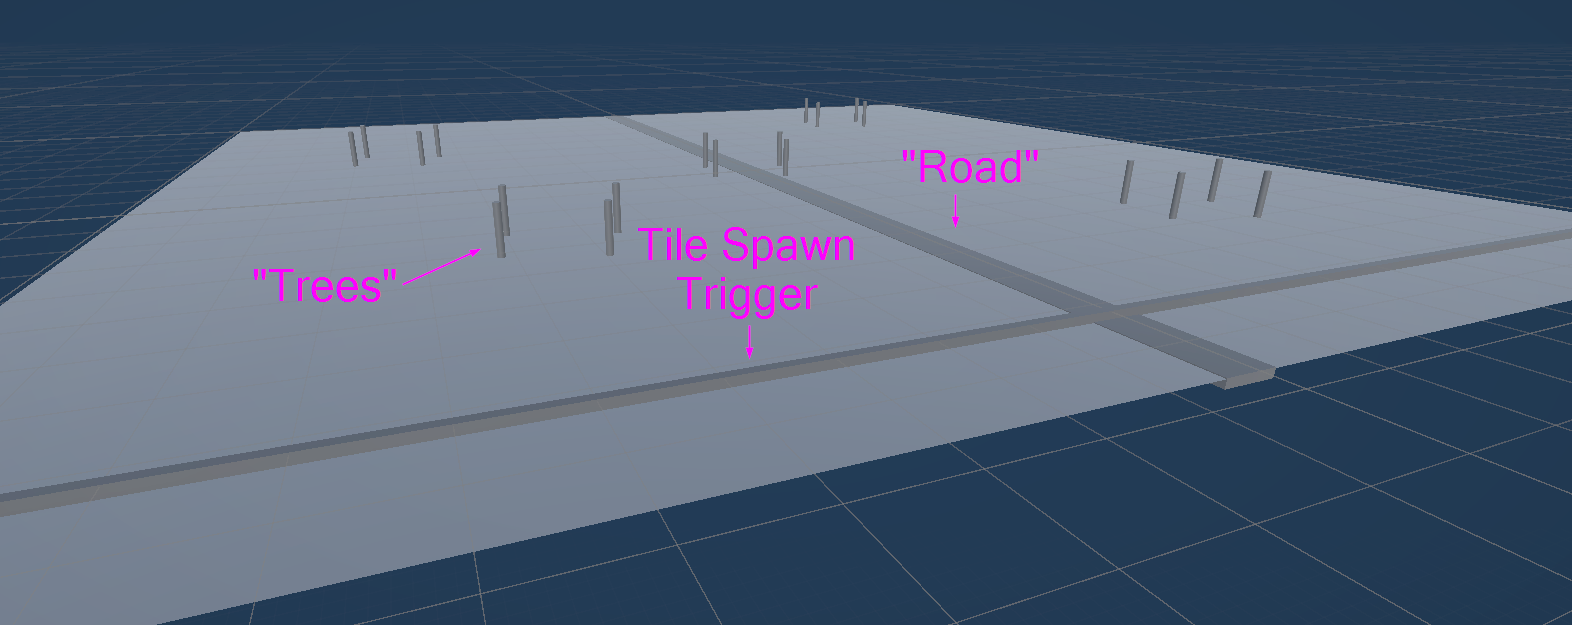
Here is a final walkthrough of the beautiful corner, showing the modularity of the sled/other props, as well as the animations for the characters.

Placeholder

After some additional tweaking with the lighting settings, and adding an actual light to the lanterns, I was able to achieve a much nicer result in the overall lighting of the scene

Placeholder

Here is an adjusted walkthrough after making all of the lighting tweaks (props to Terra for getting us 90% of the way there!)

Placeholder