Skip to content

Welcome!

Updating Git Branches

Today was mostly just updating my big branch that added in the Crew panicking with all of the changes made by the team and making sure they all meshed well together. This went pretty well though I knew Andrew and I had some changes in the same CaravanCrew script, so that took some careful review.

I also updated our project to use the latest Unity 6.0 version, since there was a security vulnerability discovered. I figured we might as well get ahead of it now, even if our game isn't published for the jam yet.

As you can see, the bulk of the work today was code busywork but at least I got the crew panicking out!

Putting an End to the Panic

Today was all about trying to finish up the Crew panicking. My goal list for the day was:

  1. Update the animations to make them fit the tone better and to add in then "sad" animations for when the Crew was broken
  2. Fix the rotation of the flee point arcs

Adding the New Run Animation

I worked on replacing the existing run animation with the one I posted about yesterday. I'm not terribly familiar with adding animations, mainly just what I did for the beautiful corner. When I added in the animation, it looked mostly right but the feet and the hands were a little too...floppy.

Gif of the new run animation being goofy

It turned out to be because the "Avatar Definition" was set to generate a new avatar off the FBX. I had set it to "Copy From Other Avatar" but I ended up undoing some changes, realized I went back too far, then tried to reapply them. Apparently, that was the only change I made that didn't get reapplied.

Screenshot of the FBX import settings showing the use of the existing crew anim avatar

Once that was corrected, the animation looked correct.

Adding the New Sad Locomotion Animations

The next animation I wanted to add was the sad walking animation for when the Crew get back to the sled after panicking. It took me a few to get this figured out. We already had a blend tree for the locomotion and I couldn't figure out a clean way to have it use a different blend tree if they were sad. I also didn't really try any of my ideas because they just felt wrong.

I then remembered that you could do 2D blend trees. That sounded like what I needed. I had to add a new animation parameter to control the "sadness". I wanted to use a boolean but blend trees only work with floats (from what I can tell). I got that wired up with the new sad walk but it wasn't quite working as expected. The animations were just not blending like I wanted. The main problem was it wouldn't run at all unless I had the sadness parameter above 0. While taking a look at this iHeartGameDev 2D blend tree tutorial, they put up a screenshot of the Unity docs.

Screenshot of the Unity docs for 2D blend trees

When I had changed the blend tree from 1D to 2D, I had noticed that were were multiple options for the 2D trees but I didn't think much of it. I picked the one that had "simple" in the name because I thought that it was what I would need. Turns out, "directional" should have been the word that I was looking out for. The directional ones are more for playing different animations in the cardinal directions. I just needed two different parameters to affect it. I saw the 2D Freeform Cartesian option and that sounded perfect.

Screenshot of the blend tree after updating the blend type

I made that change in the blend tree and suddenly everything was working well! It felt a little weird though that I was reusing the same run animation regardless of if they were sad or not. I found a "sad" run on Mixamo. It is on the edge of being too goofy but I think it looked pretty good. Here are all of different states in action.

Gif showing the blending between the speed and sadness animations

As you can see, they blend pretty well together. Here is the sad run/walk in the game.

Gif showing the Crew returning back to the sled with the new animations

As you can see, the game also got a pretty big facelift as well! Terra spent some time trying to get the atmosphere looking way closer to the final result we want. It is amazing how much that change affects the feel of the game. There is still tweaking to do, especially related to running outside the lights but this is a huge step forward. It will also give us the backdrop to actually work on the icons and see how they will read against the background.

Fixing the Flee Point Arcs

This turned out to be an issue with how I was drawing the arcs and not with how the flee points were actually determined. It turned out the code I was using to draw the arc was assuming a x-forward orientation whereas Unity uses z-forward orientation. Once that was corrected, the arcs were being drawn correctly.

Screenshot showing the arcs drawing correctly

A Day at the Zoo

Today was a pretty light day and I didn't get as much done as I had originally intended. Its fine though, since I got to go touch grass (and real goats)!

New Animations

What I did get done though is gathered some more animations. The goofy run was hilarious but kind of broke the "horror" vibe we are going for. I found this run animation that matches them fleeing a lot better, in my opinion.

Gif showing the new run animation

I also wanted to add a new walk animation for when the Crew got back to the caravan after breaking. I wanted to be able to show an obvious sign that they were broken (without having to rely on the icon). I found this sad walk that I felt like matched the vibe.

Gif showing the new sad walk animation

Panicking! Well, at Least the Crew Are…

The next feature I pulled from the board was adding panicking to the Crew when the enter the Broke Morale state. The concept is that when they break, they pick a random spot away from the caravan, run to it, then cower until either the Player Soothes them or a glimmerstalker gets them.

Determining Where the Crew Runs To

Before we can do anything, the Crew will need to determine where they will run to when panicking. In a previous post, I had put up the following diagram for how we were going to handle selecting the points.

Flee points diagram

The more I thought about this the more I didn't like it. The main reason we wanted to go that route initially was because we wanted to be able to control where the points were in relation to the caravan/sleds. As I really started thinking about how I was going to implement this, the following issues came to light:

  • If there were multiple sleds and the trail was curved, the points could overlap with the sleds in front of or behind the current sled
  • If we wanted to adjust where generally the Crew should run to (angle or distance), we have to manually move each point and make sure to keep symmetry between the two sides
  • We'd have to keep a list of points that each Crew would use

These concerns were enough to make me rethink our approach. We originally wanted to use points because we were not sure if we would have the math chops to dynamically define the areas that the Crew should run in. Well, I decided I didn't care if I had the chops or not and wanted to see what I could come up with.

After quite a bit of hacking various snippets together I came up with the following. The red and cyan lines represent the line of points that the Crew will pick from when deciding where to run.

Gif of adjusting flee point arcs

Andrew had added some logic to determine the "center" of the caravan and I wanted to utilize that as the basis for the calculations, instead of the individual sleds. This would allow us a lot more control overall and would ensure that potential locations wouldn't overlap with the sleds. I also had the thought to use arcs instead of a circle. This would allow us to have gaps directly in front of or behind the caravan, since we wouldn't want them to flee directly in the path of the caravan or too far behind.

I started out with just one 90° arc and got that working. It still checks to see if the point is on the NavMesh and retries if it isn't. Once I got that working, I was able to expand it out to the other side and add the ability to "rotate" the arc. I was really glad to get the rotation in. This will allow us to point the arc more forward, since we want to avoid having the Crew flee too far backwards. The Player will eventually have a "tether" to the caravan to prevent them from running too far away from it. It would be unfair to the Player if the Crew ran directly behind the caravan and got out of range before the Player could rescue them.

Below is the code that gets the random point. It uses a lot less math than I had anticipated but it still took a bit to get working.

public static Vector3 GetRandomPointInArcOnNavMesh(Vector3 origin, float radius, Vector3 baseArcDirection, float arcDirectionOffset, float arcAngle, int maxAttempts = 5, int areaMask = NavMesh.AllAreas)
{
    var arcDirection = Quaternion.Euler(0f, arcDirectionOffset, 0f) * baseArcDirection; // Rotate the arc direction

    arcDirection.y = 0;
    arcDirection.Normalize();

    var halfArc = arcAngle * 0.5f;
    for (var i = 0; i < maxAttempts; i++)
    {
        var randomAngle = Random.Range(-halfArc, halfArc);
        var randomRotation = Quaternion.Euler(0f, randomAngle, 0f);
        var offset = randomRotation * arcDirection * radius;
        var rawPoint = origin + offset;

        if (NavMesh.SamplePosition(rawPoint, out var hit, 1.0f, areaMask))
        {
            return hit.position;
        }
    }

    return Vector3.zero;
}

Here is how that method is used:

private Vector3 GetRandomFleePoint()
{
    var caravanCenter = CaravanManager.Instance.CaravanCenter;
    var directionModifier = CoreUtils.FlipCoin() ? 1 : -1;
    // Need to apply modifier to both direction and offset
    // This ensures symmetry between the two sides
    var arcDirection = caravanCenter.right * directionModifier;
    var arcOffset = _fleeArcDirectionOffset * directionModifier;

    return CoreUtils.GetRandomPointInArcOnNavMesh(caravanCenter.position, _fleeDistance, arcDirection, arcOffset, _fleeArcAngle);
}

I also reworked the "Caravan Center" logic to use a full Transform instead of just returning a Vector3. The intent was to be able to turn the whole double arcs to be perpendicular to the caravan at all times. However, I still have something off with it. It appears that it it rotated the wrong way. In the image below, the green line is where the centerline should be but the magenta line is actually where it is. It appears to be flipped. Should be an easy fix but I'm not that great at Quaternion or Vector logic yet. Someday!

Bug with arcs rotating incorrectly with caravan center

I didn't see that issue until I got around to writing this post, so I'll have to figure that out later.

Reworking the Crew States

I was so gung-ho to figure out the flee point generation that I didn't check to see if the Crew script was actually set up well to handle moving through the different states. Spoiler...it was not! I took a step back from working on the fleeing state specifically to rework the whole script to integrate yet another state machine.

This state machine would be responsible handling the main/high-level state changes for the Crew. We had been using a couple of booleans to determine some of the state (i.e. _isDead). I wanted to get those all replaced with actual states and really just get it working exactly as it did previously. This mostly involved just renaming some methods and changing how they were called. Instead of calling the method directly, we now moved the main state machine to that state and let the Enter/Update/Exit events handle the rest.

private void InitializeMainStates()
{
    var normalState = new SimpleState<CrewState>(CrewState.Normal);
    normalState.OnUpdate += OnUpdateMainStateNormal;
    _mainStateMachine.AddState(normalState);

    var deadState = new SimpleState<CrewState>(CrewState.Dead);
    deadState.OnEnter += OnEnterMainStateDead;
    _mainStateMachine.AddState(deadState);

    MoveToMainState(CrewState.Normal);
}

In the code above, you can see that not every state needed all three event types. CrewState.Dead only needs OnEnter because we can never leave that state and CrewState.Normal only has OnUpdate because it is the default and doesn't have any cleanup/teardown that it needs specifically.

Run Away!

Now that I had the Crew script reworked to be more "stateful" I was able to get back to implementing the Fleeing state. I was able to successfully grab a point on the arcs, now I needed to add in the Fleeing state to the state machine and ensure that it was being hit.

The problem was, unless I wanted to add a console log, I couldn't tell when they entered the Fleeing state. I could assume that it was being entered when their Morale broke but I couldn't be sure. I realized there was a blank spot on the Debug panel under the Crews' names that would be perfect to show the main state in. After slapping some code in, I got the following.

Debug panel showing the main Crew states

Now I could ensure that the Crew was in the state I thought they should be in. Next was getting them to actually run to the point they had selected. This seemed straight-forward on the surface. We had logic to control the animations and since they use a NavMesh we could just set the destination.

private void OnEnterMainStateFleeing()
{
    var fleePoint = GetRandomFleePoint();
    _navMeshAgent.SetDestination(fleePoint);

    _navMeshAgent.speed = _defaultMovementSpeed * _fleeSpeedModifier;
}

private void OnUpdateMainStateFleeing(float obj)
{
    UpdateMovementAnims();

    // Determine when to cower
}

private void OnExitMainStateFleeing()
{
    _navMeshAgent.speed = _defaultMovementSpeed;
}

Well, it was mostly that simple. The difficult part was getting the Speed animation variable to be set correctly. I found the InverseLerp function which allowed me to crunch the current speed down into a 0-1 value, based on the min and max speed that the Crew can move at. Normally, a Lerp function would take two values and a percentage, then return the "interpolated" value based on that percentage. The Inverse Lerp does the inverse of that (shocking, I know!). It takes the first two values like the Lerp but the third value is another "real" value. Then it returns what percentage would be needed to achieve that third value.

var value = Mathf.Lerp(0, 10, 0.5); // Returns 5

var percent = Mathf.InverseLerp(0, 10, 5); // Returns 0.5

Putting it all together, you get this.

private void UpdateMovementAnims()
{
    var currentSpeed = _navMeshAgent.velocity.magnitude;
    var normalizedSpeed = Mathf.InverseLerp(_defaultMovementSpeed, _defaultMovementSpeed * _fleeSpeedModifier, currentSpeed);

    _animator.SetFloat(_speedAnimHash, normalizedSpeed);
    _animator.SetBool(_isMovingAnimHash, IsMoving());
}

This almost worked. Logging the actual values everything looked good but the actual animation only seemed to barely be blending into the run animation. Taking a peek at the animation blend tree, I found that that "Threshold" was 0 for the Walk animation and 3.5 for the Running animation. This didn't look right to me, at least not for using the normalized speed like I wanted to. I changed it to be 0 and 1 for the Walk and Running animations, respectively.

Showing the thresholds in the anim blend tree being set to 0 and 1

With the thresholds adjusted everything was looking like it should. You can see them transition between the Normal and Fleeing states and going from walking to running (and them promptly dying...). Also, I know the run is goofy. That will probably change moving forward.

Gif of the Crew fleeing when they break

Cower in Fear

Now that the Crew would flee correctly, I needed to make them cower once they reached their flee point. A quick check to see if they reached their NavMesh destination and a simple state change and we were looking (mostly) good! They cower but I don't know why they are hovering off the ground a few inches. I wonder if the fix that Andrew did for the dying animation would work for this.

Gif of the Crew cowering once they reach their flee point

A problem I ran into though is that the full cower animation wasn't playing. I narrowed it down to the fact that the IsCowering anim variable was a boolean. When I changed it to a trigger, it played the animation correctly but I couldn't get out of the cowering state (because there isn't really a "negative" state of a trigger). After skimming the internet, I ran across a Unity forum post that recommended disabling the "Can Transition To Self" checkbox on the Transition. This did the trick and allowed the animation to run completely, like in the gif above.

Showing the 'Can Transition To Self' checkbox being unchecked in the anim transition

Soothing Their Fears

Our Crew can flee and cower. They are at the mercy of either the Player to rescue them or a glimmerstalker to eliminate them. However, the Player didn't have any tools to rescue the Crew. From our talk the other day, we had decided that the Player should be able to rescue the Crew by Soothing them. Once Soothed, the Crew would return to their spot by the Sled.

This was achieved by adding an OnSoothe event on the MoraleMechanic script and hooking into that. Then, if we are in the Fleeing or Cowering state, we move to the Returning state.

private void OnSoothed()
{
    if (!_mainStateMachine.IsInState(CrewState.Fleeing) && !_mainStateMachine.IsInState(CrewState.Cowering)) return;

    MoveToMainState(CrewState.Returning);
}

Here you can see that they start running back as soon as they are Soothed.

Gif showing the Crew being Soothed while fleeing

I did run into a problem when Soothing the Crew when they were cowering. I was hoping that they would start running, instead, they just kind of act like they are driving an invisible car back to the sled.

Gif showing a bug where the Crew doesn't stop cowering when they start moving back to the caravan

This turned out to be because I did not have a Transition set up for when IsCowering went back to false, so it was never leaving the Terrified/Cower anim state.

Showing the IsCowering false transition

After adding that in, the Crew came out of the cower like I would expect.

Gif showing the Crew being Soothed while cowering

Hopefully the Final Day of Soothing

The last thing I wanted to add to the Soothe spell was a change to the reticle when you are pointing at a target withing range. I was having a hard time determining if my Soothe spell would actually be applied to the expected target before I cast the spell.

To do this, I decided to expand the SpellBase class to include a method to check if it has valid targets. The intent was that the caller would essentially "dry run" the cast and see if anything would have been hit. By default, it won't do anything but can be overridden in the sub-class if they need that functionality.

// In base class
public virtual bool HasValidTargets(SpellCaster caster)
{
    // Do nothing by default
    return false;
}

// In sub-class
public override bool HasValidTargets(SpellCaster caster)
{
    var (didFindTarget, _) = GetTargetFromRayCast<ISoothable>();

    return didFindTarget;
}

I also added a property that determines if the targeting reticle should change for this spell. This was also where I learned that you can abstract a property. I've used abstract and virtual quite a bit in my career but I've never seen it used on a property. Surprisingly, this was exactly what I needed to avoid a bunch of weird parameter passing or something.

// In base class
public abstract bool ShouldChangeTargetReticle { get; }

// In sub-class
public override bool ShouldChangeTargetReticle => true;

Combining both of those in the SpellCaster's Update method, along with updating the ReticleUI class, looked like this

private void HandleHasValidSpellTargets()
{
    var activeSpell = _spells[_activeSpellIndex];
    if (!activeSpell.ShouldChangeTargetReticle) return;

    if (activeSpell.HasValidTargets(this))
    {
        _reticleUI.ShowSpellTargetValidReticle();
    }
}

And here is what it looks like in game. Now that I watch the gif, the color needs to be more contrast-y. It looked better in the actual game, as the gif gets compressed a little. However, the ideal change would be to change the actual shape of the reticle so we are not relying solely on color. It'll work for now though.

The reticle changing when in range and looking at a valid Soothe target

With that done, I was ready to merge in the latest changes from the team. They had been busy making awesome changes, like adding in the glimmerstalker and the gaquk!

Merging in Other Changes and Regrouping

I merged in their changes and had to resolve some merge conflicts (naturally). I'd love to figure out how to avoid those but when multiple team members are working in the same prefab, things get weird. Code conflicts I can handle. Another thing on the list to research further after the jam.

Anyway, I got through the conflicts pretty quickly. There wasn't anything serious and I know more what to look for now. When I ran the program everything initially seemed on the up and up.

Debug Panel showing the issues outlined below

Opening up the debug panel I noticed a couple of problems:

  1. The Soothe spell was displaying as a Minor Fear modifier instead of Soothed (though the actual value was being applied correctly)
  2. Major and Minor Fears are not configured as Timed modifiers
  3. Once Crew have Broke they can still be affected by modifiers
  4. The debug detail lines didn't expand to include all contents
    1. This shouldn't be much of an issue, since they will most likely not have that many modifiers applied at once. These stacked up over time because the Fear ones were not timing out (See #2 above)
    2. If we do end up having more modifiers, then that can be reworked but for now I'm going to leave it

Fixing the Soothed and Fear Morale Modifiers

The problem with the Soothed modifier turned out to be a "flaw" with using ScriptableObjects. When you set an enum value through the Inspector, it will always use the underlying value. I'm not really sure how it would work any other way, hence the quotes around "flaw". When I merged in the changes, both Andrew and I added new Morale Modifiers to the enum, changing what value my Soothed enum item was pointing to.

I knew there was a high probability of this happening, so I ended up adding mine at the end, since there was only one, and leaving the two that Andrew added at their original places. It was easily fixed by updating the value in the ScriptableObject instance. I could see that being a massive problem on larger projects though.

Likewise for the two Fear modifiers, it was as simple as setting the Clear Type to Timed instead of Manual and setting a duration. After fixing those, now everything is looking how I would expect.

Debug Panel showing the Fear modifiers now being timed

Fixing the Broke Morale State

The main problem with this is that once a Crew member has broken, they should remain in that state and not be affected by any Morale modifiers. It was being treated as a regular state, where if the Morale value passed a threshold it would change to the new state instead of ignoring everything.

This was a simple fix. When we go to change the state, we just don't if their current state is Broke.

if (_currentState != MoraleStatus.Broke)
{
    var newState = GetMoraleState(_currentMorale);

    SetState(newState);
}

Some More Cleanup

I ended up cleaning up the modifiers on the Debug window to only show the time remaining if it is actually a timed modifier. I also made it so they are explicitly on new lines. That helped clean up that column quite a bit.

Debug panel showing the updated modifier formatting

Unwrapping and Texturing a Goat

Today I got to shake things up a bit and work on some 3D stuff! Terra has been working on making a gaquk (a type of large goat in this world) that will be the beast of burden that pulls the sleds. She has been doing a phenomenal job getting the goat modeled, sculpted, and animated. However, she was itching to be done with it so she could work on other parts of the game. I offered to do the texturing while she finished up the animating.

Here were the base models I had to work with. I think she did an incredible job with this. It was the most complex model/sculpt she has done to date and her first time retopoing a high poly sculpt to a lower poly version.

Base models for the gaquk

Unwrapping

I unwrapped it following this tutorial by ProductionCrate . While this isn't a horse, I felt it was close enough to one and it got me there well enough. Some of the topology on the model wasn't as conducive for clean unwrapping but it was close enough that it wasn't very noticeable. Edge flow and topology are definitely on the list for further research after this jam. Though, probably on a less complicated model!

Once it was unwrapped, I brought it into Substance Painter and laid out some base colors to get a feel for what we wanted it to look like.

Color Blockout

This image of an ibex served as main inspiration for the goat overall, so I wanted to pull similar colors to that.

Reference image of an ibex

Here was the initial color blocking phase after baking the high-poly version down into the respective maps. It is amazing what you can do with normal maps and ambient occlusion. Overall I was pretty happy with the blockout. The eyes were a little intense but they would be tuned later.

Gaquk with initial color blockout

Main Body

Now that the blocking out was done, I could start trying to add some texture to the materials. I stared with the "wool" because it was the bulk of the body and I wanted it to look good (well, as good as I could make it!). Substance didn't have any raw wool textures built in, just wool fabric, which didn't quite look right, for obvious reasons. I was playing around with different textures and the closest one I could find was a concrete texture. It had enough texture to break up the forms and made it look chunky.

I thought it looked decent enough but when Terra saw it she said no. She asked if I had looked on Substance Painter's community asset site to see if they had any wool or fur textures. I did not know that was a thing, so I cruised around on there for a bit. I downloaded a few to try out but ultimately found that this fur texture looked the best for this use case.

Here is what that ended up looking like. While up close it gets a little "normal-y" once you give it a bit of distance it really looks like fur. I also added some color variation along the top to help break it up.

Gaquk with final body texture

Face

Next, I focused on the face, as that would be the next major focal point. For this, I added the same fur texture to it but increased the tiling count to make the fur smaller/finer and decreased the normal/height values to make it less contrast-y. It is pretty subtle but I felt like it added enough variation. I should have done more work on the actual snout/mouth to give it more detail but I wanted to move on.

Gaquk with final face texture

Eyes

Then I moved onto the eyes. Goats have really weird eyes and I ended up just taking an image of a goat eye and just projecting it onto the model. I did have to tone it down because the eye was way too bright for the overall tone of the model.

Gaquk with final eye texture

Hooves

The last things were the hooves and the horns. For the hooves, I just slapped a concrete texture onto them and called it a day. They are most likely going to be hidden by snow a lot of the time, so I got something that was good enough. Same with the edges between the legs and hooves. They are too sharp but they won't be seen up close.

Gaquk with final hoof texture

Horns

For the horns, I tried a couple of different textures but I couldn't find one that I liked. Terra had already sculpted the major ridges/rings into the horn so I was looking to add some finer details that I saw when looking up what ibex horns looked like up close. This was the reference that I was working off of

Reference image of ibex horn

I wanted to get more of those finer striations in between the larger grooves. I finally settled on a bark texture with increased tiling to make then small enough. Then I wanted to make those larger grooves really pop. The thing I tried that looked the best was adding a fill layer with a Metal Edge Wear generator for the mask. It wasn't looking quite right so I inverted the mask. That was the ticket and after adjusting the grunge/wear levels I was quite happy with the result.

Gif showing the different states of the horn texture

Final Textures

Here is the final textured model.

The final gaquk model with textures

The final gaquk model with textures. Closeup of head

One of the things that I struggled with was getting the masks to line up between the different folders/body parts. In order to prevent the normals from the main body to show up on the face, I had to mask out where the face was going to be, then try and match that exactly on both the Face and Body folder masks or else the white underlayer would show through. I think a better way of doing it would have been to enable the Normal channel on my base color layer in each folder, then set it to have a layer style of "Replace" and crank the value down to 0. That way it would provide a clean slate for the normals in the folder instead of trying to ensure masks masked correctly. This would have also needed to be done for the Height. Something to try on the next model.

Texturing the Harness

As you may have noticed, the gaquk model above does not include the harness. It is actually a separate object that is rigged to the same armature as the main model, so it deforms the same way. This was just a simple texture that was essentially a leather texture slapped on with some color adjustment and some edge wear added.

The final gaquk harness model with textures

Adjusting the Sled

When I originally made the sled, it was basically just as a prop that would sit in a static "beautiful corner". Because of that, the poles that would attach to a beast of burden were static as well. They couldn't be moved from where the ends rested on the ground. This posed a problem because our beast of burden exists above ground. To fix this, I had to separate the poles from the sled body so we could add and position them properly in Unity.

I had to ensure that the pivot point of the pole was in the "eyelet" so it could rotate naturally from where it was connected to the sled.

here is what that looks like in engine with the awesome walk animation that Terra completed in the meantime! For never having animated before, I think she did a swell job. Also, please ignore the fact that there is only one pole on the sled. There should be a companion one on the right side of the gaquk as well.

Gif of the gaquk walking in Unity with the sled

Even More Soothing

Now that the gaquk was out of the way, I could get back to finishing the Soothe spell (hopefully). The first thing I needed to do was to ensure that the modifier was being applied correctly and more importantly, that it was being cleared correctly.

To do this, I expanded the debug panel to have a column showing the modifiers active on a given character. Then, I added the logic in the code to populate it. If it has a (-) then that means that it has to be manually cleared. Otherwise, it will show the current time left on the modifier.

Debug panel now updated to show the active modifiers

The good news was that the Soothed modifier was clearing itself like it was supposed to when the timer ran out. The bad news (at least in my opinion) was that when you cast Soothe on the same character again, the existing timer was not being reset. I feel like that made it tedious because you had to wait until the modifier dropped before you could apply it again and I felt that you should be able to "top it up" especially since it would still consume your energy either way.

To do this, I reworked the casting logic. If the max number of modifiers (of that type) were already present, then find the oldest one and reset its timer. If the max number hasn't been reached yet, it will just add a new one like usual.

var modifiersWithSameTemplate = _modifiers.Where(m => m.Template.Type == modifierType).ToList();
if (modifiersWithSameTemplate.Count >= modifierTemplate.MaxInstances)
{
    if (modifierTemplate.ClearType == MoraleModifierClearType.Manual) return;

    var oldestModifier = modifiersWithSameTemplate.OrderBy(m => m.Timer.TimeRemaining).First();

    oldestModifier.Timer.Reset();

    return;
}

This worked and felt much better to do. Unfortunately, that was all I was able to get done. Hopefully tomorrow I can actually get the Soothe spell finished!

Gif showing the Soothed modifier being reapplied before the timer expires

Soothing Continued

Getting Things Configured

Today was spent adding some missing pieces to get the Soothe spell testable in the game. I needed to create the actual instance of the Soothe Spell ScriptableObject so I could configure it and assign it to the Player's spell list.

Soothe Spell config in Inspector

Now that it has been created, I slot it into the Player's spell list and now it shows up as a usable spell in-game!

Player spell list in Inspector with the Soothe spell added

The Spell Slot ui in game showing the Soothe spell

I am reusing the "man with hearts" icon until we can get proper icons put in. It fit the best, even though it is also used for the "stalking" Crew icon...we only have so many placeholders in the game so far!

Testing the Spell

Now that everything is configured, I was able to start testing it. The first problem I ran into was the "range" for the spell was way, way too low. I practically had to be hugging the Crew in order to Soothe them. Granted, a hug would probably also be soothing but I wanted something with a little more distance!

Gif of the Soothed morale modifier being applied to Crew

I adjusted the range and was able to get the Soothed Morale modifier applied, as you can see if you look at Lee's Morale value in the gif above. However, I feel like it isn't always picking up the target when I do the raycast. I need to do some more testing on it but ran out of time tonight. Another thing I want to do is expand the debug panel to show the morale modifiers that have been applied and their timings (if any). That sounds like a problem for tomorrow

Soothing the Crews' Fear

I didn't have as much time to work on this today but I did get most of the way through the adding the Soothing spell into the game. We wanted to give the Player a way to combat the negative Morale modifiers with a temporary hit of happy-juice. Enter, the Soothe spell. The Player points at a Crew member, casts the spell, and the Crew has a few moments of reprieve from the constant harassment of the Glimmerstalkers.

Now we have a new Soothe Spell ScriptableObject available to be created

Displaying the Soothe Spell Slot

The rest of the time was mostly spent working on getting the raycast code written up, as well as adding in the supporting pieces, like the Soothed Morale modifier and an ISoothable interface.

For the raycasting, I am flipflopping between doing a single raycast and checking if it is an ISoothable or doing a RaycastAll and grabbing the closest one. I initially went with the RaycastAll to ensure that other things didn't get in the way but I am leaning more towards the single cast. That would make it work more like a typical raycast call that only expects one actual target. I think I originally went with the RaycastAll because I wasn't confident that it would work. I have some testing to do, so I'll be playing around with both.

As far as the morale modifier is concerned, this will be our first "timed" modifier, so I'll finally get to test that system fully.

The Soothe ScriptableObject in the Inspector

Morale Continued

Today was spent cramming to get the Morale system out before the end of the weekend. A lot of the features we needed to work on next interact with the Morale system. I was kind of holding up the whole train.

The biggest thing preventing me from getting the system out was the need to refactor several of the larger systems to better support the increased complexity. Namely, how the Warmth states were being handled and how the Icon Trays worked.

Reworking the States

The Problem

If you looked at the code from the post the other day, you might not see the problem right away. When the Crew warmth state was that simple, there wasn't really anything wrong with it. For easy reference, here is the code from the other day.

private void HandleWarmthStateChange(WarmthStatus state)
{
    switch (state)
    {
        case WarmthStatus.Freezing:
            _freezingTimer.Start();
            _moraleMechanic.AddModifier(MoraleModifierType.Freezing);

            break;
        default:
            _freezingTimer.Stop();
            _freezingTimer.Reset();
            _moraleMechanic.RemoveModifier(MoraleModifierType.Freezing);

            break;
    }
}

Seems simple enough on the surface. Either we are Freezing or we are not. If we're Freezing, start the timer and add the Morale modifier. If we are not Freezing, reset everything. This worked fine and dandy when we only had the Freezing and "Normal" states but it broke down really quickly once we started to add in the other states.

Andrew was working on adding in the other Warmth states (Warm and Hypothermia) and just extended the pattern that was already there. That looked like this:

private void HandleWarmthStateChange(WarmthStatus state)
{
    ClearWarmthIcons();

    switch (state)
    {
        case WarmthStatus.Warm:
            _iconTray.AddIcon(IconKeyUI.Warm);
            HandleTimer();
            break;

        case WarmthStatus.Hypothermia:
            _iconTray.AddIcon(IconKeyUI.Hypothermia);
            HandleTimer();
            break;

        case WarmthStatus.Freezing:
            _freezingTimer.Start();
            _iconTray.AddIcon(IconKeyUI.Freezing);

            break;
        default:
            HandleTimer();

            break;
    }
}

As you can see, it is still pretty clean but if you look closely, you'll notice two things: the call to ClearWarmthIcons at the top of the method and the HandleTimer call that is called from every state except Freezing.

The ClearWarmthIcons is a sleeper problem that I'll go over more in the "Reworking the Icon Tray" section below. The HandleTimer is more straight forward. The contents of that method are essentially the contents of the default case in the original code. It is responsible for resetting the Freezing timer and removing the Freezing morale modifier. With the current code, we can't really tell what state we were in last so we can't intelligently clean up the Freezing state stuff (or the icons).

I had thought about adding a field to track the last state, the checking if the last state was Freezing and do the reset then. However, this seemed like just kicking the can somewhat down the road. If we needed to handle specific states, we'd have to add checks in for each previous state and handle it. It didn't seem very expandable.

private WarmthStatus _lastWarmthState;

private void HandleWarmthStateChange(WarmthStatus state)
{
    switch (_lastWarmthState)
    {
        case WarmthStatus.Freezing:
            // Clear Timers
            break;
        case WarmthStatus.Normal:
            // Do stuff
            break;
    }

    // Rest of the method
}

Another option that I tossed about was something I'd seen early on in my career (where switch-based "state machines" were abused) was to add more states to the WarmthStatus to include things like:

WarmthStatus.EnterFreezing
WarmthStatus.Freezing
WarmthStatus.ExitFreezing

Then you add more cases into the switch statement to do your setup and teardown. This is really unruly and only really works if you have a very linear flow to the states. What I was really heading towards though was a simple state machine.

MoveTo(StateMachine)

To my thinking, a simple state machine could be the ticket for managing all of the states and ensuring that we no longer have any issues with setup and teardown.

I started with creating a StateMachine class and an IState interface. I'll start with the IState, so the state machine makes more sense. The interface is incredibly simple. Each state has a Type (i.e. the key/state it represents) and Enter/Exit methods.

public interface IState<TState>
{
    TState Type { get; }

    void Enter();
    void Exit();
}

The state machine would have methods for registering/adding states to it and moving to a given state. This was built with the intention of utilizing an enum as the defining factor for the keys/state names, hence the generic param. I have excluded most of the safety checks for brevity.

public class StateMachine<TState>
{
    private readonly Dictionary<TState, IState<TState>> _states = new();
    private IState<TState> _currentState;

    public void AddState(IState<TState> state)
    {
        _states.Add(state.Type, state);
    }

    public void MoveToState(TState type)
    {
        if (!_states.TryGetValue(type, out var state)) return;

        _currentState?.Exit();

        _currentState = state;

        _currentState.Enter();
    }
}

It is a very simple implementation. You can add any number of states, then when you want to MoveTo the state, you just pass in the state to use. If there is a current state it will call the Exit method on it, then call Enter on the new state. This allows us to put setup logic in the Enter method and teardown in the Exit method.

While I built it with the intention of making specific IState implementations for each state, I ultimately didn't go that route. The main reason was because I didn't want to deal with passing in all the information/objects that the states might need. That would typically be handled by a blackboard or similar. Given the fact that this was for a game jam and my two other team mates aren't as familiar with game programming (not that I really am either...it is the slightly less blind leading the blind). Instead, I decided to make a SimpleState implementation that just fires events when the Enter/Exit methods are called on it.

public class SimpleState<TState> : IState<TState>
{
    public event Action OnEnter;
    public event Action OnExit;

    public TState Type { get; }

    public SimpleState(TState type)
    {
        Type = type;
    }

    public void Enter()
    {
        OnEnter?.Invoke();
    }

    public void Exit()
    {
        OnExit?.Invoke();
    }
}

The main benefit of this is that it keeps all of the logic in the class that owns the state machine. The main downside is that it makes the owning class a little...verbose... Here is how the Warmth state machine is being initialized. You can see that we create a new state then assign event handlers for the Enter and Exit events on each one.

private readonly StateMachine<WarmthStatus> _warmthStateMachine = new();

var warmState = new SimpleState<WarmthStatus>(WarmthStatus.Warm);
warmState.OnEnter += OnEnterWarmthStateWarm;
warmState.OnExit += OnExitWarmthStateWarm;
_warmthStateMachine.AddState(warmState);

var normalState = new SimpleState<WarmthStatus>(WarmthStatus.Normal);
_warmthStateMachine.AddState(normalState);

var hypothermiaState = new SimpleState<WarmthStatus>(WarmthStatus.Hypothermia);
hypothermiaState.OnEnter += OnEnterWarmthStateHypothermia;
hypothermiaState.OnExit += OnExitWarmthStateHypothermia;
_warmthStateMachine.AddState(hypothermiaState);

var freezingState = new SimpleState<WarmthStatus>(WarmthStatus.Freezing);
freezingState.OnEnter += OnEnterWarmthStateFreezing;
freezingState.OnExit += OnExitWarmthStateFreezing;

_warmthStateMachine.AddState(freezingState);

Here is what the Freezing event handlers look like:

private void OnEnterWarmthStateFreezing()
{
    _freezingTimer.Start();

    _moraleMechanic.AddModifier(MoraleModifierType.Freezing);
    _iconTray.AddWarmthIcon(WarmthStatus.Freezing);
}

private void OnExitWarmthStateFreezing()
{
    _freezingTimer.Stop();
    _freezingTimer.Reset();

    _moraleMechanic.RemoveModifier(MoraleModifierType.Freezing);
    _iconTray.RemoveWarmthIcon(WarmthStatus.Freezing);
}

As you can see, now we can handle starting the timer and cleaning it up in a nice, isolated manner. It doesn't matter what state we are coming from, nor where we are going. It takes care of everything it cares about.

This also made it really easy to add in another state machine to handle the Morale states, which have similar needs. Now, it was on to reworking the Icon tray and taking care of that sneaky ClearWarmthIcons call.

Reworking the Icon Tray

I needed to add a couple more icons to be displayed in the icon tray. Since I didn't build the icon tray system, I started digging into it to understand how it worked. While the overall structure was pretty good, there were a couple things that I noticed right off the bat.

  1. The ClearWarmthIcons method clears out all of the icons and then the appropriate ones are reapplied every frame.
    1. Depending on how it was being handled, this could be fine, if excessive. However, I found that the icon GameObjects were being destroyed and instantiated every time. If you are not as familiar with Unity, this can cause a ton of overhead and potentially big chuggies when the garbage collector comes around. Honest mistake but still problematic
  2. There was a separate enum that holds all of the icon names but it doesn't quite map easily to the individual enums we already had (e.g. WarmthStatus and MoraleStatus)
    1. There was nothing wrong with this approach, it was just something that stood out to me
  3. The icon tray was being dynamically spawned and attached to the Crew
    1. Again, there isn't anything particularly wrong with this but I felt that it would be better to just make it a child of the actual Crew prefab so we don't have to worry about it not being there and could move almost all of the configuration on the component instead of needing it in the Crew script
      1. For example, the "Icon Library" was being defined in the Crew script and having to be passed in. After the rework, all of that config just lived on the Icon Tray itself

My main goal of the rework was to do the following:

  1. Change the individual "icon tray item" UI pieces to use existing instances and hide/show them instead of destroying and instantiating them every time
  2. Consolidate the icon items to be more by "type"
    1. Even though we have a handful of Warmth-related icons, we only ever want one to be shown at a time. Same with Morale.
  3. Rework where the icon tray lived and how it got its configuration.

Note: I know this sounds like a lot of negatives for this system, but that is only because that was what I was focusing on refactoring. There were quite a few good features in the icon tray that I did not have to touch (or they got touched incidentally because something else did). The overall structure for almost all of it was left intact but the coolest piece of it all was the dynamic resizing of the icons based on how close you were to the Crew. That was really cool and was left completely as-is. Good job, Andrew!

Refactoring the Icon Tray Icons

This refactor would hopefully take care of the first two goals. The idea was to replace the icon tray item spawning with discrete instances, one for each main "type" of icon that the tray supports. This would mean I only had to manage one instance per type, hiding it when no icons of that type were being displayed and showing it when appropriate. No need to instantiate or destroy on the fly and I get the "segregated" icons. Win-win!

Here is what it looked like after the initial refactor. We have one icon tray item for each "slot" we have on the tray. They all get initialized the same way, to ensure they all look consistent and are set up to utilize that nifty distance-scaling feature.

private void Awake()
{
    _camera = Camera.main;
    _baseScale = transform.localScale;

    _warmthTrayItem = InitializeTrayItem();
    _moraleTrayItem = InitializeTrayItem();
    _stalkedTrayItem = InitializeTrayItem();
}

private IconTrayItemUI InitializeTrayItem()
{
    var trayItem = Instantiate(_itemPrefab, _rowRoot, false);
    trayItem.SetSize(_iconSizePx);
    RemoveIcon(trayItem);

    _allTrayItems.Add(trayItem);

    return trayItem;
}

Next was expanding that concept to add "slot" specific methods for adding and removing icons. Originally, it was a more generic "AddIcon" method that took that enum I was talking about. I wanted to move away from that to prevent someone from trying to add multiple icons of the same type accidentally. Here is an example of the Warmth icons:

public void AddWarmthIcon(WarmthStatus status)
{
    var icon = _iconLibrary.GetWarmthSprite(status);

    AddIcon(_warmthTrayItem, icon);
}

public void RemoveWarmthIcon(WarmthStatus status)
{
    RemoveIcon(_warmthTrayItem);
}

As you can see, the icon type separation goes all the way down to the Icon Library (more on that in a second). Then we just pass that to the AddIcon method, along with the slot that it should show up in. The AddIcon method is responsible for setting the sprite and ensuring it is visible (if we have a valid sprite) and the RemoveIcon does the opposite.

private void AddIcon(IconTrayItemUI trayItem, Sprite icon)
{
    if (icon == null)
    {
        RemoveIcon(_moraleTrayItem);
    }
    else
    {
        trayItem.SetSprite(icon);
        SetItemVisibility(trayItem, true);
    }
}

private void RemoveIcon(IconTrayItemUI trayItem)
{
    trayItem.RemoveSprite();
    SetItemVisibility(trayItem, false);
}

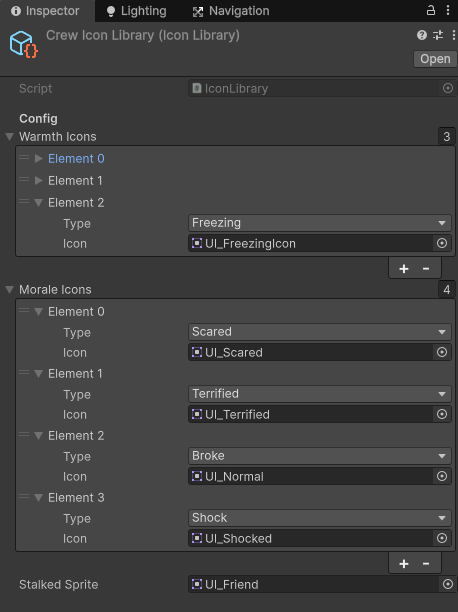
This makes sure all the slots work the same but provides a more explicit interface to get the icons that you want. Speaking of getting the right icons, our Icon Library is a ScriptableObject, so we can have different Icon Libraries if we wanted to (like for different types of characters or something).

[CreateAssetMenu(fileName = "IconLibrary", menuName = "THGJ22/Icon Library")]
public class IconLibrary : ScriptableObject
{
    [Header("Config")]
    [SerializeField]
    private List<IconKeyValue<WarmthStatus>> _warmthIcons = new();

    [SerializeField]
    private List<IconKeyValue<MoraleStatus>> _moraleIcons = new();

    [SerializeField]
    private Sprite _stalkedSprite;

    public Sprite GetWarmthSprite(WarmthStatus status)
    {
        var icon = _warmthIcons.FirstOrDefault(w => w.Type == status);

        return icon?.Icon;
    }

    public Sprite GetMoraleSprite(MoraleStatus status)
    {
        var icon = _moraleIcons.FirstOrDefault(w => w.Type == status);

        return icon?.Icon;
    }

    public Sprite GetStalkedSprite()
    {
        return _stalkedSprite;
    }

    [Serializable]
    private class IconKeyValue<T>
    {
        [field: SerializeField]
        public T Type { get; private set; }

        [field: SerializeField]
        public Sprite Icon { get; private set; }
    }
}

I ended up following the same pattern I talked about in the "Housekeeping and Morale" post the other day to make the "dictionary" visible in the Inspector, hence the private class at the bottom. Pretty simple, other than that. Here is how it looks in Unity.

Icon Library config in Inspector

Reworking where the Tray lived

The last part of the rework was to rearrange who owned "spawning" the icon tray and where its configuration was stored. The prefab and the actual icon library used to live on the Crew script but we've been trying to break out (potentially) independent systems into their own components, so I thought it made more sense to expand the existing IconTrayUI script to own more of that. Now you can set the icon library and the icon size per tray, unlike before.

I also moved the actual tray to always be on the Crew prefab instead of being dynamically spawned in. This is what that looks like in Unity.

Icon Tray config in Inspector and placement in prefab

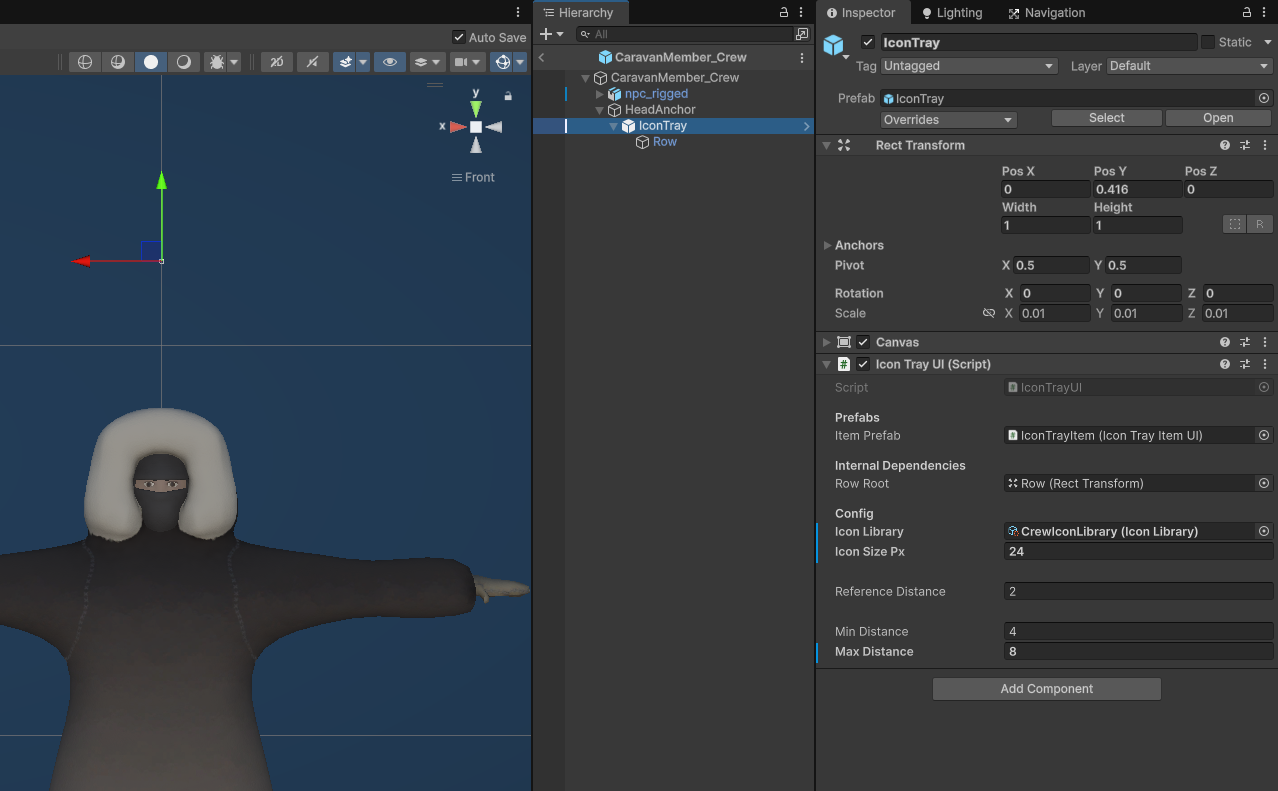
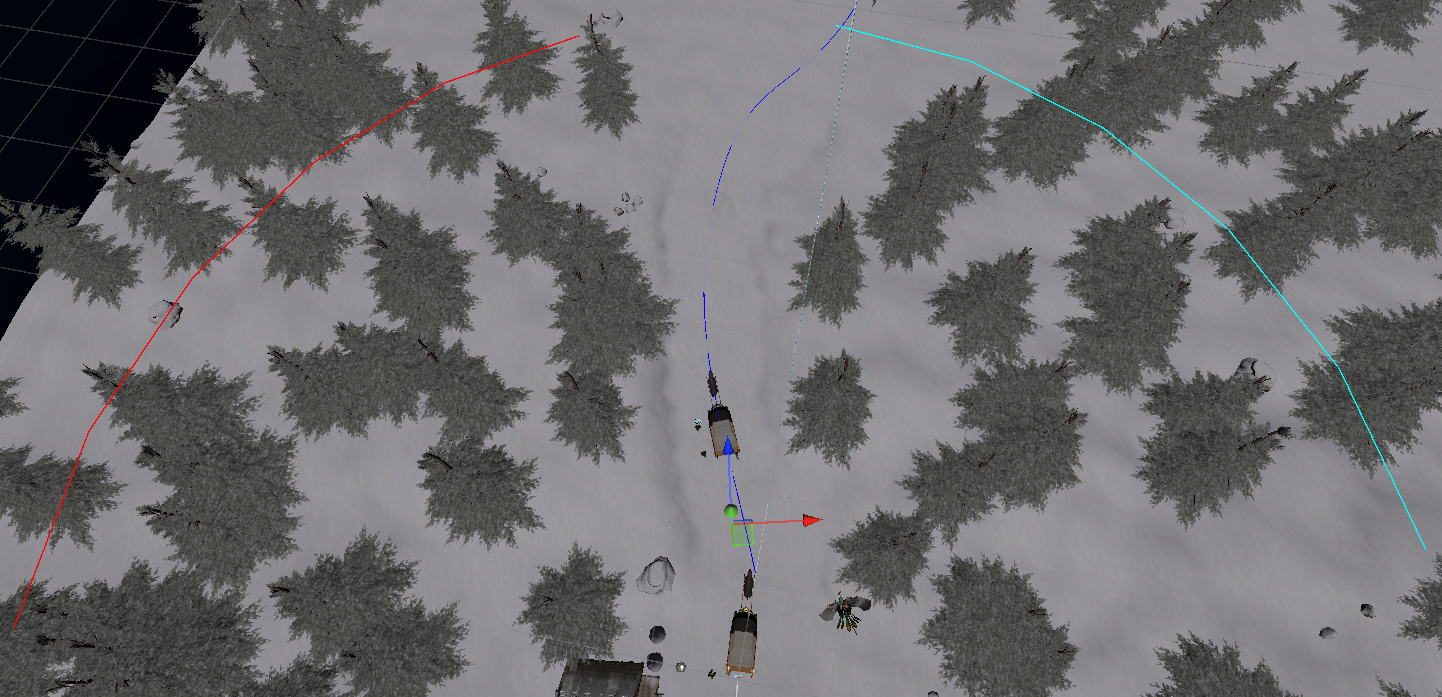
The Row child GameObject of the IconTray has a Horizontal Layout Group that takes care of dynamically positioning the icon "slots" when they are enabled and disabled. I didn't add this, Andrew already had it. I just wanted to call it out because it was really helpful to have that already set up.

The Final Result

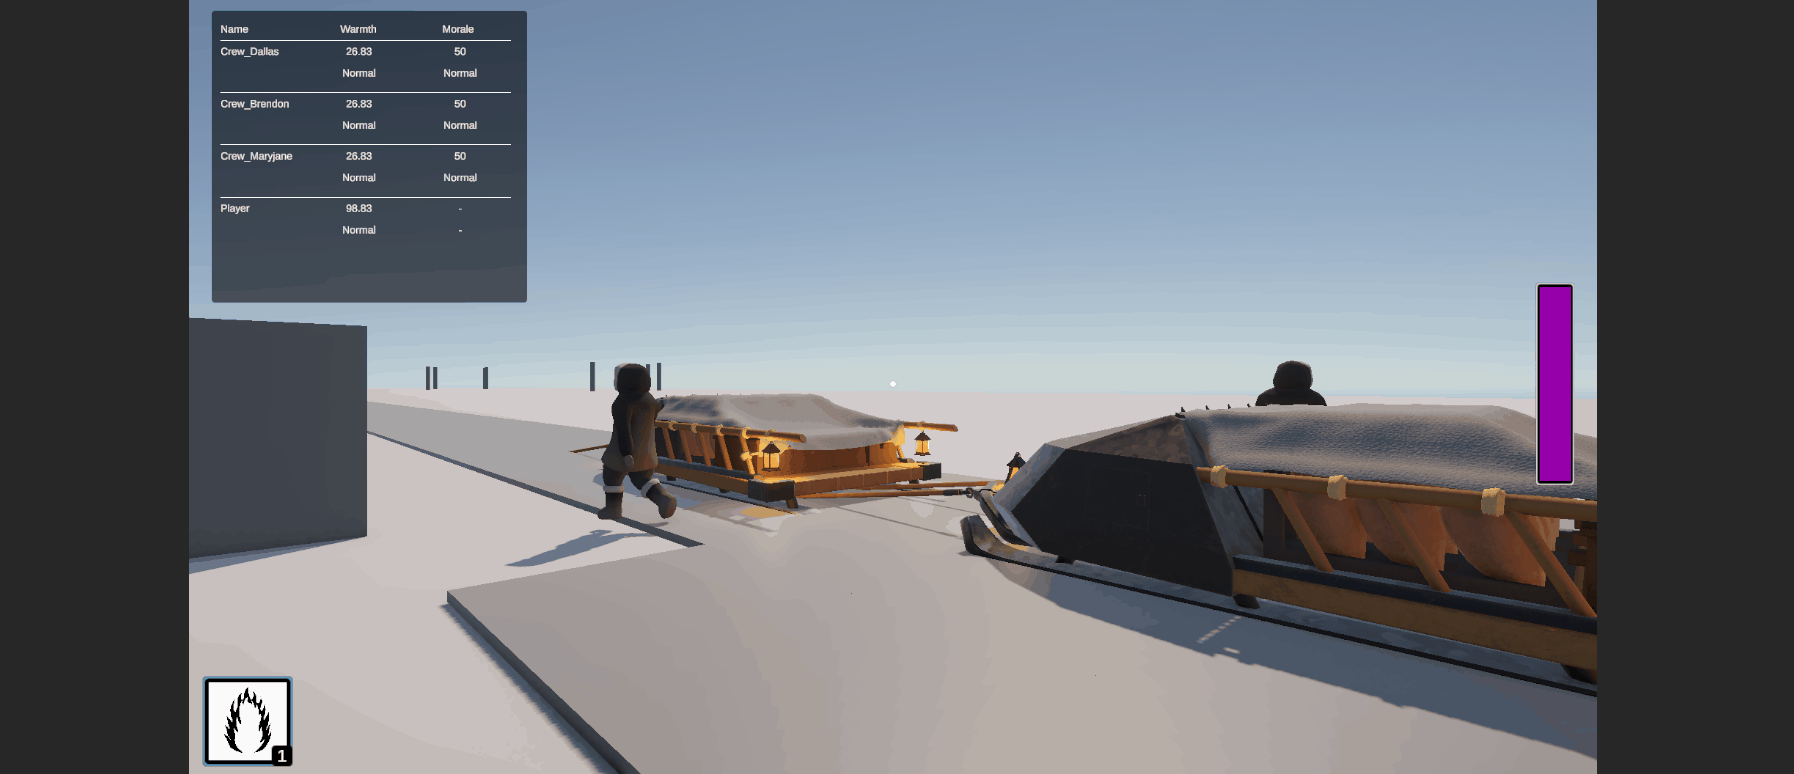
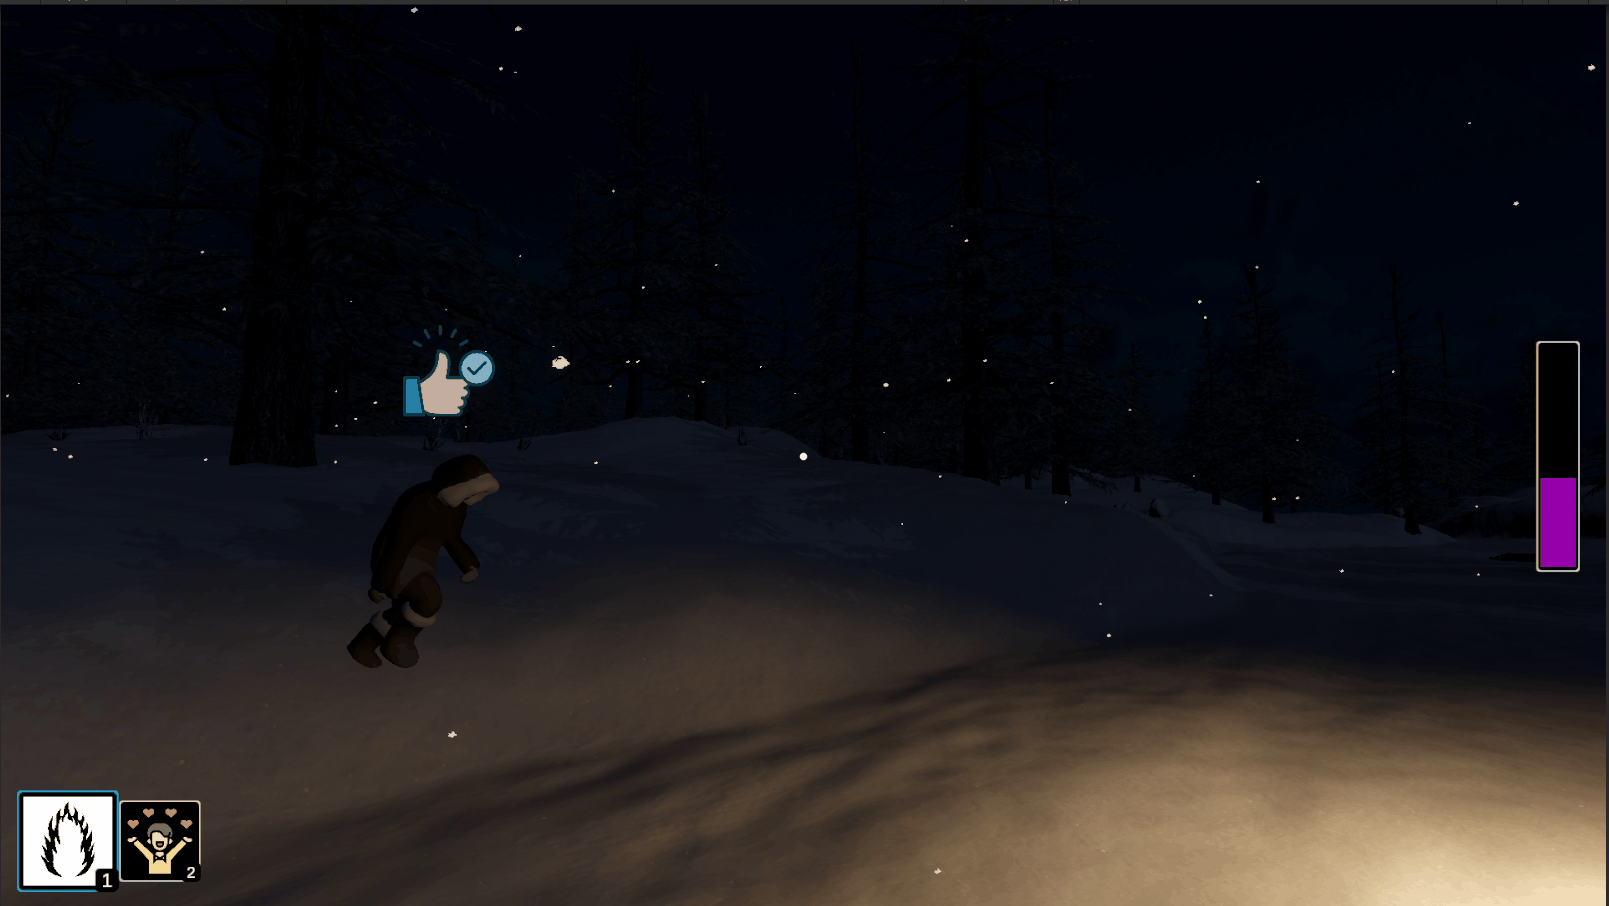
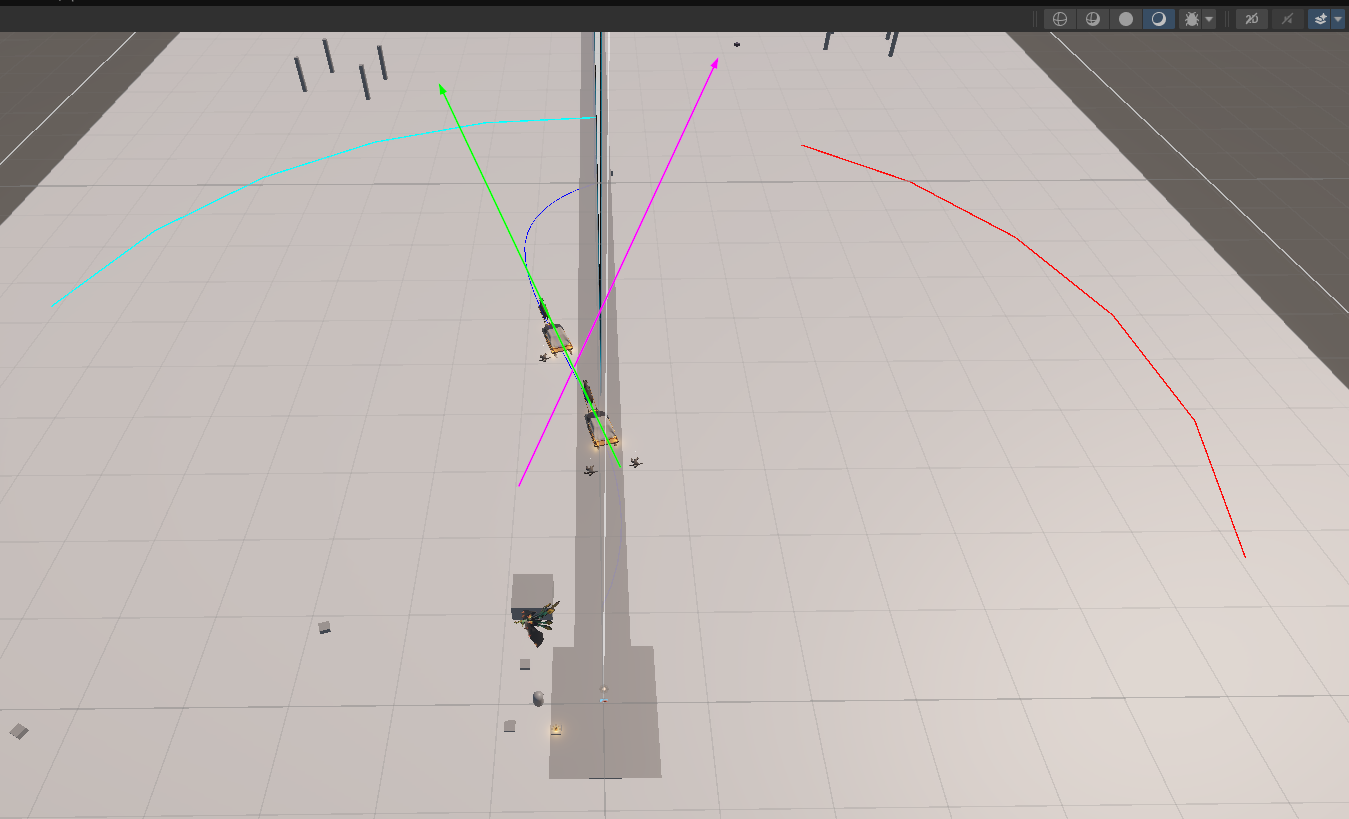
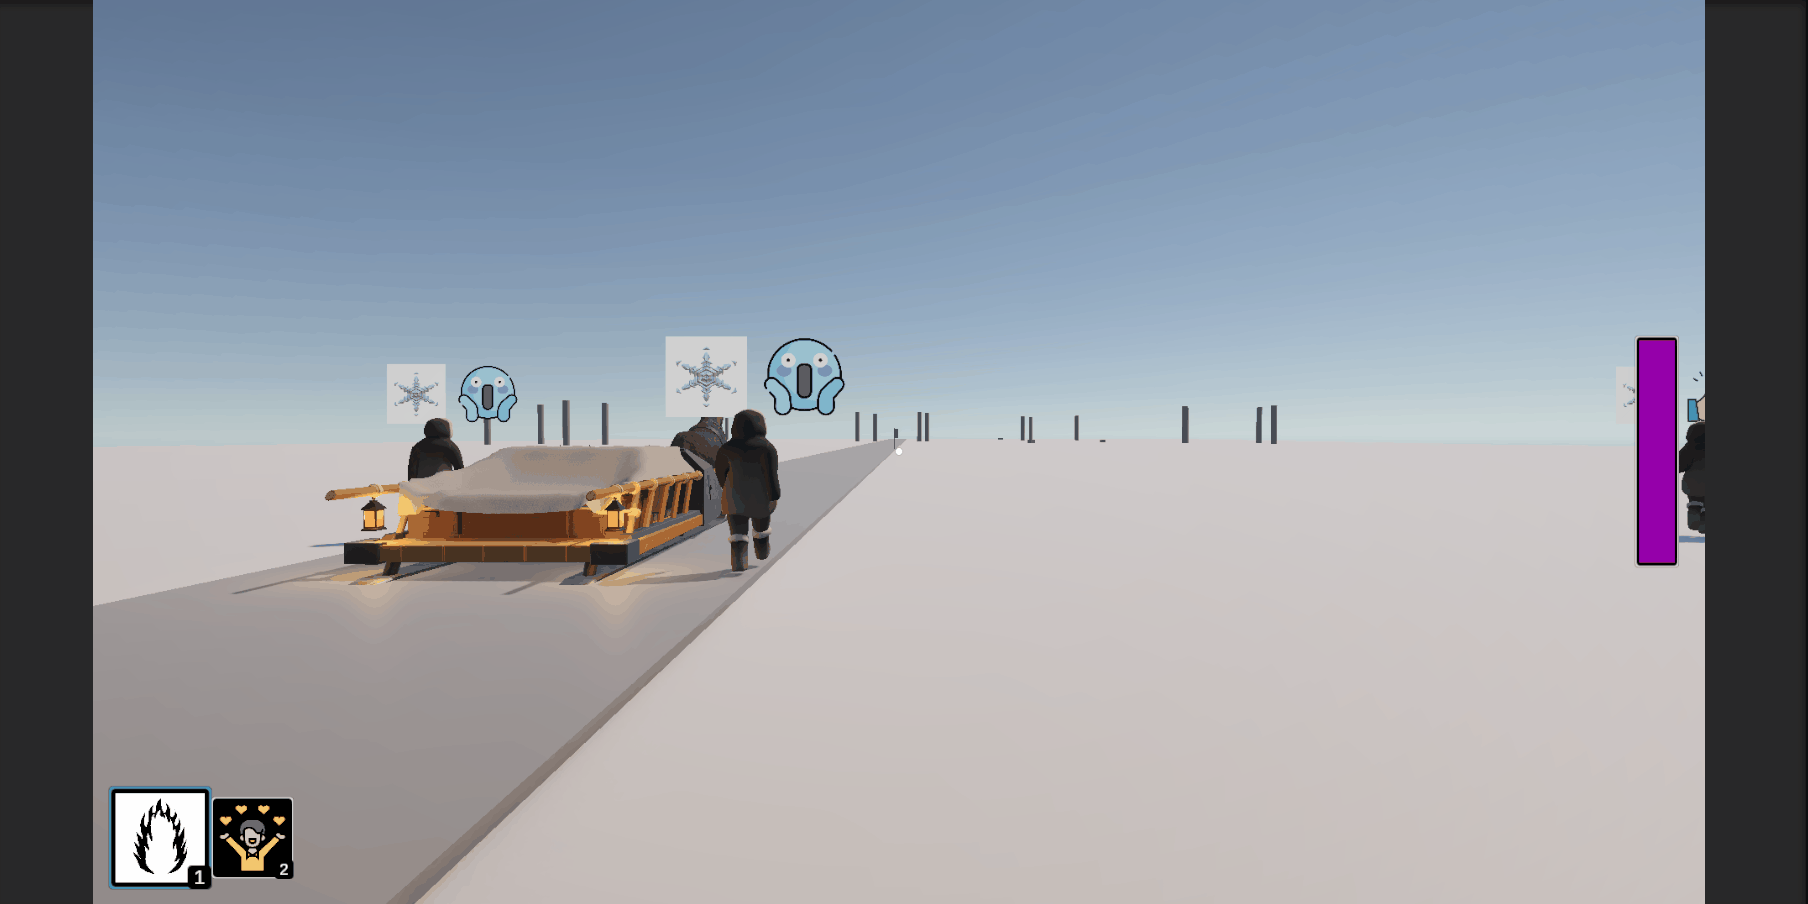
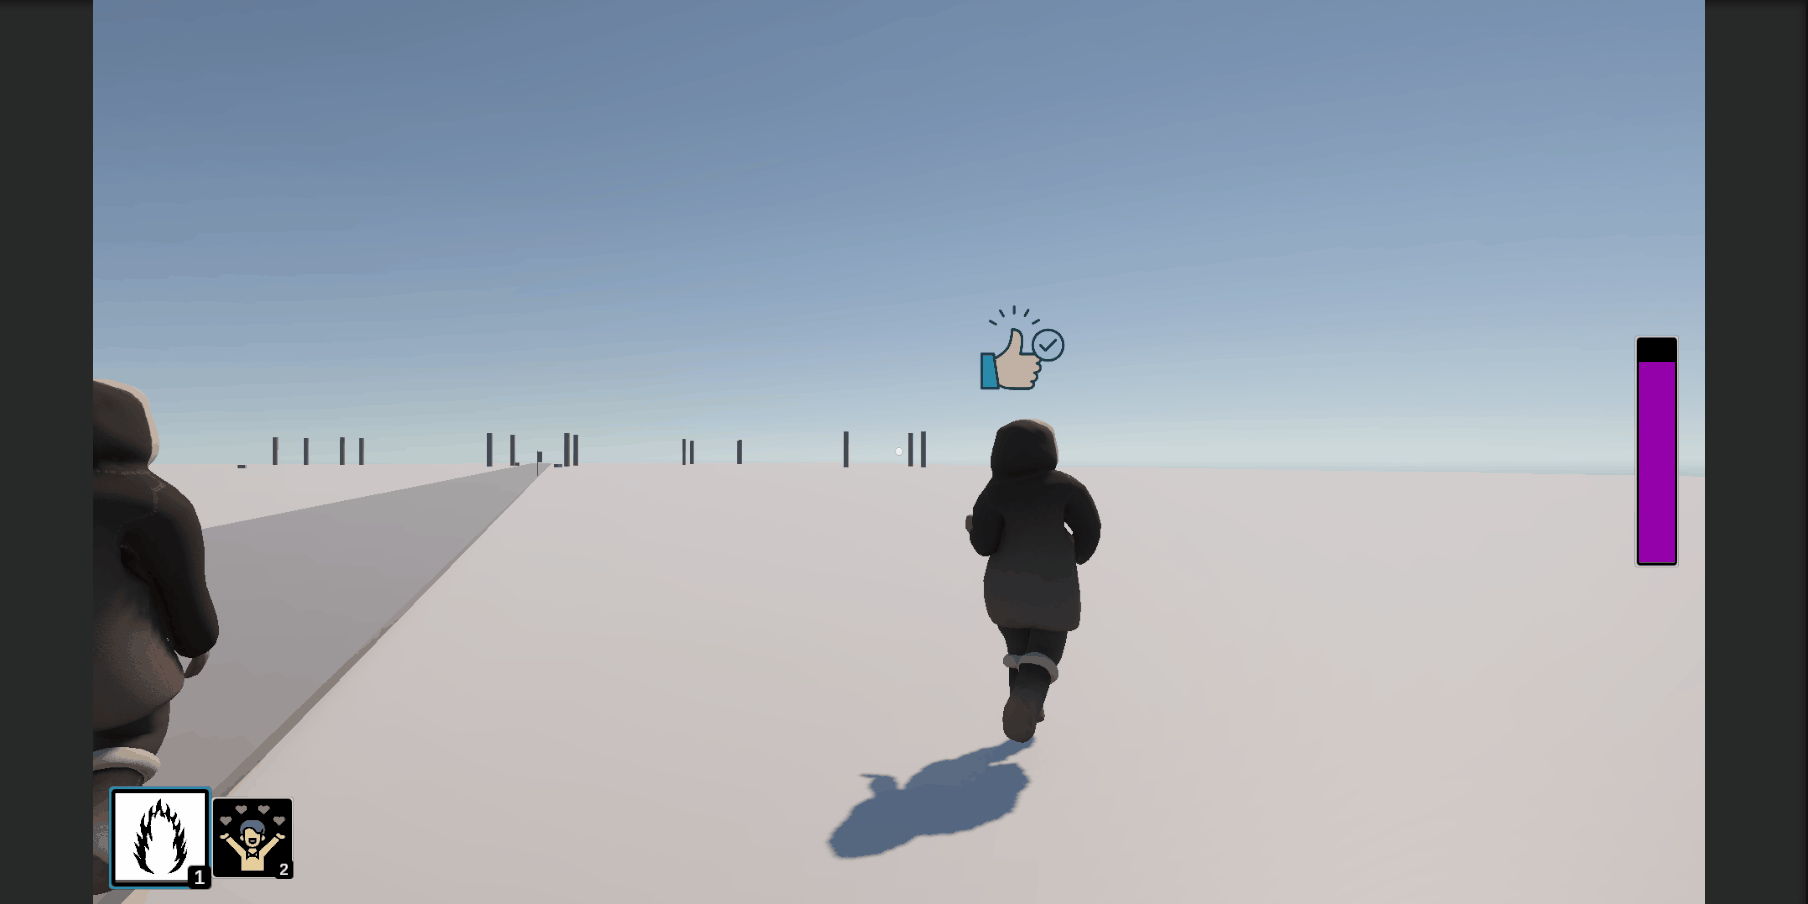
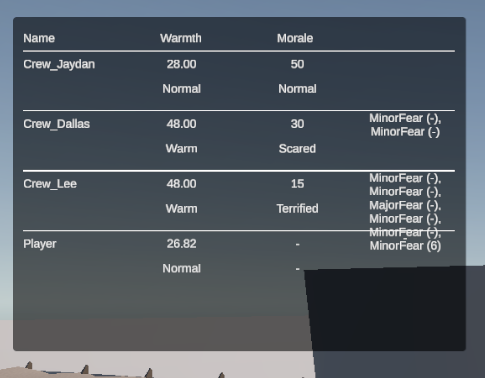
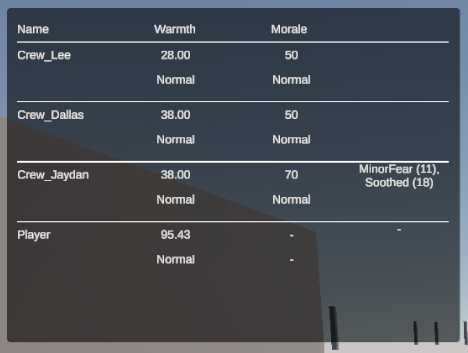
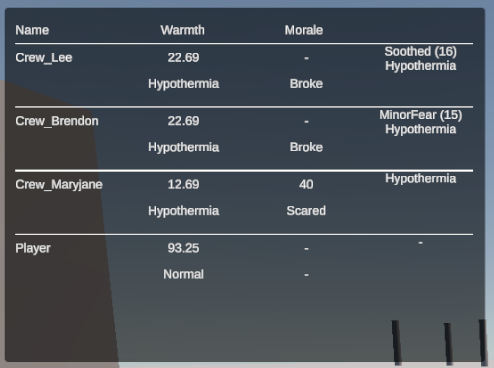
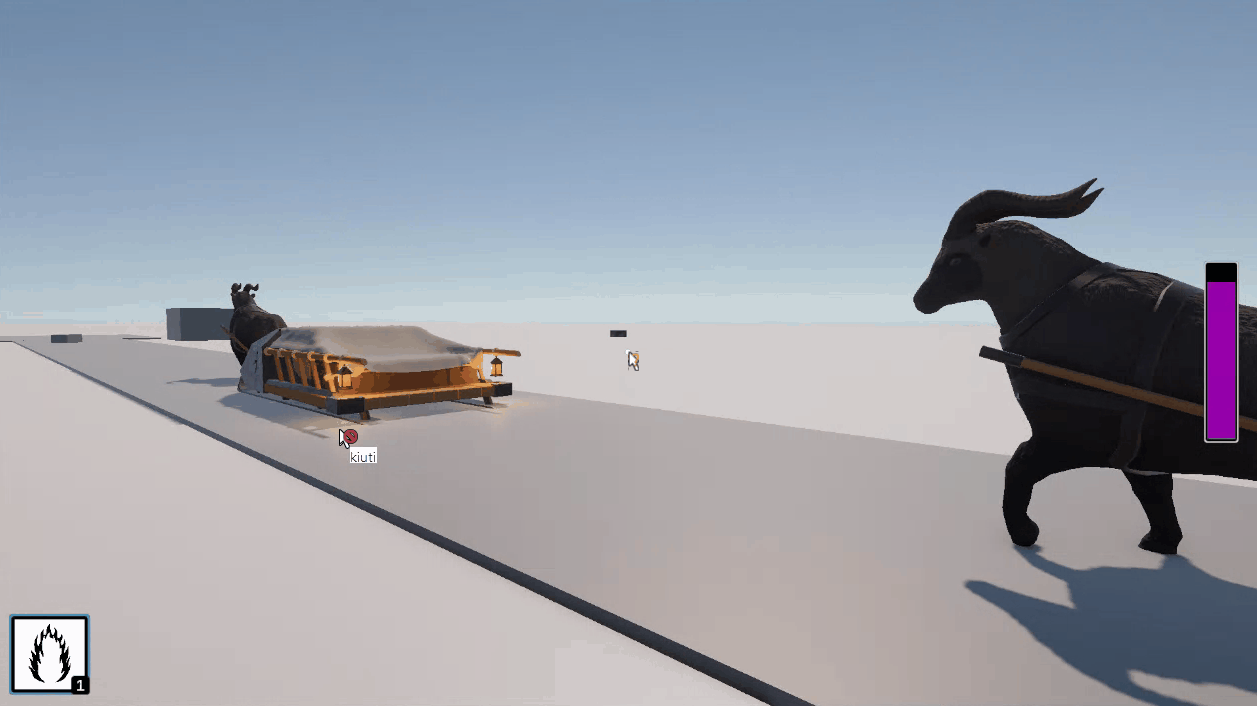
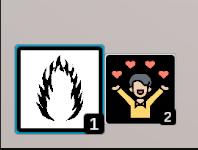
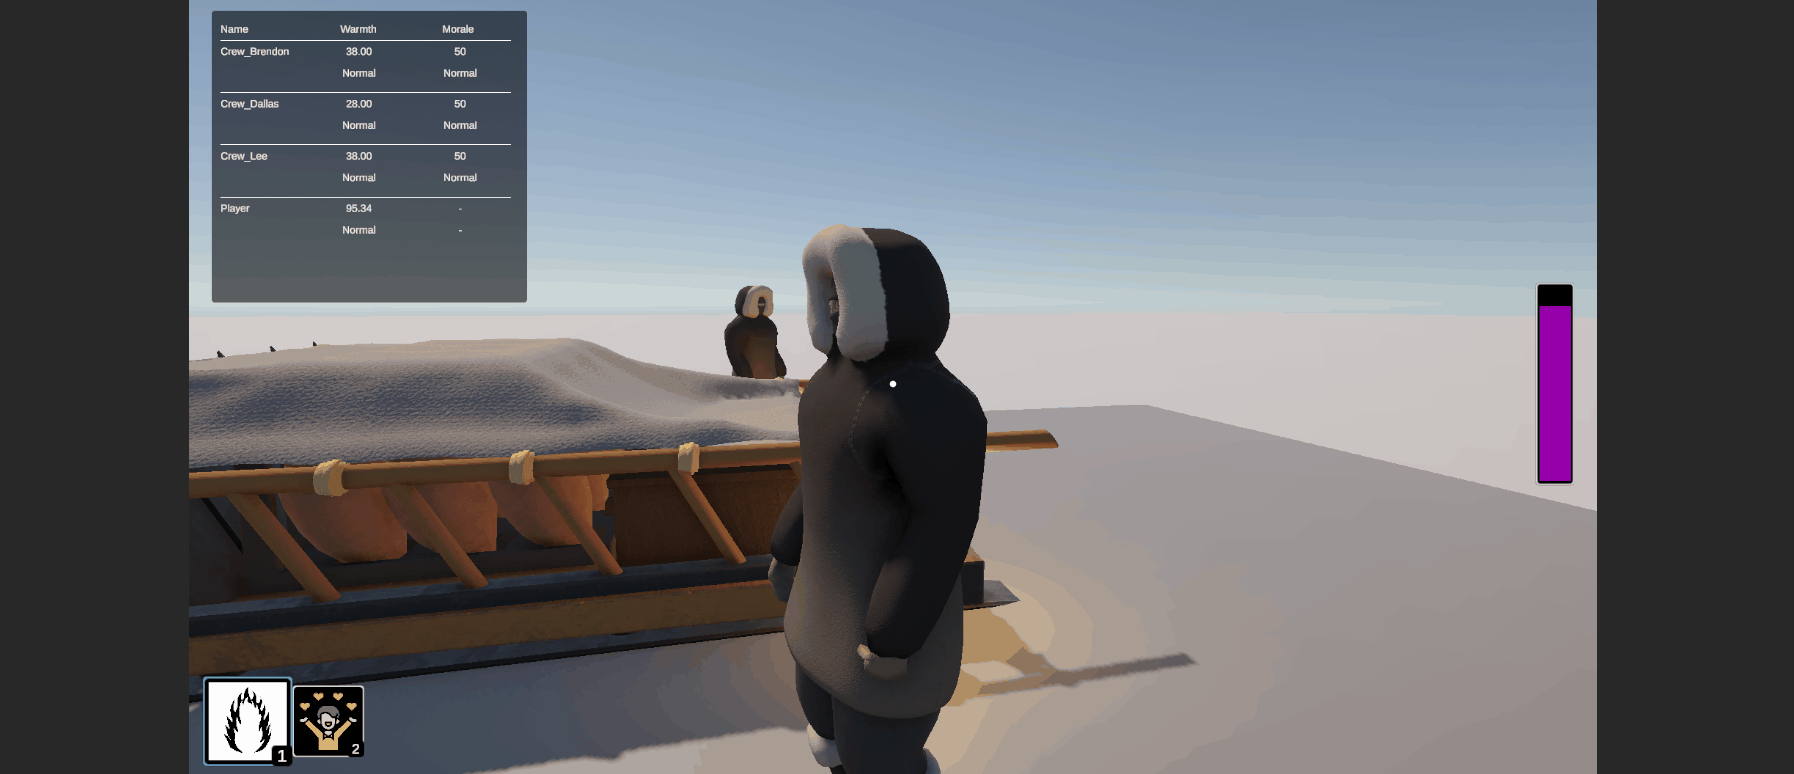
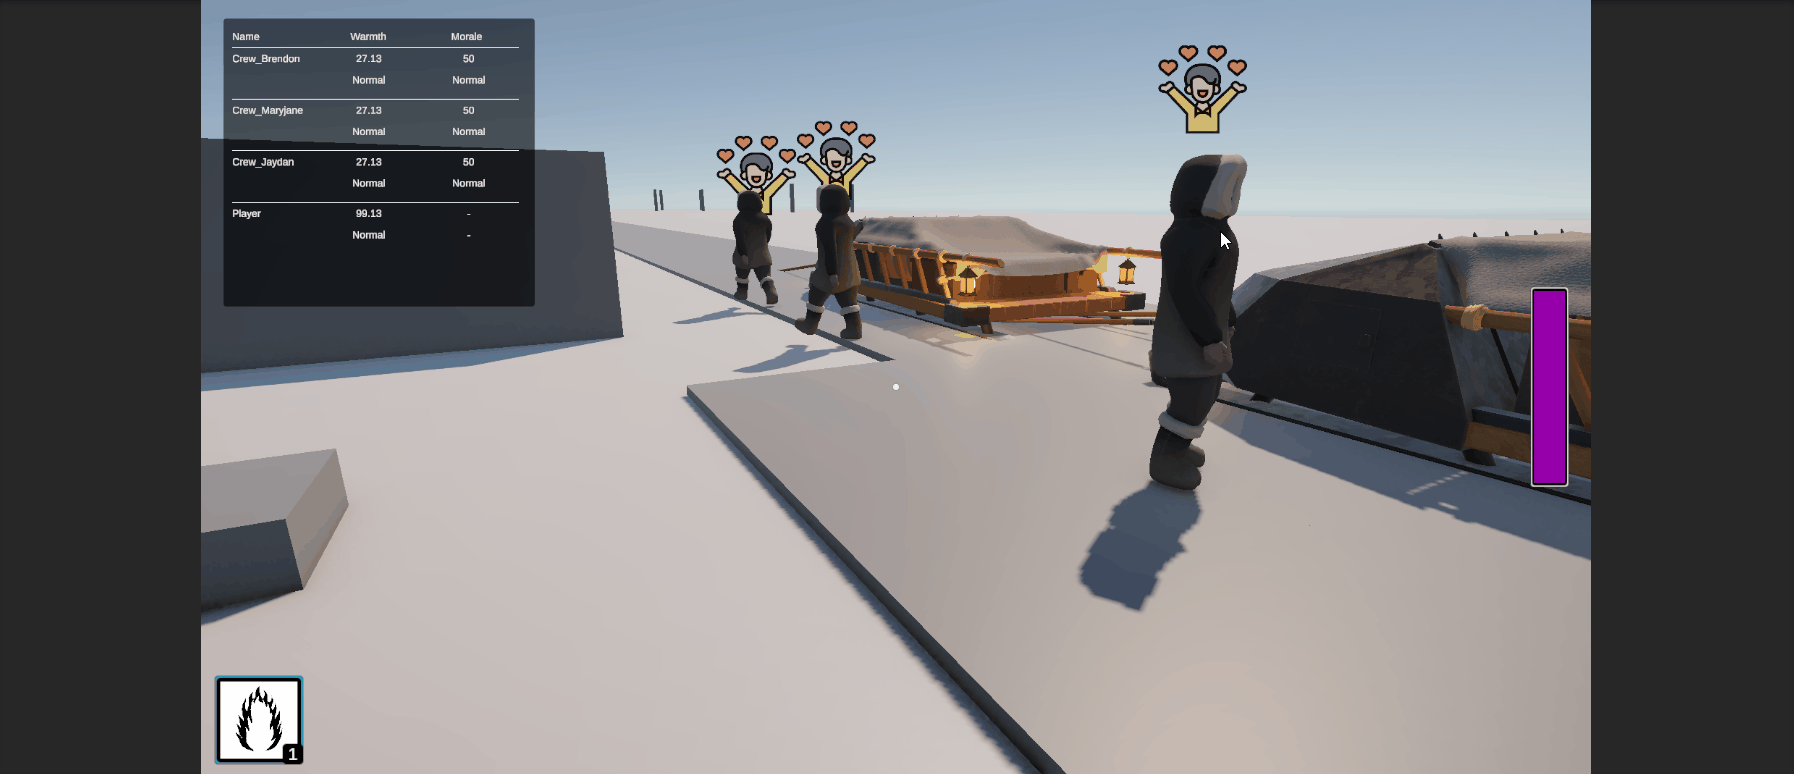
Once all the of the refactoring was completed, it made using the system much easier and it all looked good. Well, besides our goofy placeholder icons! Yes, the "Stalked" icon is a man with hearts above him. When all three icons are shown, the left one is the Warmth icon, the middle is the Morale icon, and the Stalked on the right.

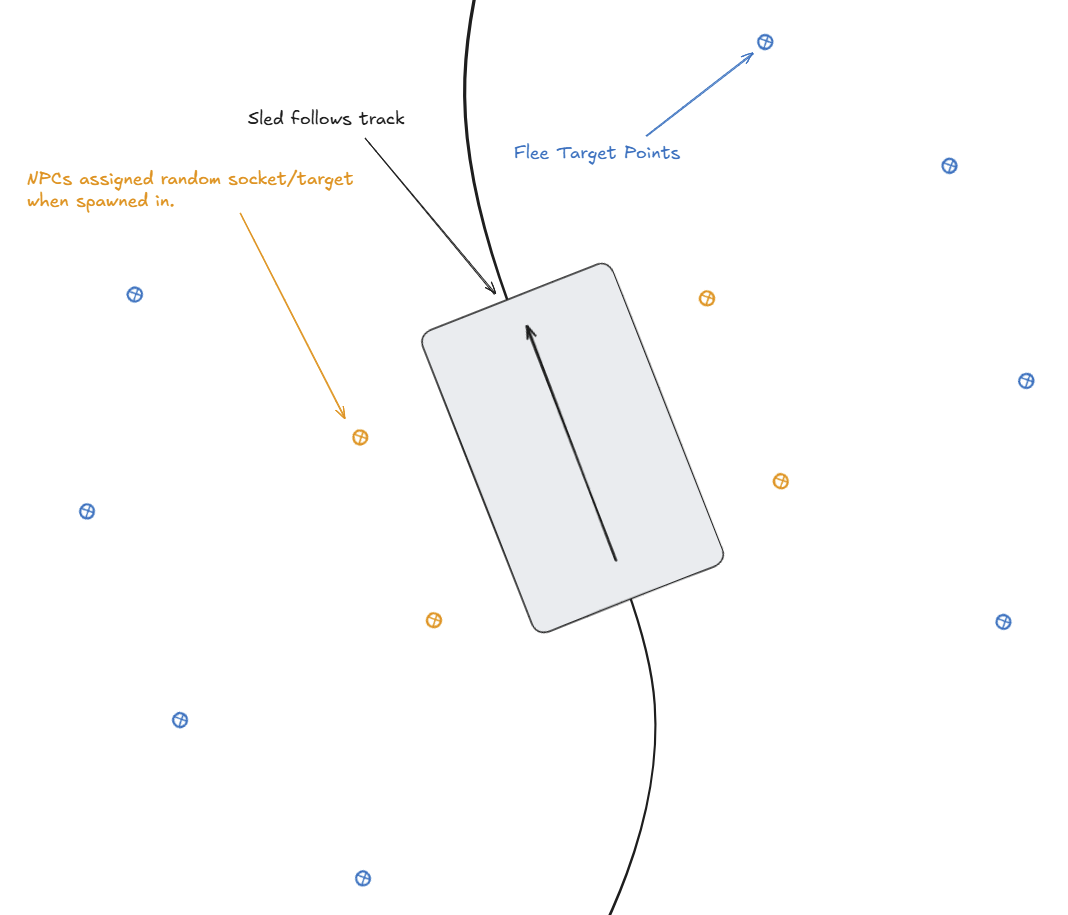
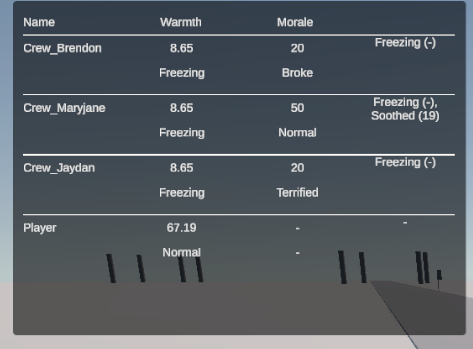
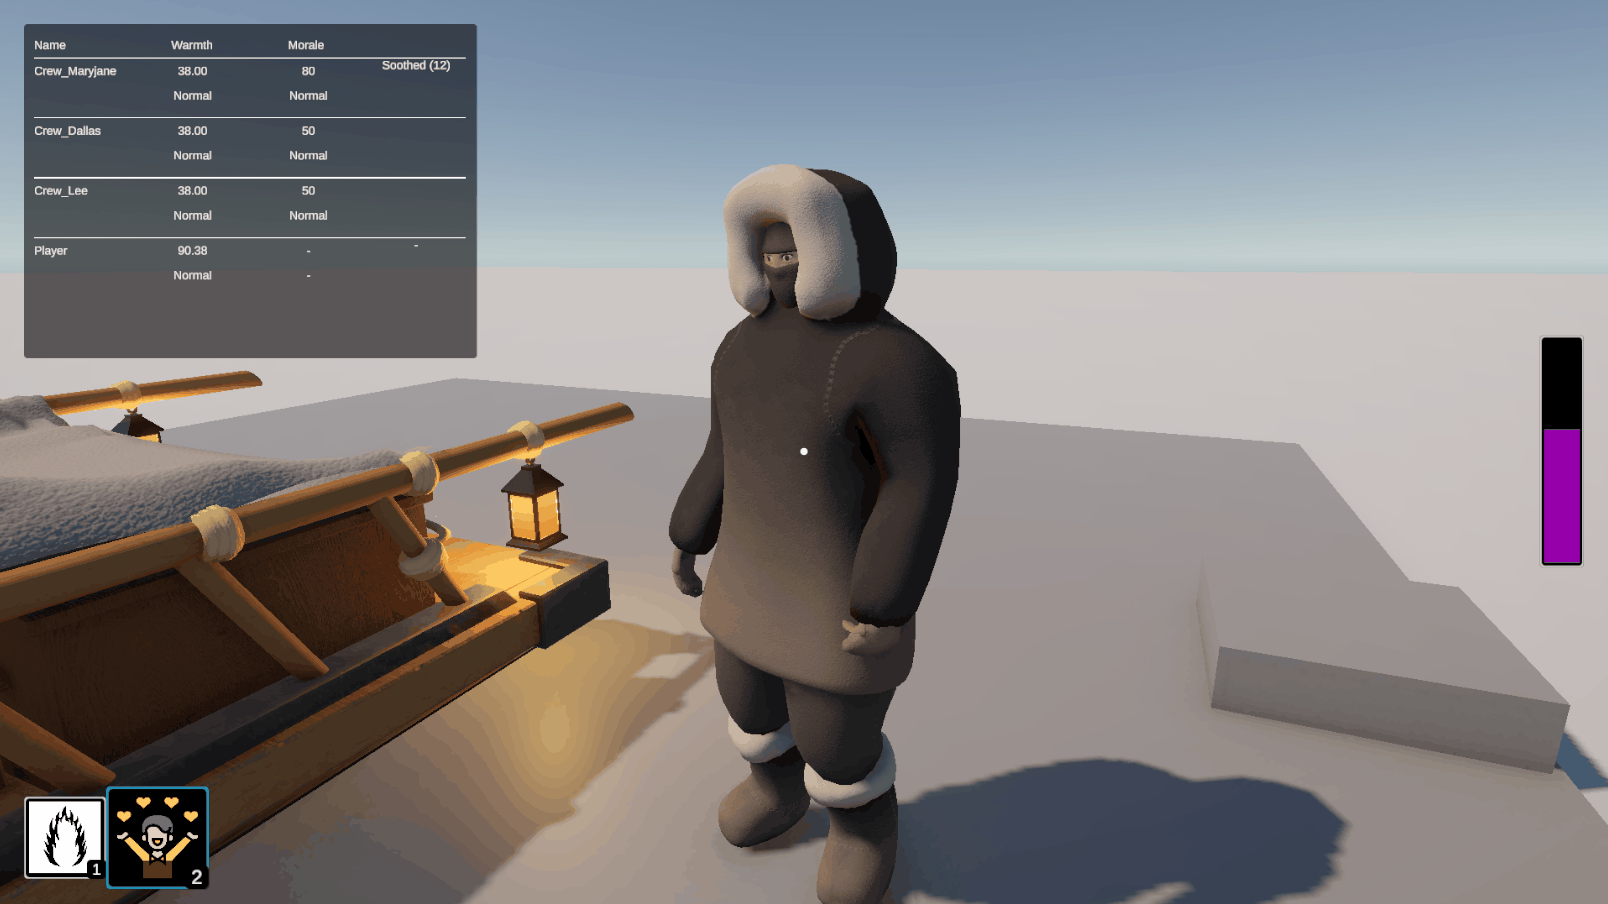
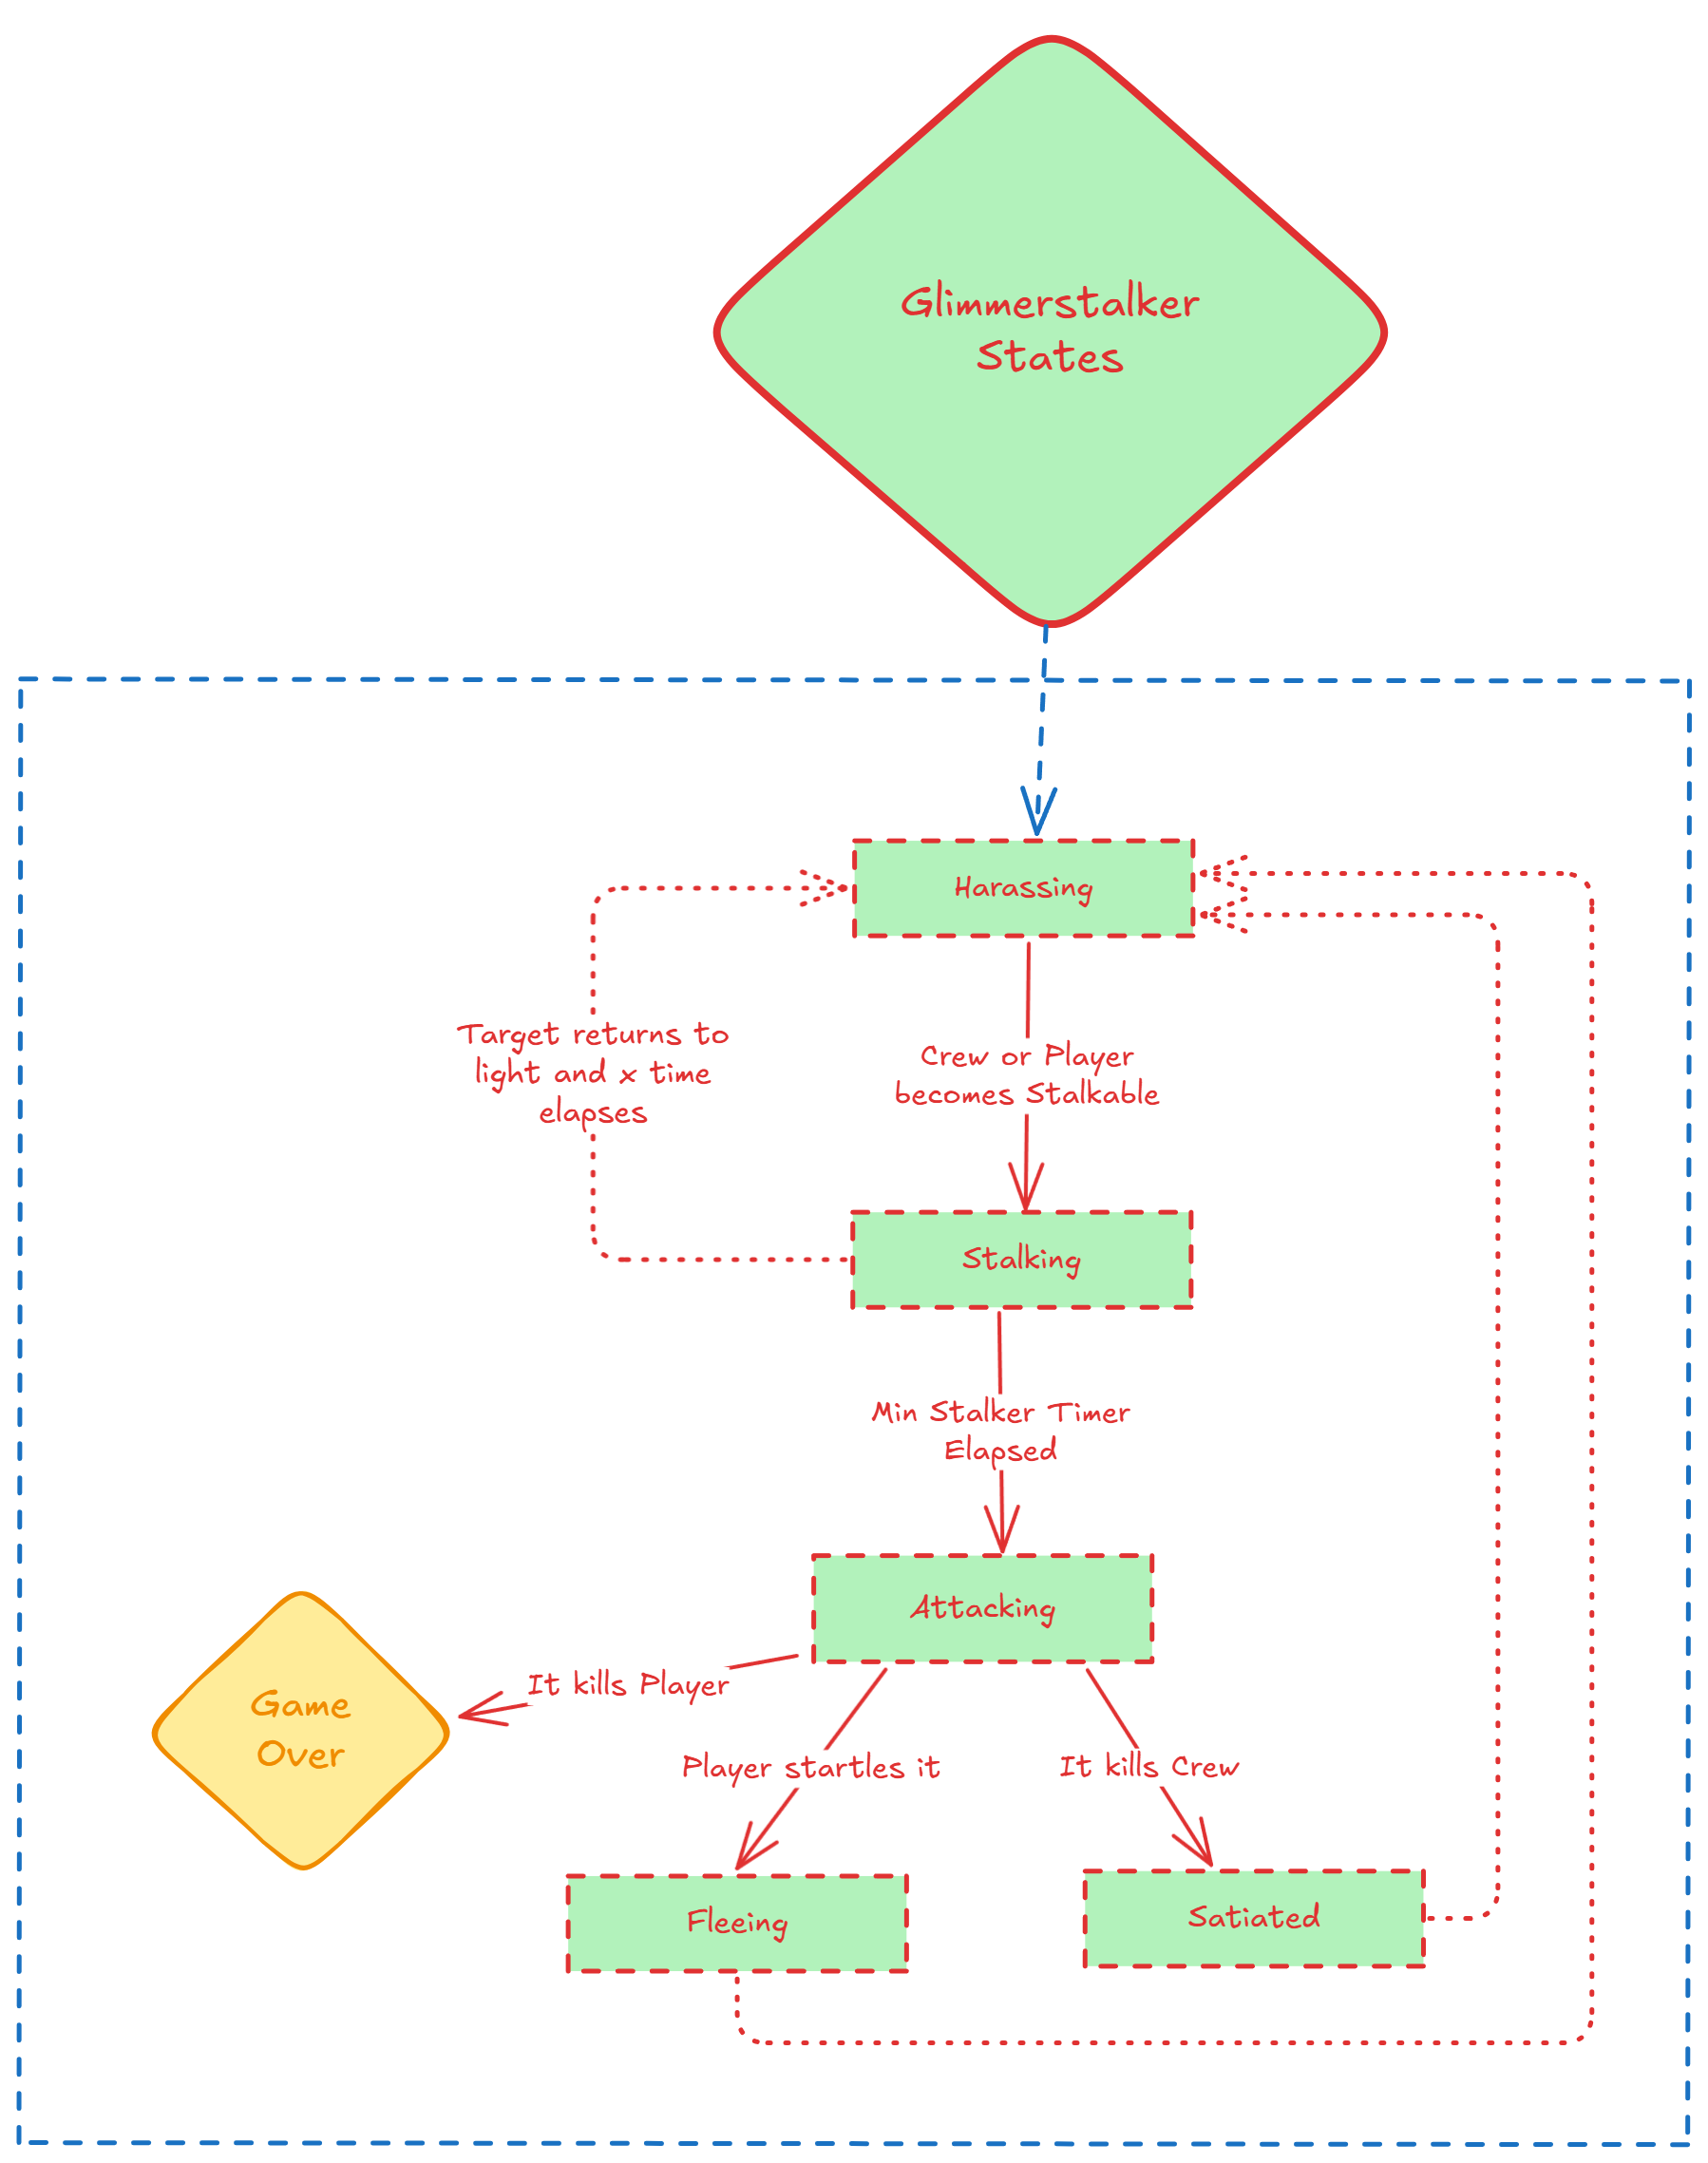
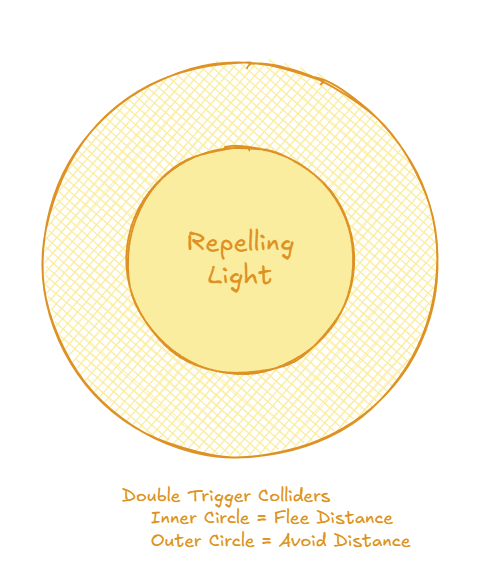
You can see the Warmth and Morale icons being added in when the Crews' temperature drops low enough, then changing when their temp gets even lower. If you check the debug window in the top-left corner, you can see when the states change. You can also see the scaling in action as the last sled moves away. There is still a lot of fine tuning to get the icon sizing, position, and scaling just right but that will be cleaned up when get a bit further along. They are also all changing at the same time but that should change as we tweak buff/debuff/threshold values and add in the Glimmerstalker harassing mechanic.

GIF of the status icons changing

Adding in Breaking

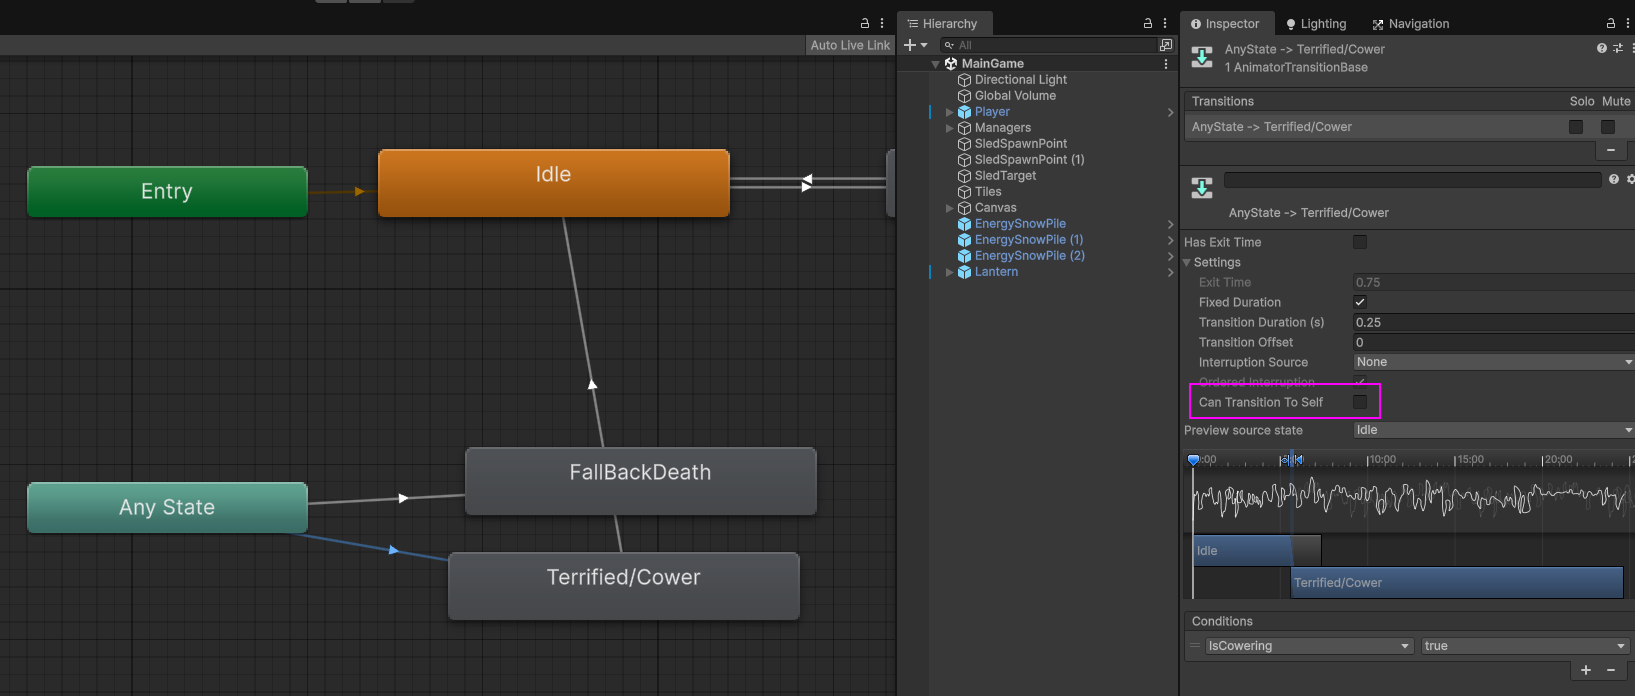
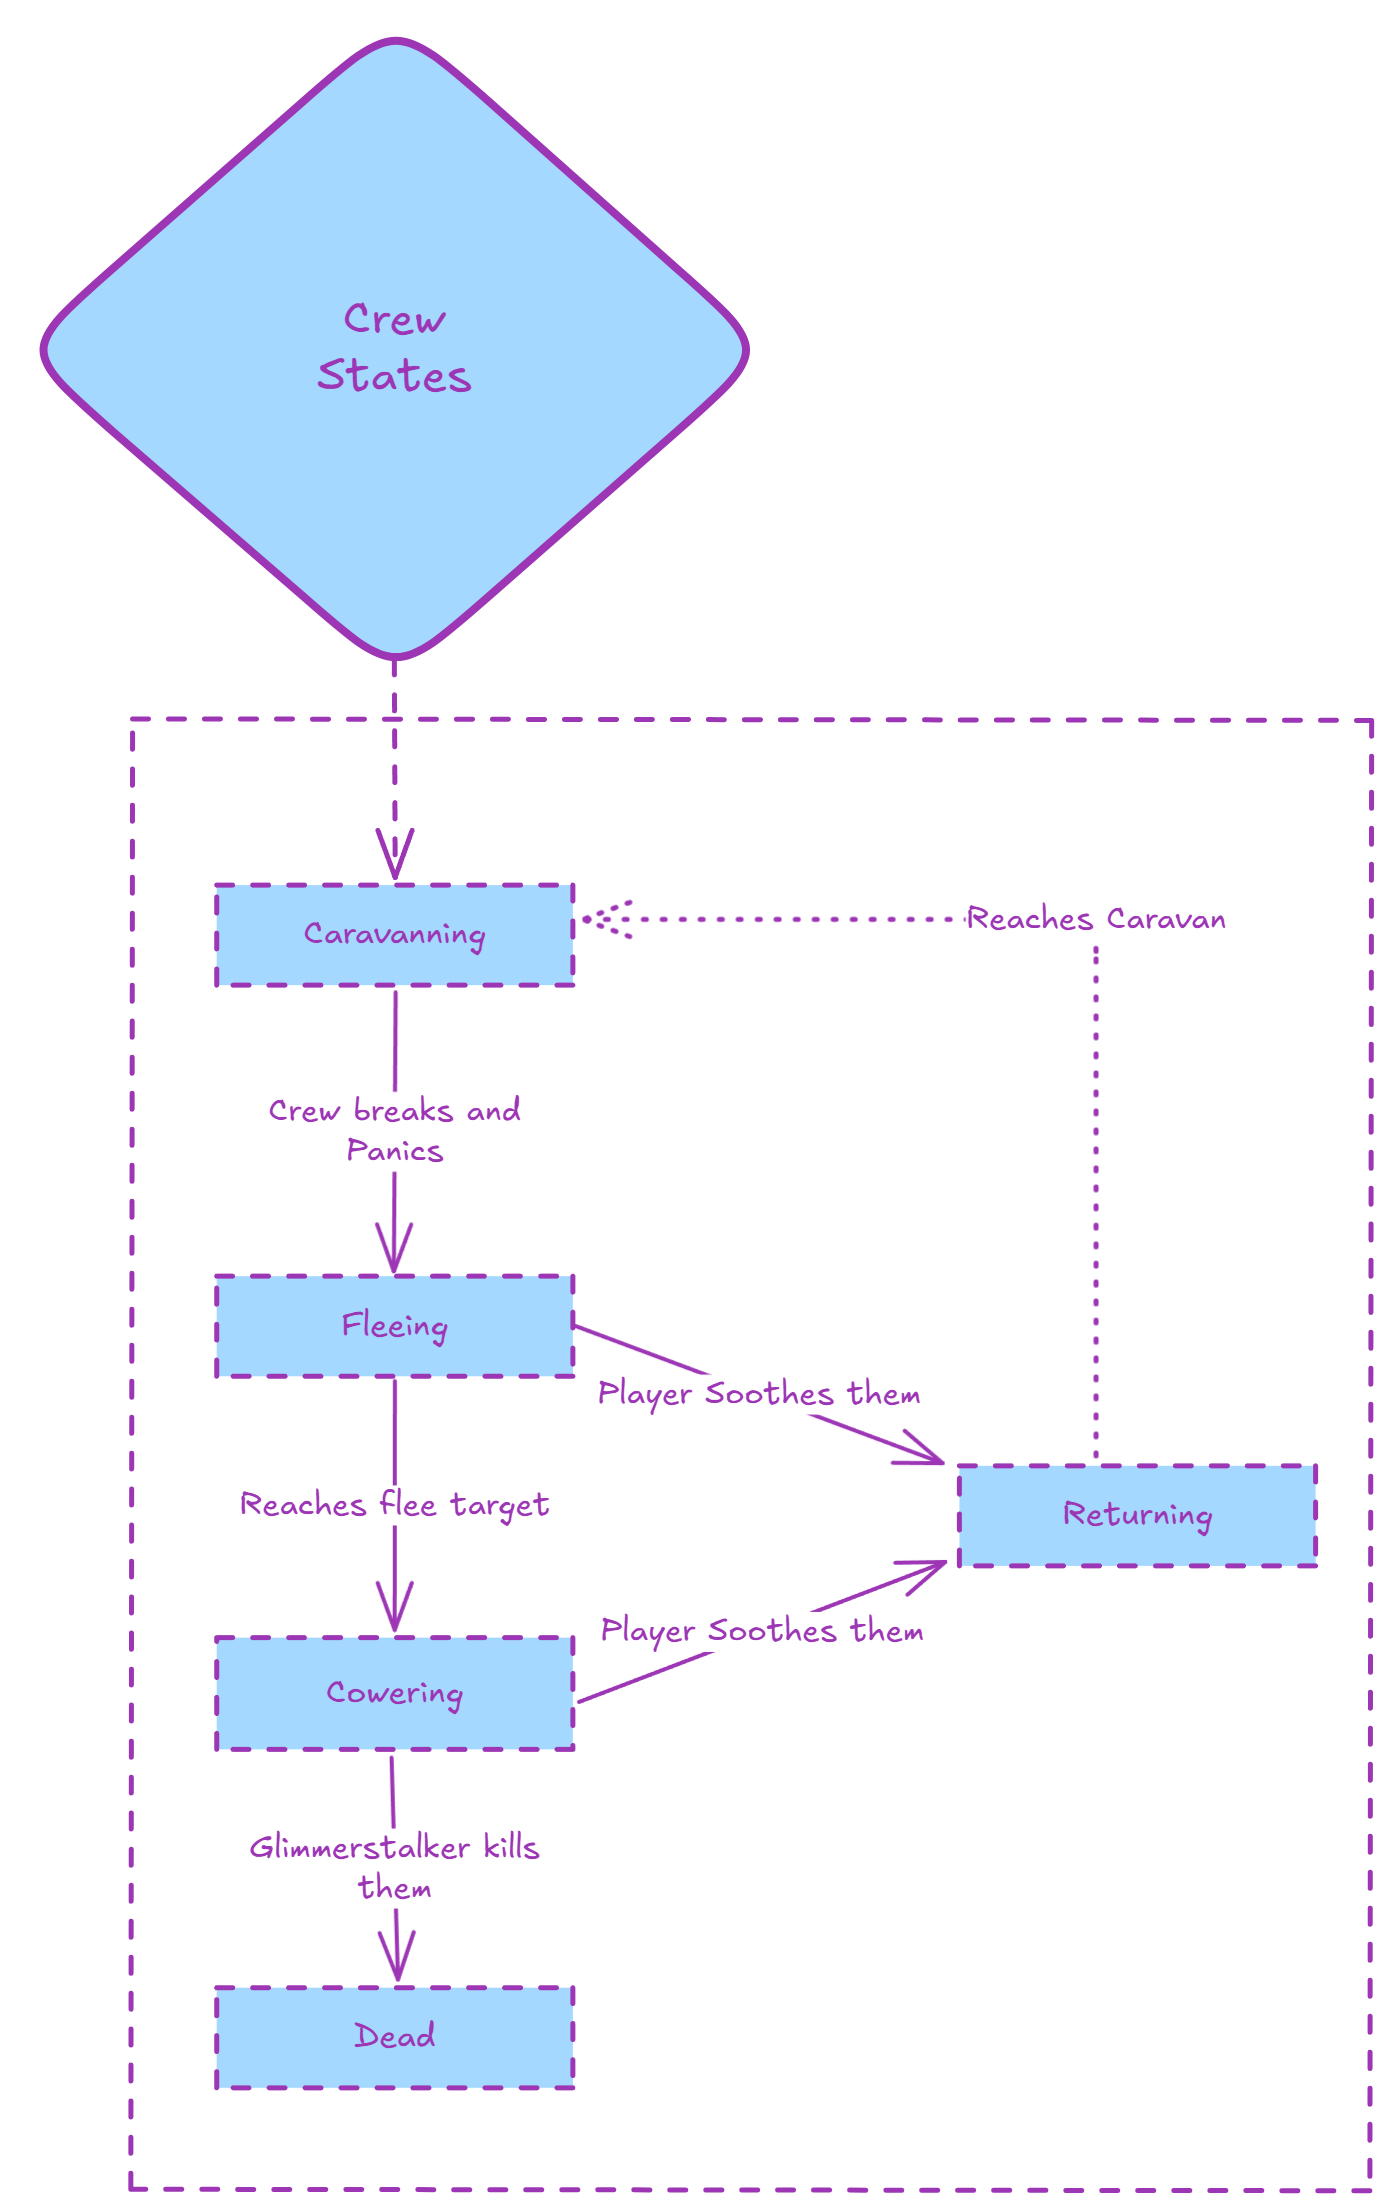
The last thing I needed to get added in was the chance for the Crew to break if their Morale was too low. This mainly just involved adding a new Broke state and a method to check if the Crew should break.

Adding the new state was as simple as adding a new state to the Morale state machine and the event handlers for it.

private void InitializeMoraleStates()
{
    // Add Other States

    var brokeState = new SimpleState<MoraleStatus>(MoraleStatus.Broke);
    brokeState.OnEnter += OnEnterMoraleStateBroke;
    brokeState.OnExit += OnExitMoraleStateBroke;
    _moraleStateMachine.AddState(brokeState);
}

private void OnEnterMoraleStateBroke()
{

    _iconTray.AddMoraleIcon(MoraleStatus.Broke);
    Debug.Log($"{name} broke due to {_moraleMechanic.CauseOfBreak.Type}");
}

private void OnExitMoraleStateBroke()
{
    _iconTray.RemoveMoraleIcon(MoraleStatus.Broke);
}

The check was a little more involved because I had to add another "dictionary" so we can assign different break chance rates to the different Morale states. Once I had that in, the check became a pretty straight-forward case of "roll random number and check against a target DC". The one thing I want to call out though is that we only want to check if they break if the modifier being applied is negative. It would feel bad to Soothe the Crew and then they break because you tried helping.

private void CheckIfBreak(MoraleModifierBase modifierTemplate)
{
    // Never break when adding positive modifiers
    if (modifierTemplate.Amount >= 0) return;

    var randomValue = UnityEngine.Random.Range(0, 100);

    var breakChanceMap = _breakChances.FirstOrDefault(b => b.Status == _currentState);
    var breakChance = breakChanceMap?.BreakChance ?? 0;

    if (randomValue < breakChance)
    {
        CauseOfBreak = modifierTemplate;
        SetState(MoraleStatus.Broke);
    }
}

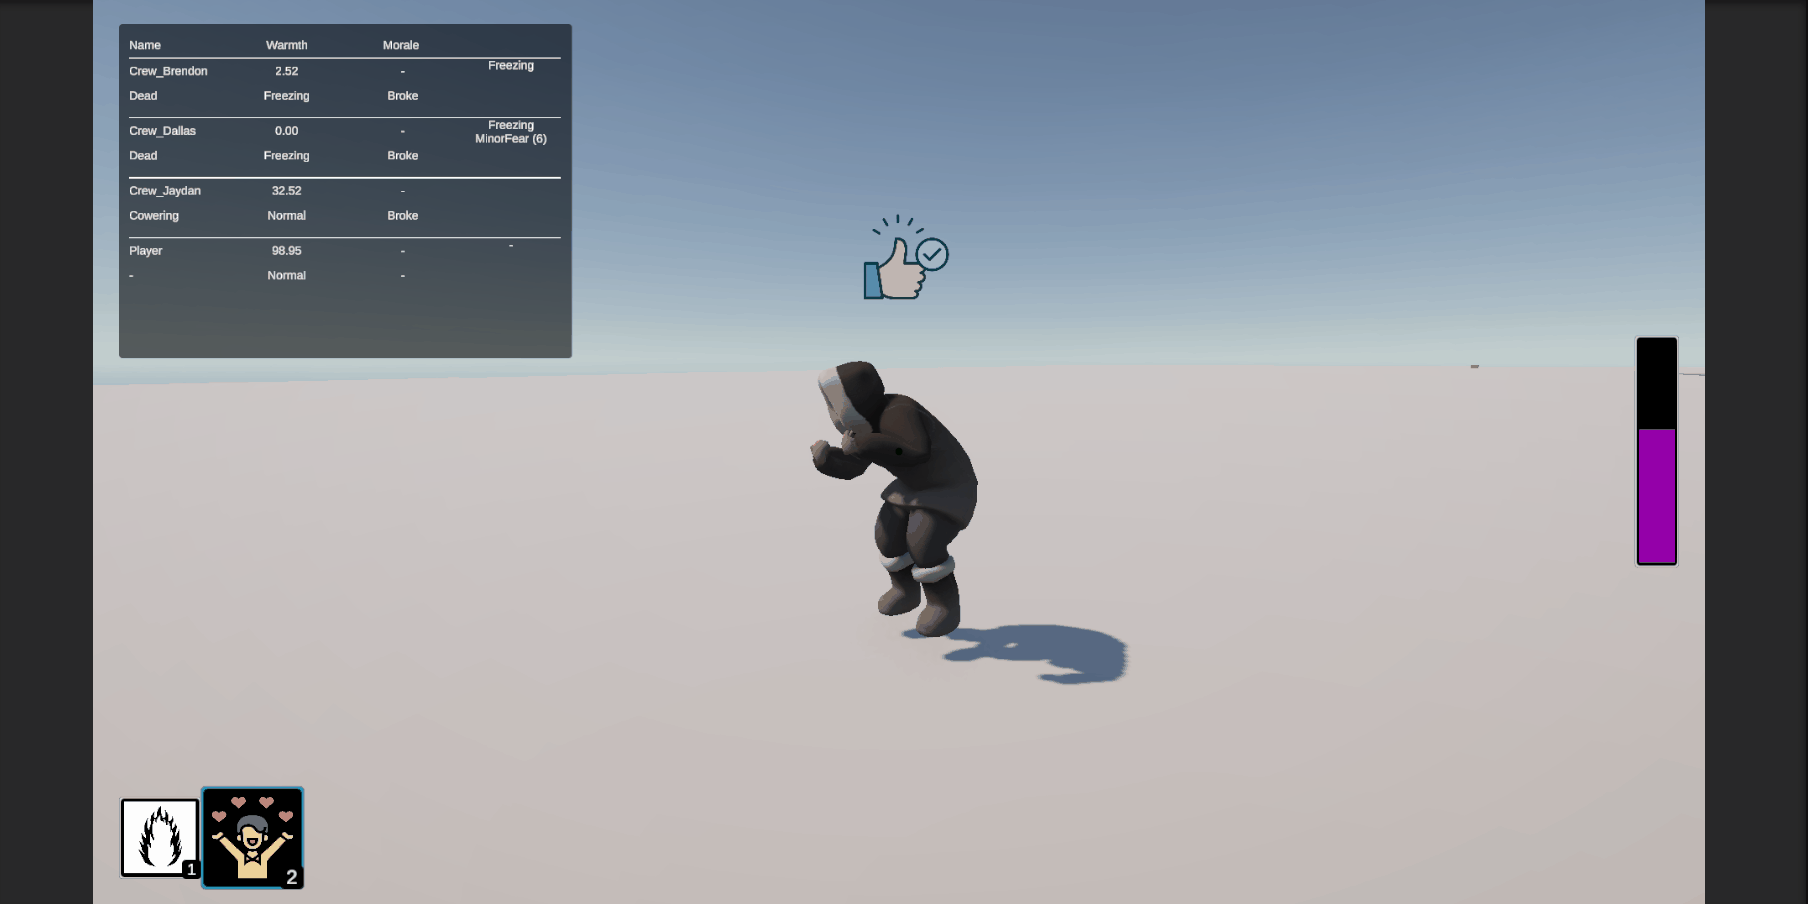
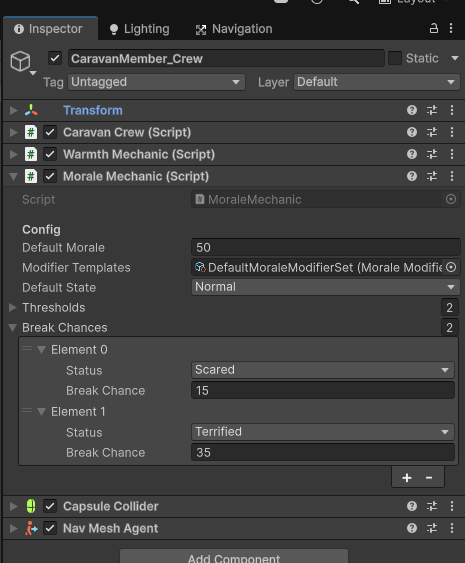
Here is what it looks like in the Inspector. You can see the break chances. In the Normal state there is no chance that they break, then a very small chance when they are Scared and a larger chance when they are Terrified. Honestly, I'm not sure if there should be a chance when they are only Scared but that will come out in playtesting.

The Moral Break Chance config in the Inspector

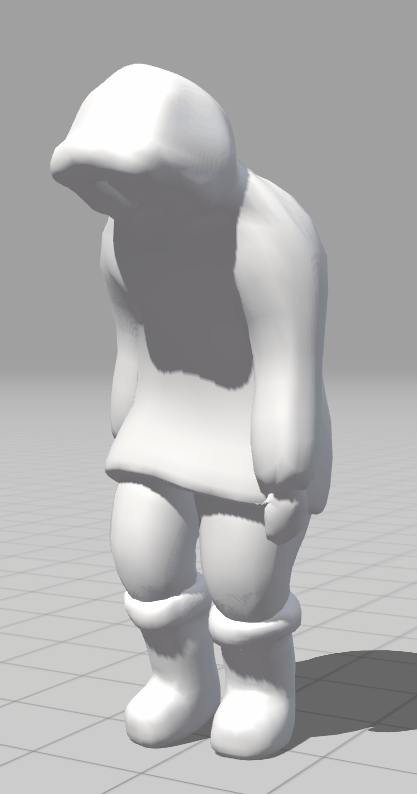
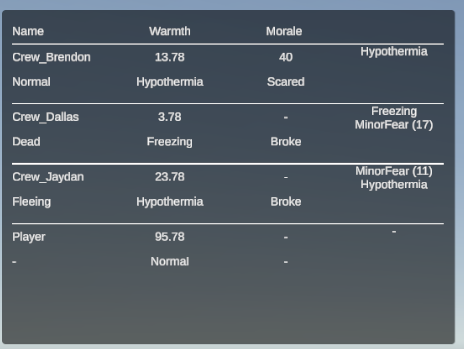
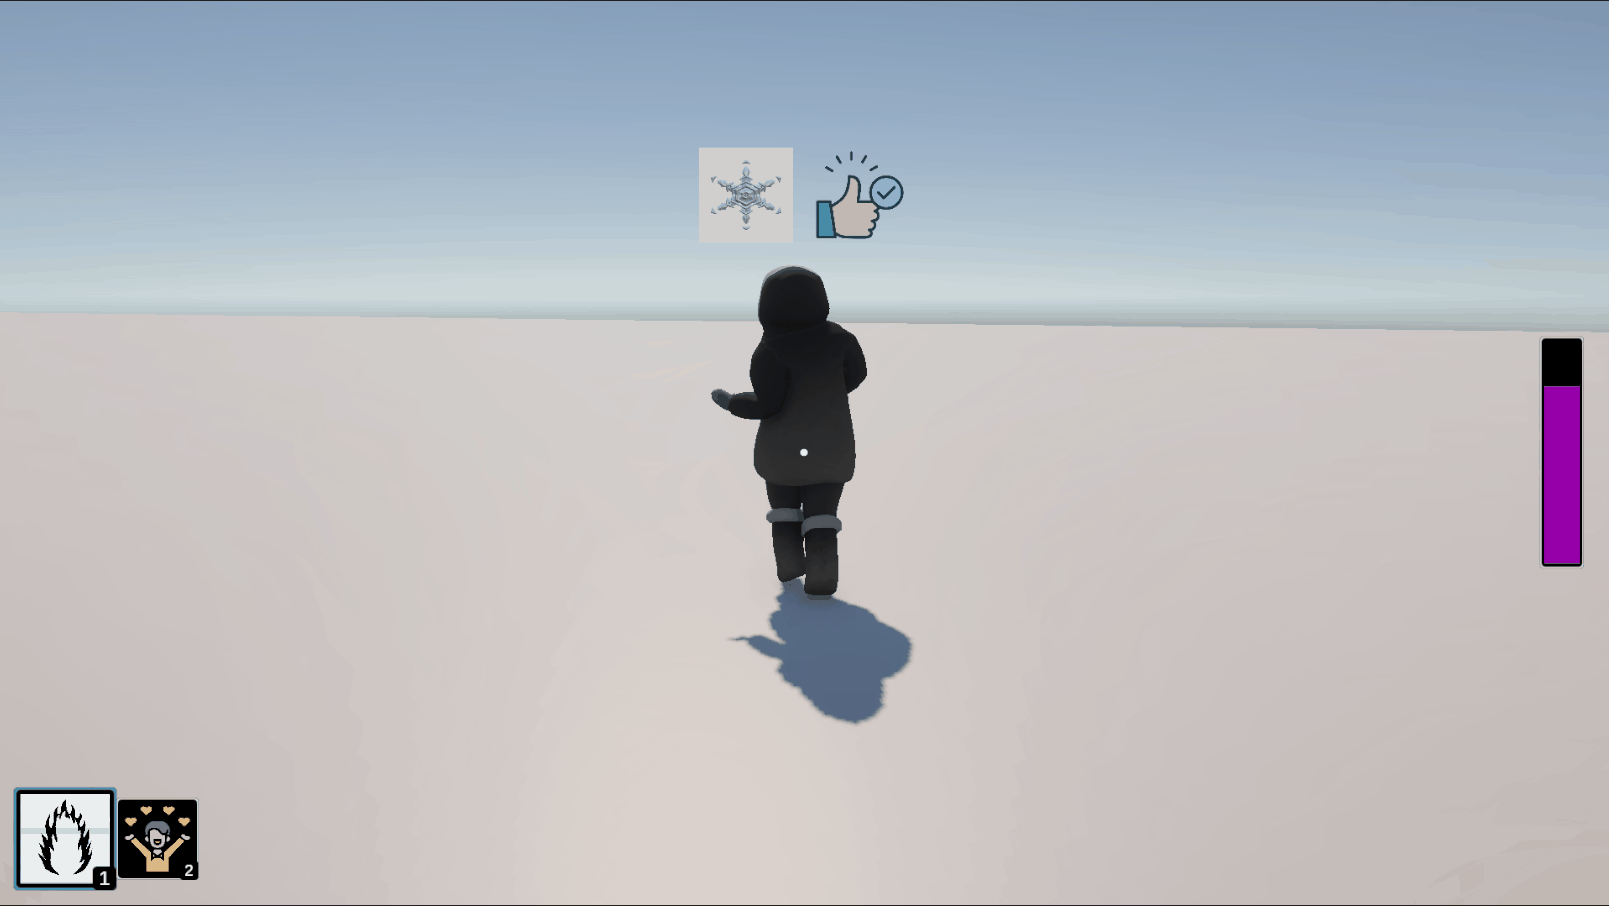
Here is the break icon in action, another banger that is spot on.

GIF of the Break icon showing

Team Feature Alignment

A good chunk of the day was spent having a nice, long team call to work through some of the unknowns we were encountering in the design. This ended up being a roughly 4 hour call. Things really started gelling when we all hoped onto the same Excalidraw. This helped really visualize what we were talking about and to lay out our ideas much quicker.

Below you can see all the different topics that we talked about. I'll go into them in more detail below, in no particular order.

Overview of all the topics discussed

Glimmerstalker Behavior

The biggest thing that we needed to nail down was how do the Glimmerstalkers, the main antagonists of the game, work. I think we had a rough handle on how it should work on a "conceptual" level but not really at all on a technical level. There was also some uncertainty about the different states and general behavior of the Glimmerstalkers.

Looking back, I should have made actual diagrams much sooner, as I was the main driving force behind how they would work. While I did have board items that textually described them (though probably not adequately) there is just something about being able to see a flow chart describing how it flows through the different states.

With that, I present you our state diagram for the Glimmerstalkers!

Glimmerstalker States

We defined five states that Glimmerstalker could be in: Harassing, Stalking, Attacking, Fleeing, and Satiated.

Note: The Glimmerstalker will be invisible unless otherwise noted. It will still move around the map to provide positional "dialog", among other reasons.

State - Harassing

In this state, the Glimmerstalkers will target one or more Crew and apply Morale debuffs to them, in an effort to make the Crew break/panic and run out of the light.

During this time, it is also checking to see if any character (either the Player or Crew) has been out of the light for a given amount of time. If it finds a "stalkable" character that isn't already being stalked it will enter the Stalking state.

State - Stalking

In this state, the Glimmerstalker stalks the target character and begins moving towards them. Once a minimum timer has elapsed, and the Glimmerstalker is close enough, it moves to the Attacking state.

The timer is there to help make the encounters more fair to the Player. Without the timer, if the Glimmerstalker happened to already be right next to the character, the Player would not have enough time to react before that character was eliminated.

If the Glimmerstalker is subjected to light while in this state, it will either: 1. If the Glimmerstalker is at the edge of the light, it will move to avoid it 1. It will "hover" around the light until its prey leaves the light again 2. If the character stays within the light for some amount of time, the Glimmerstalker will revert back to the Harassing state 2. If the Glimmerstalker is too close to the light, it will enter the Fleeing state

State - Attacking

In this state, the Glimmerstalker becomes "corporeal" and visible. It will charge the character. If it reaches the character, the character is eliminated and the Glimmerstalker will go into the Satiated state.

State - Fleeing

In this state, the Glimmerstalker kicks up a cloud of snow, then takes off into the sky, disappearing. It stays in this state for some time, then reverts back to the Harassing state.

The intent of this state is to allow the Player to rescue the Crew (or themselves) by throwing up a light (more on that later). It gives them a temporary reprieve from being Stalked or Attacked.

State - Satiated

In this state, the Glimmerstalker disappears and stays in this state for some time, then reverts back to the Harassing state.

The intent of this state is to give the Player a reprieve after they lose a Crew member. A calm after the storm, so to speak.

Repelling Light

One of the biggest things that came out of the discussion about the Glimmerstalkers was how we were going to handle lights in relation to the Glimmerstalkers.

We determined we needed to know two things: 1. How does the Glimmerstalker know to avoid the light? 2. How does the Glimmerstalker determine if it should Flee the light?

Choosing the Light Structure

We talked through a couple of ideas for detecting the lights: 1. Spherecasting to find lights 1. This sounded expensive, with each Glimmerstalker pinging the area around it every frame to find lights and reacting to them 2. Querying a Light Manager to find the closest lights 1. This would give the Glimmerstalkers a central point for determining where the lights were and provide a (hopefully) low-cost way to calculate the distances. 2. This solution would be good if we needed more granularity or specific behavior to move them outside the lights 3. Using colliders on the lights 1. The next idea that Terra had was to use colliders around the lights that the Glimmerstalker would collide with 2. This is probably the easiest solution for now and what we'll move forward with

The Implementation

Now that we determined the structure we want to attempt, it was time to actually figure out what that meant from a technical standpoint.

We decided to structure our "Repelling Lights" like this:

Repelling Light Structure

If the Glimmerstalker hits the outer collider, it will move to extract itself from the light. The exact mechanism of that will be worked out more once we get the Glimmerstalker actually put into the game and start figuring out what its movement control looks like.

If the Glimmerstalker hits the inner collider (though, theoretically it shouldn't if it is avoiding properly), it will move to the Fleeing state and extricate itself from the area.

There are definitely some questions though:

  1. How does the Glimmerstalker know which way to move out of the light?
    1. We might be able to just take the position of the collision (i.e. where the Glimmerstalker collided with the collider) and the center of the hit light. That should give a vector that we can use to move directly away from it
  2. How can we get the Glimmerstalker to "hover" around the light, if its target is inside it?
    1. Unknown at this point. Hopefully as we build out the Glimmerstalker controller more ideas will come
  3. If the Glimmerstalker is already in a position and the light is spawned on top of it, will the colliders trigger or does it have to "collide" with the edge of it?
    1. We don't think the colliders will trigger in this instance, so we'll have to figure something out for the Light Spell, since that should be the only time that we are spawning lights dynamically

Light Spell

Closely tied to how the lights work is the Light spell. The idea for this spell was that the Player could burn some energy to create temporary safe zones around them. There was some vagueness if this would be something that they would have to "hold" the spell (i.e. it was active as long as they held the cast button)? Would it shoot out like a flare? Does it drop a light?

After some discussion, we decided that it should drop a Repelling Light where the player is standing when they click the cast button. We decided to go this way because it is simple, no targeting, reusing the Repelling Lights functionality, etc. It also has the added gameplay benefit of it being stationary while the Caravan is always moving forward. This means that the Player only has temporary reprieve and will have to move eventually (either because they need to catch up to the caravan or because the light goes out). We'll need to balance the radius, energy cost, and duration to ensure that it can't just be cheesed to provide unlimited safety.

Because we don't yet know if spawning a collider on top of an existing Glimmerstalker will actually trigger it, we are planning to do a spherecast (or two?) to detect if any IRepellables are within the radius to flush them out explicitly, then let the Repelling Light do the work from there.

Spell Structure Diagram

That wraps up all of the discussions related to light. Now we can go over the Crew behavior.

Crew Behavior

We've had the ideas for the Crew behavior for quite a while, but much like the Glimmerstalker, some of it wasn't very well defined. Generally, we wanted the Crew to follow the Caravan until they (inevitably) had their Morale break and they panicked. Then they would run off into the woods and would get eaten by a Glimmerstalker unless the Player could rescue them. Like, what actually happens when the Crew panics or what does it mean to "rescue" the Crew?

To help us hammer it all out, we made another state diagram (actually, it was a lot more involved than this one but this is more easily understood).

Crew States Diagram

We laid out five states: Caravanning, Fleeing, Cowering, Returning, and Dead

State - Caravanning

In this state, the Crew walk next to their designated sled in the Caravan. They do not really do much else besides that (and slowly freeze to death!)

When they acquire new negative Morale Modifiers, a check is ran to see if they "break", unless they are in Shock. The chance of this is determined by their current morale level (as talked about in a previous DevLog). If they break, the move into the Fleeing state.

State - Fleeing

In this state, the Crew picks a random target to run to, away from the Caravan, and start running towards it. They will also make some type of callout to alert the Player. We decided to place points around each sled that they could flee to. This may not be the best way to go about it, but we wanted more control over where they could flee to. We wanted to avoid them picking points that were directly in front of or behind the sled, since there could be more sleds in the way. I'd be interested in looking into other ways to handle this, like using a combination of Random.insideUnitSphere and some type of mask (probably programmatic) that would mask out the unwanted areas.

With the current plan, the Crew will pick a random target, check if it is reachable on the NavMesh, if it is reachable, then go to it, otherwise pick a new one.

Flee Points around Sled example

If the Player uses the Soothe spell on them, they will enter the Returning state. If the Crew reaches their "flee target" then they enter the Cowering state.

State - Cowering

In this state, the Crew cowers in place, awaiting their fate.

If the Player uses the Soothe spell on them, they will enter the Returning state. If the Player does not Soothe them in time, a Glimmerstalker will eliminate the Crew member and they will enter the Dead state.

State - Returning

In this state, the Crew attempts to return to the Caravan. If they make it back without being eliminated by a Glimmerstalker, they return to the Caravanning state but will be in Shock.

State - Dead

In this state, the Crew is dead and cannot move, be targeted, etc.