Skip to content

Welcome!

Glimmerstalker Effects

The next thing I wanted to work on was getting the basic implementation in for when the Gimmerstalker actually kills the Player. Right now, it was very confusing because the Player input was still active after death and there was no other indication that you were hit. Besides fixing the input, we wanted two main ways to communicate that the Glimmerstalker hit you: A flash and a screech. Basically, like a flashbang went off.

The Flash

I started with the flash. This would be the main indicator (since someone could be playing without sound). I created a simple white overlay that gets shown and then fades out.

Gif of the Glimmerstalker flash playing when the game starts

It has two configurable settings: the Stay and Fade Durations. The Stay Duration dictates how long it will stay full white before starting to fade. The Fade Duration dictates how long it should take to fade from white to fully transparent. This gives us some flexibility with how the flash is presented.

Screenshot of the Glimmerstalker Flash UI configuration in the Unity Inspector

The Screech

The next thing was the screech. I spent some time searching for some good, free screeching sounds until I found one that seemed to fit. I ended up with an hawk screech because the peacock calls were not quite the right vibe.

While testing it out in game, both Terra and I felt that the screech would be better used as the indicator that the Glimmerstalker has started attacking, instead of when it hit. While not exactly lore-accurate, it definitely felt better for the game (which is ultimately more important). So, I moved the screech to play when the Glimmerstalker enters the Attack state and found a body impact sound to play alongside the flash. This felt much better when playing.

Multi-Glimmerstalker Problem

Also when testing the screeches, I fixed an issue where multiple Glimmerstalkers were stalking/attacking the same character. I had seen it before but it was very apparent once we added in the attack effects. Multiple screeches and flashes was hard to miss! I ended up putting in a temporary fix to not allow the characters to be stalked if they are already being stalked. This prevented the doubling up on Glimmerstalkers but the simplistic check caused issues with the AvoidantStalking behavior, causing them to never re-engage. That'll have to be fixed tomorrow.

The Body

I really liked the overall feel of the death so far but one thing that bothered me was that once the flash faded you were just staring at the same screen it was before the flash. Joking around with Terra, I had the idea of the "Player's" body was laying on the ground. I struck a funny pose, we laughed, and I went back to building out the piece I was working on. However, that thought stuck in my mind.

We already have the Crew rigged and a death animation. What if I could just spawn a Crew body and have it play the animation? So I did!

When the Player gets hit, it now does the following:

  1. Disables the Player Input
  2. Spawns a Crew body at the Player's location
  3. Triggers the Die animation
  4. Moves the camera up some
  5. Has the camera look at the dead body

All that together looks like this

Gif of the Glimmerstalker attacking the Player and showing the body after

Overall, I am really pleased with how it turned out!

Reworking the Cape!

I mentioned last time that I saw that Unity could handle cloth physics and wanted to take a look at that. I found this cloth sim tutorial by Cam Ayres and it was very easy to follow. I got a mockup working with the primitive plane in Unity and proved that it would work for this. Next, I just needed to model the new cape.

Modeling the Cape

I didn't think the belt portion of the original cape would play well with both the cloth sim and animations, so I decided to remove the belt. However, I still needed some way to affix it the cape to the coat. Something Cam said in the tutorial stuck out to me about modeling in like lapels/clasps onto the model and that seemed like a decent idea.

I made two clasps that would affix to the coat and put them on each upper corner. For the actual cloth part, I grabbed the outer faces of the previous cape and separated them into their own object that I then combined with the clasps. Next, I exported them all to an FBX (no rigging shenanigans this time!) and brought them into Substance Painter. Some quick texturing later and I have the following.

Screenshot of the new Caravan Master cape in Unity

Adding it in Unity

Now that I had the FBX and textures, I could add it into Unity. I attached it to the Caravan Master and set it up using a couple of capsule colliders, like in the tutorial. I only ended up using two colliders, since it is really just the hip and upper leg that the cape can collide with.

Screenshot of the cloth colliders for the cape

I then had to tell Unity which vertices needed to move (and by how much). I really just made the ones around the clasps static, then the one immediate next to those have some give. Then, the rest of the vertices were left unbound. I'm sure there would be a better way to do it but it looked decent enough.

Screenshot of the cloth settings for the cape

And here it is in action. It is hard to see because they walk so fast but it is working. The cape does get a little wonky if you run by it or it hits you. It gets all bunched up but eventually straightens itself. I felt this was acceptable for what it is. Please ignore the Glimmerstalker in the background...it is also in progress!

Gif of the cape deforming when the Caravan Master walks beside the caravan

I'm not really sure of the performance implications of using the cloth simulation in Unity but there is only one instance in the game and I think it will be fine. If this were a longer project, I would want to dig into that more. For now, it works!

First Pass at Real Tuning

As previously mentioned, we wanted to have another team call to get the numbers in the game feeling more like an actual game. We hopped on the call and I started out sharing my screen and playing the game initially. In addition to getting numbers in better places, we ended up also fixing a couple of bugs with the snow manager and the reticle, as well as changed the Soothe spell to only use energy if it actually hit a target. The team felt it was too punishing to accidentally miss when the Crew is running away and then not having enough energy to cast it again.

The main problem we were seeing with the game so far was the "actions per minute" was low. You spent a lot of time just walking with the caravan and rarely needed to go out into the darkness. And when you did go out to refill your energy, it would take forever for it to fill. It seemed like when you needed the energy the most was when things were happening but you would have to stop doing those things to run out and stand at a snow pile for like 20 seconds. The game mostly felt like you were either standing doing nothing at the caravan or standing doing "nothing" at a snow pile. It was a lot of "doing nothing".

We ended up increasing the rate at which you could recharge your energy and tweaked a bunch of the numbers (e.g. warmth depletion rate, spell costs, spell power, etc) and it was finally starting to feel fun. We then increased the number of Crew that spawned and that helped a lot. Now you had to actually move around manage your resources better. Granted, this did have the effect of making the game more hectic rather than scary, which was unfortunate.

Next Steps

We identified a couple of areas that still needed improvement before we could do further tuning:

  1. Icons/overlay for when the Player is being stalked and/or freezing
  2. We need the music and sound effects for when the Glimmerstalker is stalking and attacking
  3. Refine the Glimmerstalker brightness

There was also some additional tuning that needs to be done:

  1. Tune the warmth depletion rate so the Crew don't die before the Glimmerstalker can actually attack
  2. Tune the Glimmerstalker timers to make it more engaging
    1. This will depend heavily on the music and sound, so those will need to be done first
  3. Tune the freezing timers to give the Player more time to respond
    1. Currently, they only have 10 seconds to warm the Crew once they see the Freezing icon display. This is barely enough time to react and reach them, let alone if they broke and are running away

There were also a few other things we noticed that would improve the experience:

  1. Granularity on death causes
    1. Right now it just says the Player died but it doesn't say the cause (e.g. Freezing, Glimmerstalker, Tether, etc)
    2. Having more of the icons and such would help with that but we'd still want the cause so it can be displayed on the end game screen
  2. Stop player input when player dies
    1. Right now when the Player dies, there is a timer that starts before moving to the end game scene. This was to allow time for any animations to play, etc. However, we are not currently disabling the input when they die, so it can feel unfair that you died because the action that killed you actually occurred several seconds before
  3. Pulse the freeze icon when x duration remains
    1. Since the Freeze state has a timer that kills the character when it elapses, Terra wanted a way to denote which Crew were in the most peril of freezing, so you could prioritize them. Our plan is to have the icon pulse once the timer reaches a certain threshold so the Player knows who is in immediate peril

Lack of Experience is Incredibly Frustrating

Today I wanted to work on making the Caravan Master npc more unique than the general Crew. The Caravan Master will allow the Player to halt the caravan for a short duration. For the world lore, the Caravan Master would probably be a "Clerk", which are denoted by an orange half-cape on their waist.

I got to modelling that but I wanted to do a quick version just to make sure that it would work how I was hoping. Spoiler: It did not...not at all!

Screenshot of the Caravan Master cape in progress

I was pretty happy with how it turned out for now. I got it weight painted and rigged on the same armature as the character mesh. Everything was working well in Blender. Once I tried to getting it out of Blender things started falling apart.

Extra Root Bone

The first problem I ran into was an armature mis-match when trying to configure the FBX after importing it in Unity. I wanted to apply the existing animation "avatar" to it that was created from the character mesh, since it should be the exact same rig. When I tried to apply it though, it said:

Rig Error: Copied Avatar Rig Configuration mis-match Transform hierarchy does not match Transform 'Armature' not found in: HumanDescription

This led me down a rabbit hole trying to figure out why the rigs were different, when I had imported the exact same character FBX into Blender before modelling the cape. One difference that I knew is that the original character was rigged and exported from Mixamo and I was exporting from Blender.

In the image below the Mixamo structure was what Unity was expecting but the Blender one had the Armature container at the root, instead of the mixamorig:Hips bone.

Screenshot of the Unity hierarchy showing the difference between the Mixamo and Blender exports

I wasn't really sure what was going on, because Terra had exported the goat without any issues and I had successfully exported/imported another character previously. I found forum posts from all the way back in 2014 asking about this problem. It appears that it really only shows up if you import characters rigged in Mixamo back into Blender, then go to re-export them. I tried a couple of the suggestions in the posts but none seemed to fix the problem. No matter what I tried, what settings I used, or script changes I made, that darn Armature container was always there...mocking me...

It didn't help that most of the posts I could find were for older versions of Blender and I think some things had changed. I finally stumbled upon A-Ribiero's CustomBlenderFBXExporter Blender Add-On that supposedly fixed the issue. I was hesitant because, again, the forum post was older. However, looking at the GitHub for it, it looked like it is actively kept up to date with new Blender versions.

I got that add-on installed and was pleasantly surprised that it added the functionality in addition to the built in exporters instead of replacing them. I thought this was very considerate and made me feel better about using it.

Screenshot of the CustomBlenderFBXExporter menu option

What really made me enjoy using it was the fact that it actually worked! Once I got the settings down (I was just missing the Armature FBXNode Type being set to RemoveGhost) I was able to export it from Blender and import it into Unity without any issues.

Screenshot of the CustomBlenderFBXExporter export settings

I'm not sure why this had to be as hard as it was. I spent several hours bashing my head against the wall trying to get it to work. I am still very new to rigging, animating, exporting, importing, basically all of the pieces of getting characters and such into Unity.

Side Quest to Texture the Cape

Once I could get it into Unity, I wanted to relax some and decided to texture the cape. I've textured multiple things in Substance Painter so far, so surely this should be easy-peasy. Right?

Well, my problems with texturing the cape seem to stem from Mixamo once again. They do something with the rotation of the model. Realistically, it is probably because Unity is weird with the Y-axis being up and they are rotating it correctly...but still! Well, in order for the rotation of the cape to match the character (or more specifically, the rig) I needed to rotate the object in Blender. Well, when I brought in the fbx to Substance Painter, of course it was sideways. This made rotating the object in its "actual" orientation very difficult. In the gif below, it should be rotating horizontally but because the cape is actually sideways in the viewport it doesn't.

Gif of the cape rotating strangely in Substance Painter

I think it also affected how the Metal Edge Wear generator applied itself to the mesh. I think it likes to put more grunge on upward facing edges, which unfortunately was the inside of the cape. Not my best work but at this point I was taking anything I could get!

Getting the Cape To Deform

Now, something that I had no idea how to do (even now) is how to add the fbx prefab to the existing Caravan Master prefab and have it use the same animations as the character. I thought, since they were rigged the same and this wasn't an uncommon thing to do (is it?) then there should be lots of resources on it. Maybe it was because it was the end of the night but I was just not finding anything. Most of the stuff I could find was adding to the rig in Blender and exporting the whole thing. For instance, if a character model had some armor pieces as separate meshes to make animating better, they would still export all of the meshes as one FBX.

A lot of posts that I found talked about a Bones array on the SkinnedMeshRenderer that needed to be replaced with the bones from the character but I couldn't find it. It turns out that the array is not actually accessible through the Inspector and I would need to write a script to handle it. It was getting close to bedtime and I didn't want to deal with trying to figure out the script for it.

Instead, I decided to add an animator onto the cape prefab and use the same Animator Controller as the character, then adjust the main CaravanMaster script to take an array of Animators instead of just the one. Then when it changed values (set bools, floats, triggers, etc) it would do the same on all of them. This actually worked. It was real nasty, but it was working! Well, only some of the time. To prevent all of the Crew from walking in lockstep, I had added a random offset to the animations. Since the character Animator and the cape Animator were separate, this meant that each Animator got their own offsets. Sometimes the offsets were more in-sync and other times they weren't. I thought I was being clever but once again my work was in vain.

Finally, I gave up on the whole cape thing and just added a dumb flag that the Caravan Master carries. Attached it to the bone and it was serviceable!

Screenshot of the Caravan Master in game with the placeholder flag

Right before bed, I did have an idea to look at cloth physics in Unity itself, so I'd like to explore that some more this weekend before admitting defeat and using the flag. Overall, one of the most frustrating nights of development I've ever had and I'm sure if I knew more about all of it, I would have been able to make sense of everything much quicker!

Resting, Regrouping, and Recompiling

I took Monday off to decompress. I had pushed out the changes for the Glimmerstalker and was feeling a bit burnt out on everything. Instead of working on the game, I took the evening to play some games and relax. It was very nice! It was back at it again on Tuesday though with a team call to regroup then onto trying to make a web build.

The Team Call

It had been a while since we actually had a call with everyone on it. Normally, we just chat and update via Discord but it is nicer/easier sometimes to just talk. The main focus of the call was to make sure we are all on the same page and to regroup since the bulk of the systems were now in place.

Here is a quick overview of some of the things we talked about (I'm writing this a couple of days later so I'm sure I am missing some things)

Icons

We needed to lock down what icon style we were going to go with. We have been running with some pretty terrible placeholder icons for quite a while and the last attempt we made was before the Atmosphere™ was put in, so they didn't quite match.

Andrew threw out some initial ideas, based in a similar style to the spell energy/soulstone UI he made. He went with (or I pushed him into...unclear) a more sketchy look, as it seemed to fit better with the overall aesthetic. Below is one of the earlier iterations. I think the new one looks much better.

Image showing one of the original designs for the new spell energy UI and the final one we settled on

Anyway, in keeping with the more white-lined sketch motif, Andrew presented some potential ideas for the Warmth spell. We all seemed to like the center icon the best, at least the fire part of it.

Image with a variety of flame designs for the Warmth spell icon

So, Andrew cleaned it up and it is looking pretty snazzy!

Image of the new flame design for the Warmth spell

Here it is in game, along with some others he made up in the same style.

Screenshot of all the new spell icons in game

They are all looking really good!

Soulstone

The soulstone is the crystal that the magic user stores energy in and casts from. We had a placeholder in there of a raw chunk of crystal but we always wanted it to be more refined. The characters in the world would want to make their primary fuel source more functional and/or prettier than just a jagged piece of rock.

Andrew was playing around with some different shapes and we all liked this one the best. Obviously it doesn't have the actual soulstone in the middle yet but the shape is neat.

Screenshot of the new, work-in-progress clasp for the soulstone

Web build

We decided we should probably figure out what it would take to publish our game as a web build. Better to do it now so we can pivot if needed, rather than finding problems the day before we go to submit it. I'll discuss this more later.

Tuning

Now that we had (almost) all of the big systems in, we really needed to start actually tuning the game to be more representative of how we expect the final game to play. We talked about several strategies for tuning, like each taking a stab at it then comparing, but we decided to just have another call on Sunday where we take turns playing the game and seeing what needs to be adjusted. The first person to play will probably have the most work, since they'll be establishing a baseline for the rest of the tuning.

Snow manager

I was able to wrap up a bug we found with the Snow Manager. Somewhere along the line it stopped spawning snow, which meant certain death on the trail. I discovered that this was due to the terrain and was the same problem I talked about previously where the Crew and Glimmerstalker would periodically move to the world origin. I fixed that bug and reworked the overall structure to be cleaner and (hopefully) more reliable.

Web Build

The next thing I tackled was trying to get our game built as a web-based game. We knew Unity supported publishing a WebGL build but we did not know what that actually entailed. So, following this tutorial by Max O'Didily I was able to successfully create a web build. Woohoo!

I thought everything was fine. The build succeeded and it uploaded to Itch without errors. However, when I actually went to preview the Itch page the game failed to load.

Screenshot of the file too large error message on Itch

I thought this was weird because on the upload page it said the max file size was 1GB and our game was only ~550MB (yeah, we'll get to that in a few...), so why did it say that the file size was too big? After some digging around on the internet, I saw a passing comment that there was a limit on how big a single file inside the zip could be. This led to me rooting around in the build files to see what might be a likely culprit.

It was pretty easy to find. The Web.data.unityweb file was 501MB, the bulk of the game size. I still didn't know why it was "too big". More digging online and I found the Itch documentation for zip files.

Screenshot of the zip file requirements from the Itch documentation

The important line in there is:

The size any single extracted file should not be greater than 200MB

Welp, that file was definitely larger than 200MB. Now, to figure out what is driving up the file size. Through some very cryptic Unity forum posts, I was able to find that the Unity Editor Log contains a "build report" for each build and it breaks down the assets that were included in the build. It also has a nice summary by type at the beginning. The log can be accessed by clicking the three dots if the top-right of the Unity console and selecting "Open Editor Log".

Screenshot of where to find the editor logs in Unity

In the log, you can search for build report until you find the one you are looking for. It will have all of the past builds as well, until the log is cleared (I don't know if it cleans itself up or not). When I found my build, it showed a whopping 719MB just for textures, which it was able to compress down to ~500MB, That is bonkers.

Screenshot of the initial build report with excessive texture sizes

Scrolling down from the summary, it shows all of the assets, using the file size as the order. I found that the textures from some rocks from an asset pack was accounting for a massive chunk of the size. These were tiny rocks just dotted about for visual flair. We decided to try removing the rocks and rebuilding and that cut the build size in half. Crazy that just a few assets could affect that much!

Screenshot of the reduced build report after removing asset pack rocks

This got us close to the 200MB file limit but still not quite there. We still have to add in music/SFX, icons, and some VFX, so I don't know if we'll be able to crunch it down enough to get a web build out. I think if we did, the main problem will probably be the assets from the asset packs (like the buildings and trees). Those might be more difficult to reduce the size of, compared to our custom textures. Almost all of our custom textures in Substance Painter, so we can easily export them at a lower resolution. We may end up quickly modeling replacements for the asset pack stuff just to have more control over the sizing of things. Now we know more what to look for!

For now, we will just move forward with a downloadable build and once we get the game tuned and the missing pieces added, we can take another pass at optimization. We'll definitely have to sacrifice some quality if we want to support the web build, which is fine because the game is pretty dark most of the time, so higher fidelity textures are less useful any way. We would also really, really like to have a web build. It gives better visibility in the jam and means it will be more likely to be rated.

Making the Glimmerstalker Stop Stalking

After getting the bulk of the Glimmerstalker behavior done yesterday, the last piece that I could think of was having the Glimmerstalker go back to the Harassing state if the target they were stalking stayed in the light/RepelZone for a set amount of time. It wouldn't make any sense if the Glimmerstalker's target was a Crew member that panicked and was rescued. Once the Crew got back to the caravan, they would always be in the light...it would be silly if the Glimmerstalker forever after still tried to get just that Crew member.

So, we needed a way to tell when the Glimmerstalker's target had been in a Repel Zone for some amount of time and if they had been, for the Glimmerstalker to go back to general Harassing. We already had a RepelZoneDetector on the Crew and the Player that the Glimmerstalker was (indirectly) using to determine if the character was stalkable. This was pretty easy to adjust to also track how long the detector had been inside any repelling zone.

In the gif below, you can see the Glimmerstalker state change at the top of the debug panel when the Player is outside the light for too long, then it switching back to Harassing when the Player goes back into the light for a couple of seconds.

Gif showing the Glimmerstalker changing from Stalking to Harassing when the Player goes back into the light for long enough

Code Cleanup

There was quite a bit of cleanup of leftover code from reworking several of the systems. Luckily, most of it showed up in Visual Studio as unreferenced variables! In addition to removing unused code, I also added in some other things, like showing the Stalked icon on the Crew when appropriate. There is still a lot that needs to be added as far as effects, animations, and such but I tried to wire up what we already have.

Big Merge...Again...

Because this branch was way more involved than I had anticipated it lived longer than I wanted. This allowed Andrew and Terra to get quite a few items put into the game. This meant quite a bit of careful merging. It mostly went well...at least the second attempt. I need to get better at identifying what pieces need to be in place when merging the Unity scenes. I thought I had it down but apparently not. I eventually got it. Long term, we'll need to figure out rules to help avoid conflicts in the first place, like not working on the same GameObjects/scenes. Oh well, for the game jam it is fine.

Adding the Attack state

The main goal of today was to get the Attack state working, along with the other states associated with it (namely, Fleeing and Satiated). I got to work adding in the Glimmerstalker "charging" the Player when it entered the Attack state. There will need to be some tweaks made to the speed and distance at which it charges from but overall, it was working pretty good.

One glaring problem though, is that the Glimmerstalker is way too dark/hard to see with the default texture that came with the model. We plan to change the texture to be white to match the lore but we haven't gotten to that yet. I think that will really help make the Glimmerstalker pop, especially if we add a slight glow to it. It is supposed to "glimmer" after all!

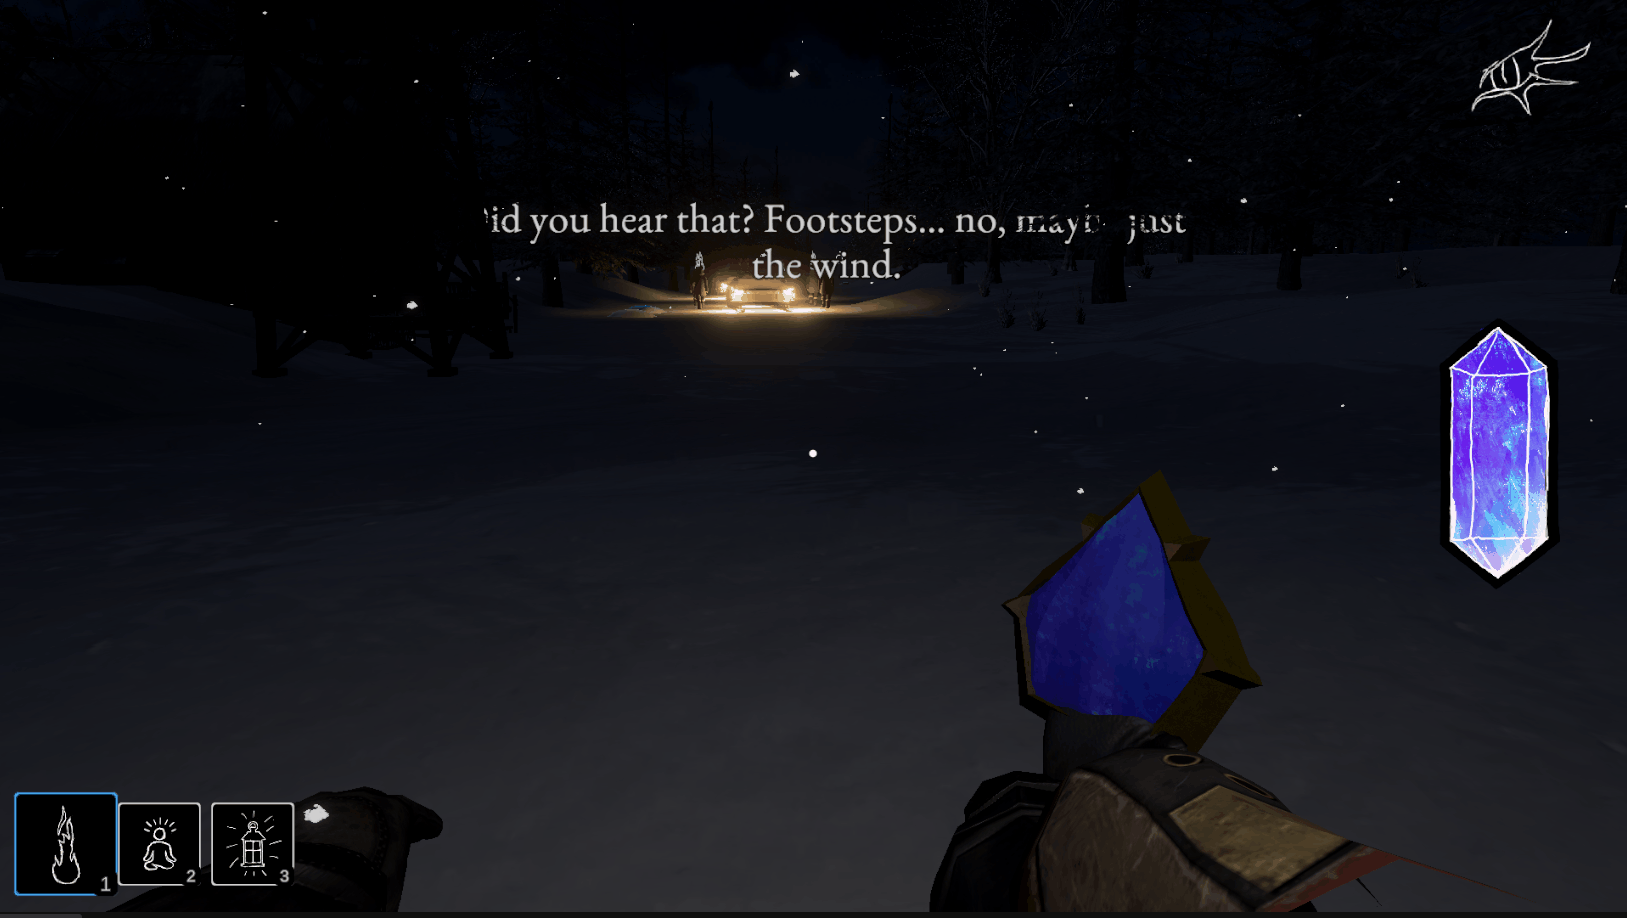
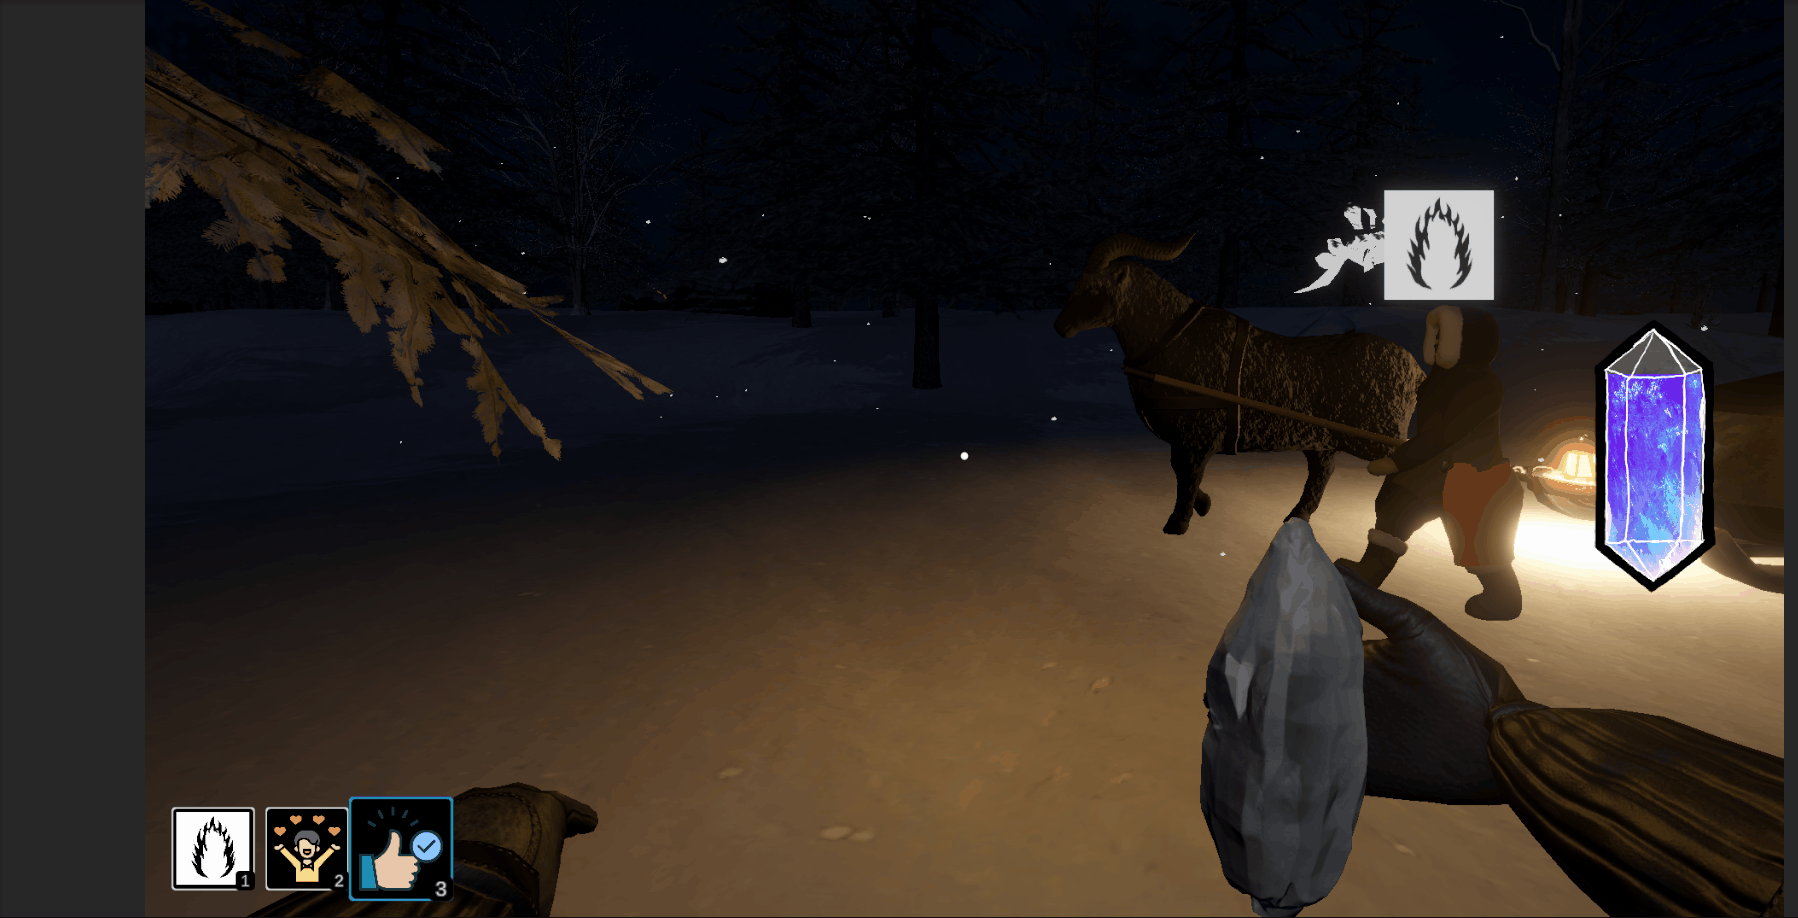
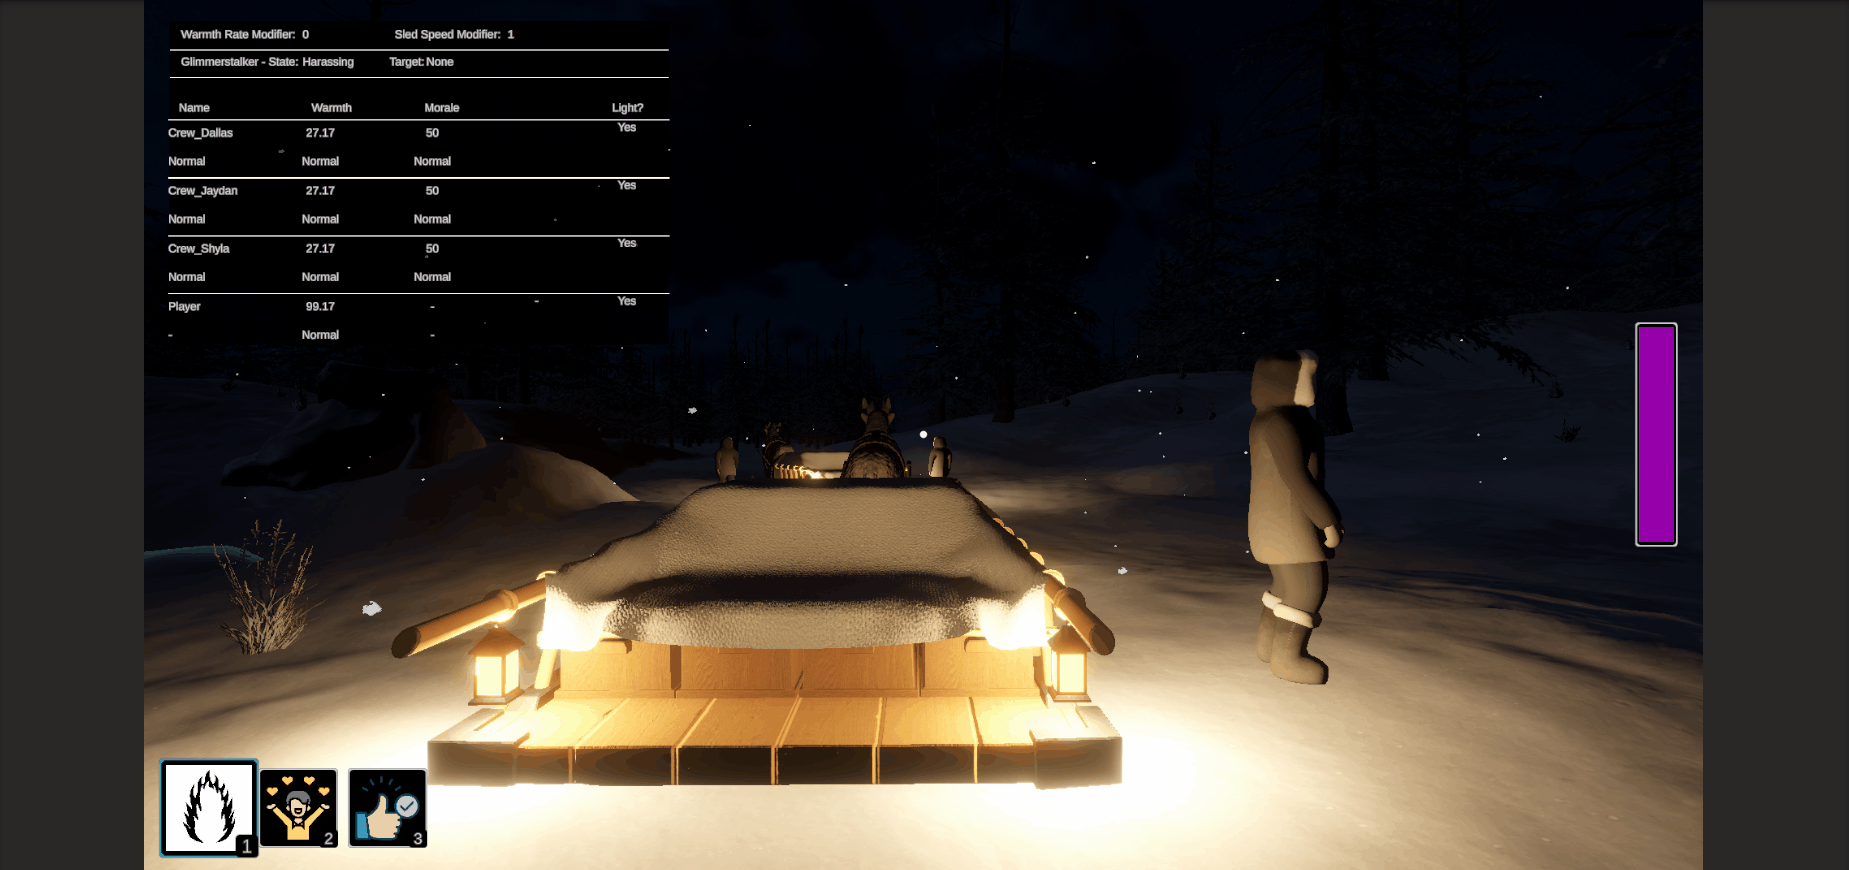
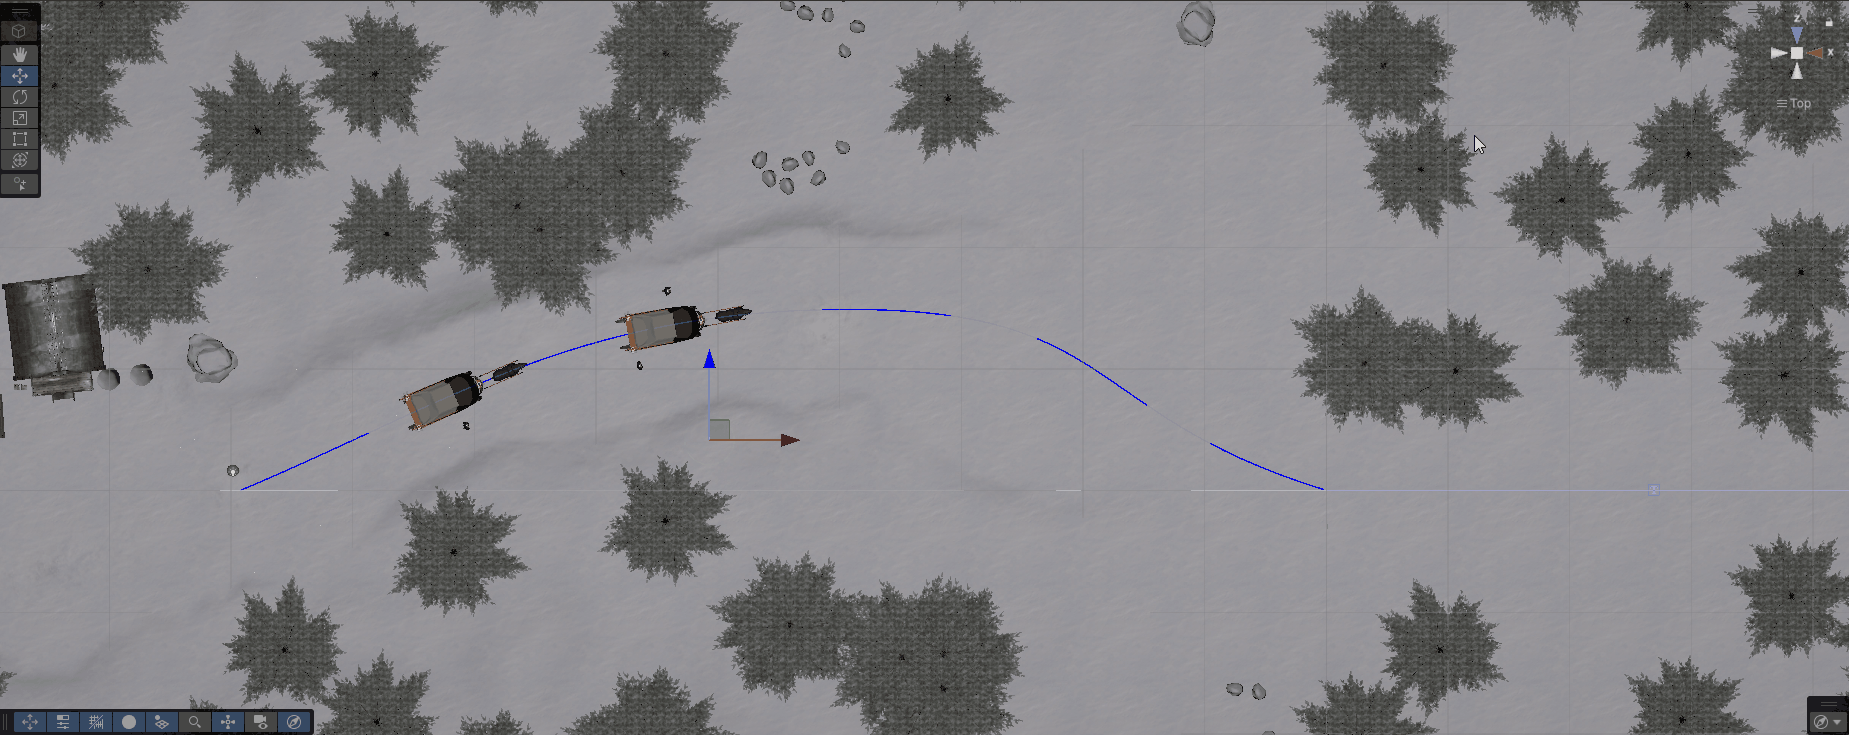
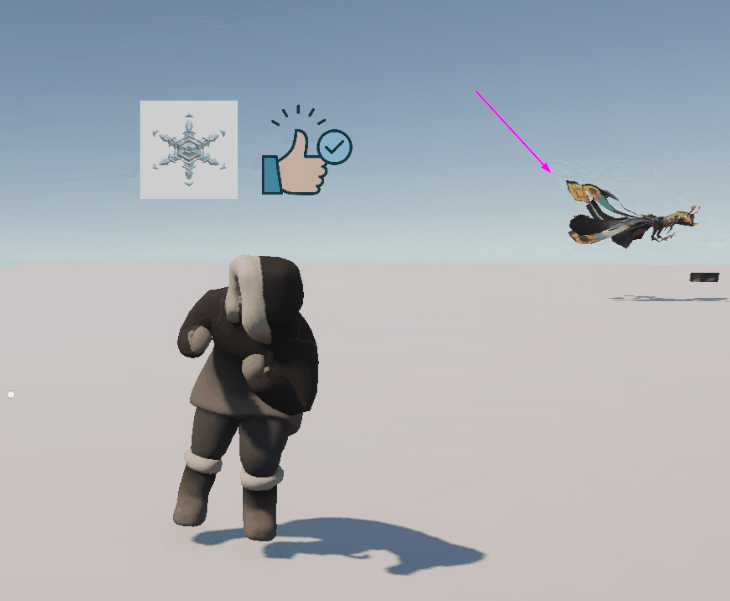
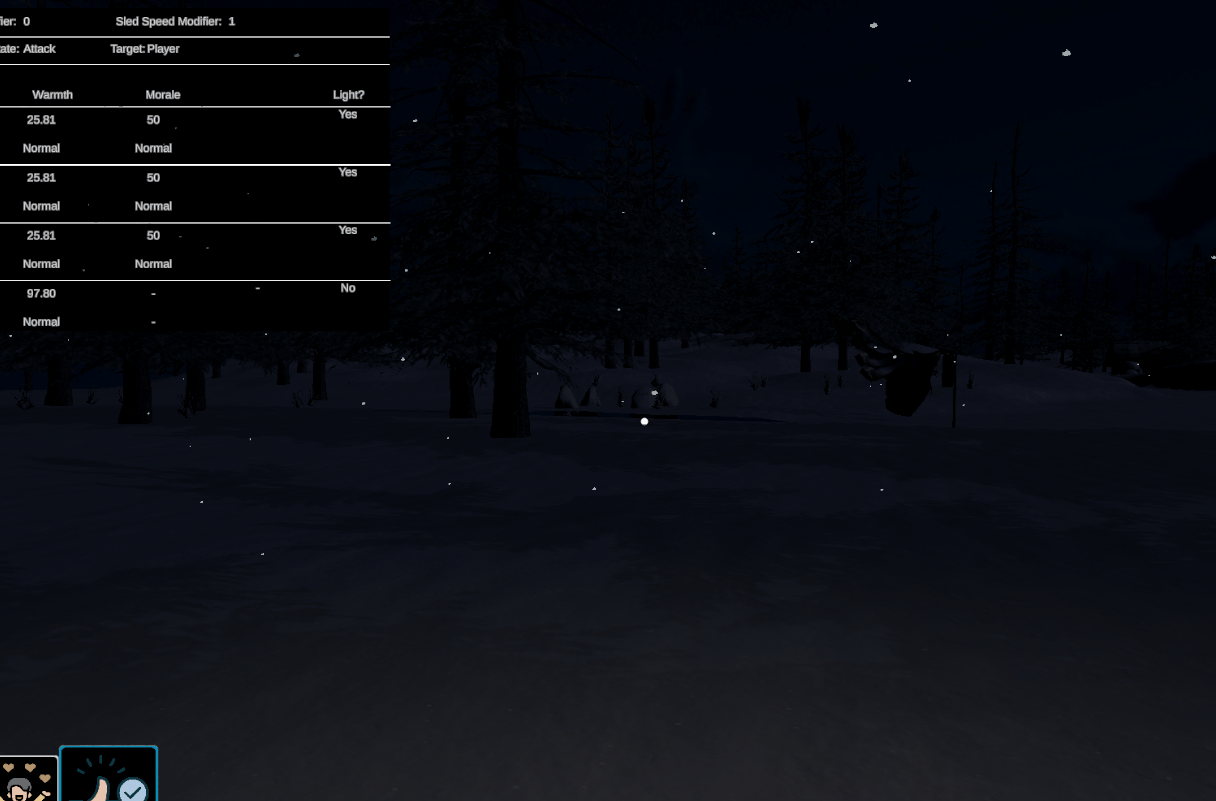
In the image below, see if you can find the Glimmerstalker. I'm sure the image compression and viewing it at a smaller resolution doesn't help but it isn't much better "in person".

Screenshot of Glimmerstalker in the dark

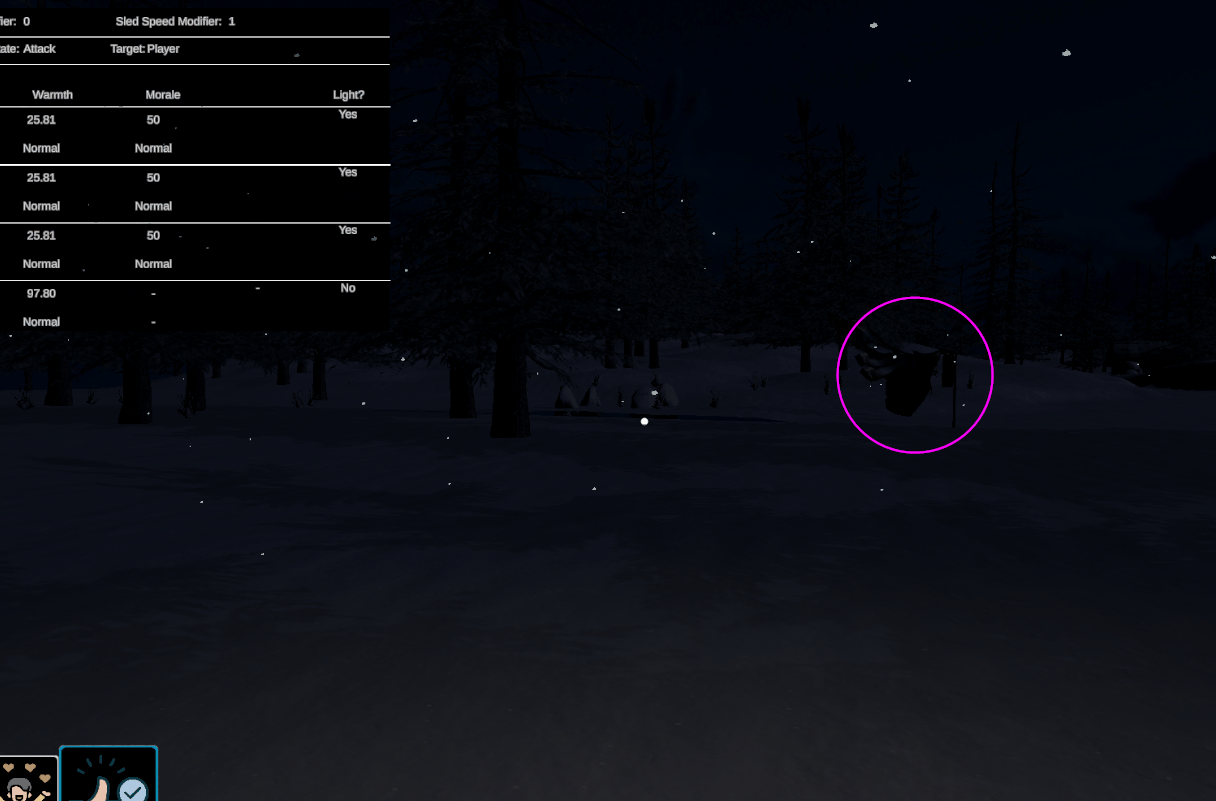
In case you didn't find it, here it is. See how it blends in way too well with the surroundings? We want it to be scary but without the texture change, it is just straight up not fair. You do get some help because it is animated, so you can catch the movement but still.

Screenshot showing where the Glimmerstalker is in the dark

We already have it in the plan to retexture the Glimmertalker, so for now I will just soldier on, trying not to get eaten by the almost invisible killer.

Once I got it to collide with the Player or the Crew, I stubbed out what it was supposed to do. For now, it would just send out a debug log to tell me that a character got hit. I didn't want the game to end or the Crew to die quite yet because I wanted to test more functionality, like what happens when the Glimmerstalker interacts with a light.

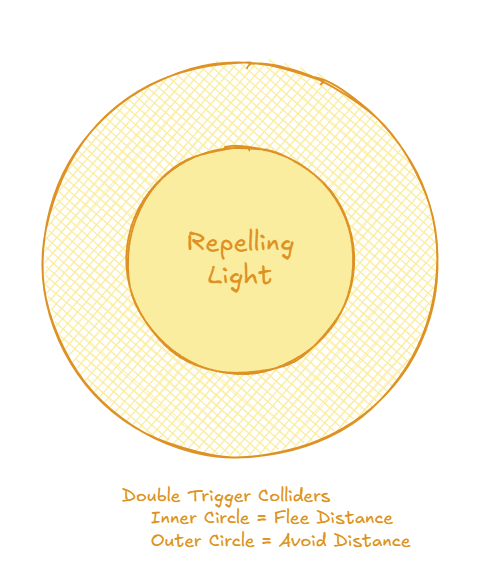
The original plan for the light/Glimmerstalker interaction was that the Glimmerstalker would skirt around the edges of the Avoid zone of the light and would "flee" if it entered the Flee zone. The intent was to either give the Player a short reprieve while they were in the light or to give them a longer reprieve if they timed casting the Light spell just right to catch the Glimmerstalker in the Flee zone. This would give the Player the option of going the easier route of not having to time it perfectly, at the cost of the Glimmerstalker resuming their attack quicker or going with the high risk, high reward that would make the Glimmerstalker go away for longer.

Diagram of the initial Repelling Light structure

The problem I had with the initial plan, is that I had already tried to implement the "skirting" behavior previously and I did not like how it looked. I think it could be good but I think we would need to take a lot more control over the movement, rather than just telling the NavMeshAgent to go to the target. This was more work than I am willing to do for the game jam, since we are already like halfway through it and we have a ton of cleanup and polishing to do.

This led to start rethinking what should happen when the Glimmerstalker encountered a light. I had some ideas and talked it through with Terra to help narrow down the options. The Avoid zone was definitely the problem, conceptually, whereas the Flee was much simpler and defined (i.e. enter Flee zone, it enters the Fleeing state and goes away).

My initial thought was to just remove the Avoid zone altogether and just have the Flee. Since we didn't have the Glimmerstalker have a corporeal body when not attacking anymore, the utility of the Avoid zone was greatly diminished. However, Terra liked the concept of the different zones and thought it gave more variety. So now it was just down to figuring out what the Avoid zone did.

An idea Terra had was to just have the Glimmerstalker stop when it hit the Avoid zone and stare at the Crew/Player until they left the safety of the light again (up to a certain duration, at least). Kind of going for the spooky, "You may be safe now, but I'm always here" atmosphere. However, that came with a couple of problems, like:

  1. What happens if the Glimmerstalker is caught in the middle of the Avoid zone (i.e. the Player cast Light and caught it as opposed to the Glimmerstalker just ran into the light)?
    1. We thought about having it flap backwards out of the light then stand but that brought us to the next question
  2. What happens if the light is moving, like on the sled? Does it try to "keep up" with it?
    1. It would look silly if the Glimmerstalker would reposition itself every couple of seconds to stare from outside the light.

Ultimately, we thought that the solution would work if all of the lights were stationary (especially if you added logic to make it stalk around the periphery of the light). However, because we have moving lights, it probably wasn't our best option.

The final solution we settled on was to basically mimic the Flee concept but smaller. If it hit the Avoid zone, an animation/particle/sound/etc would play of the Glimmerstalker moving away and it would disappear. Then it would wait until the character was no longer protected by the light then move right back into the Attack state. There would still be the slight delay that already exists granting the characters a couple seconds of safety after leaving the light. The Flee zone would be similar but with bigger animations/particles/etc and the Glimmerstalker would return to the Stalking state instead, which would restart the Attack delay timer, giving the character even more time to react.

This seemed like our best option for now. A good balance between visuals, code complexity, and time to implement. It could always be reworked later if it ended up not being fun. When I got into the nitty-gritty of implementing it though, I ran into some issues.

Repelling Light Inconsistencies

Problem 1: Starting States

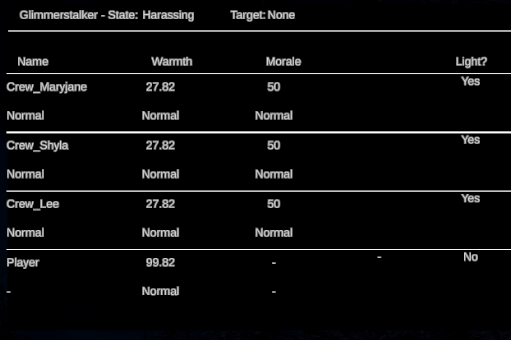
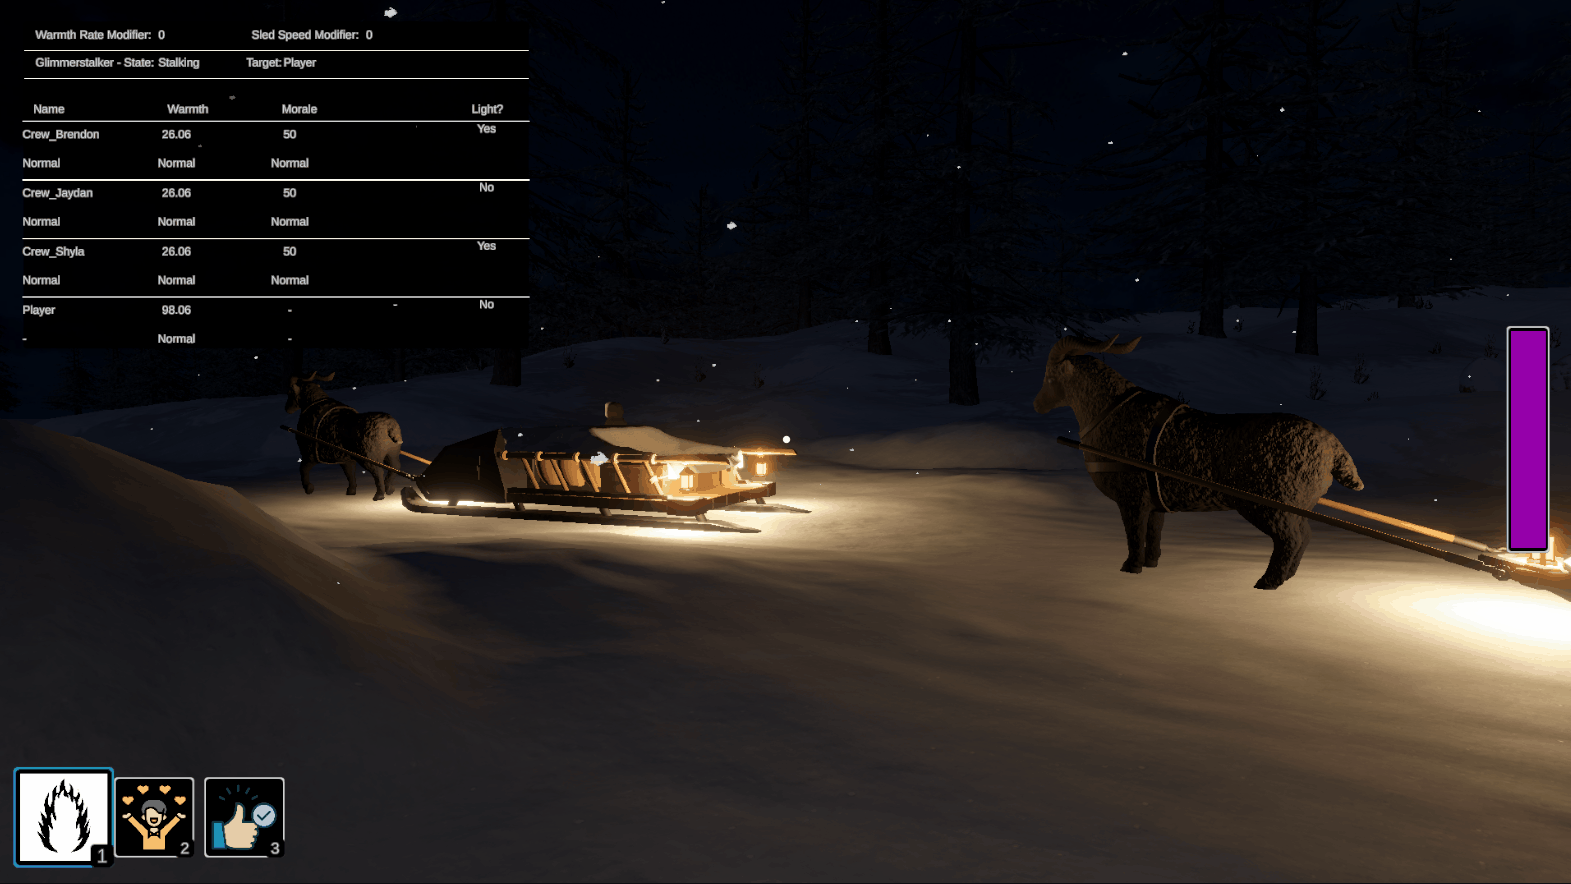
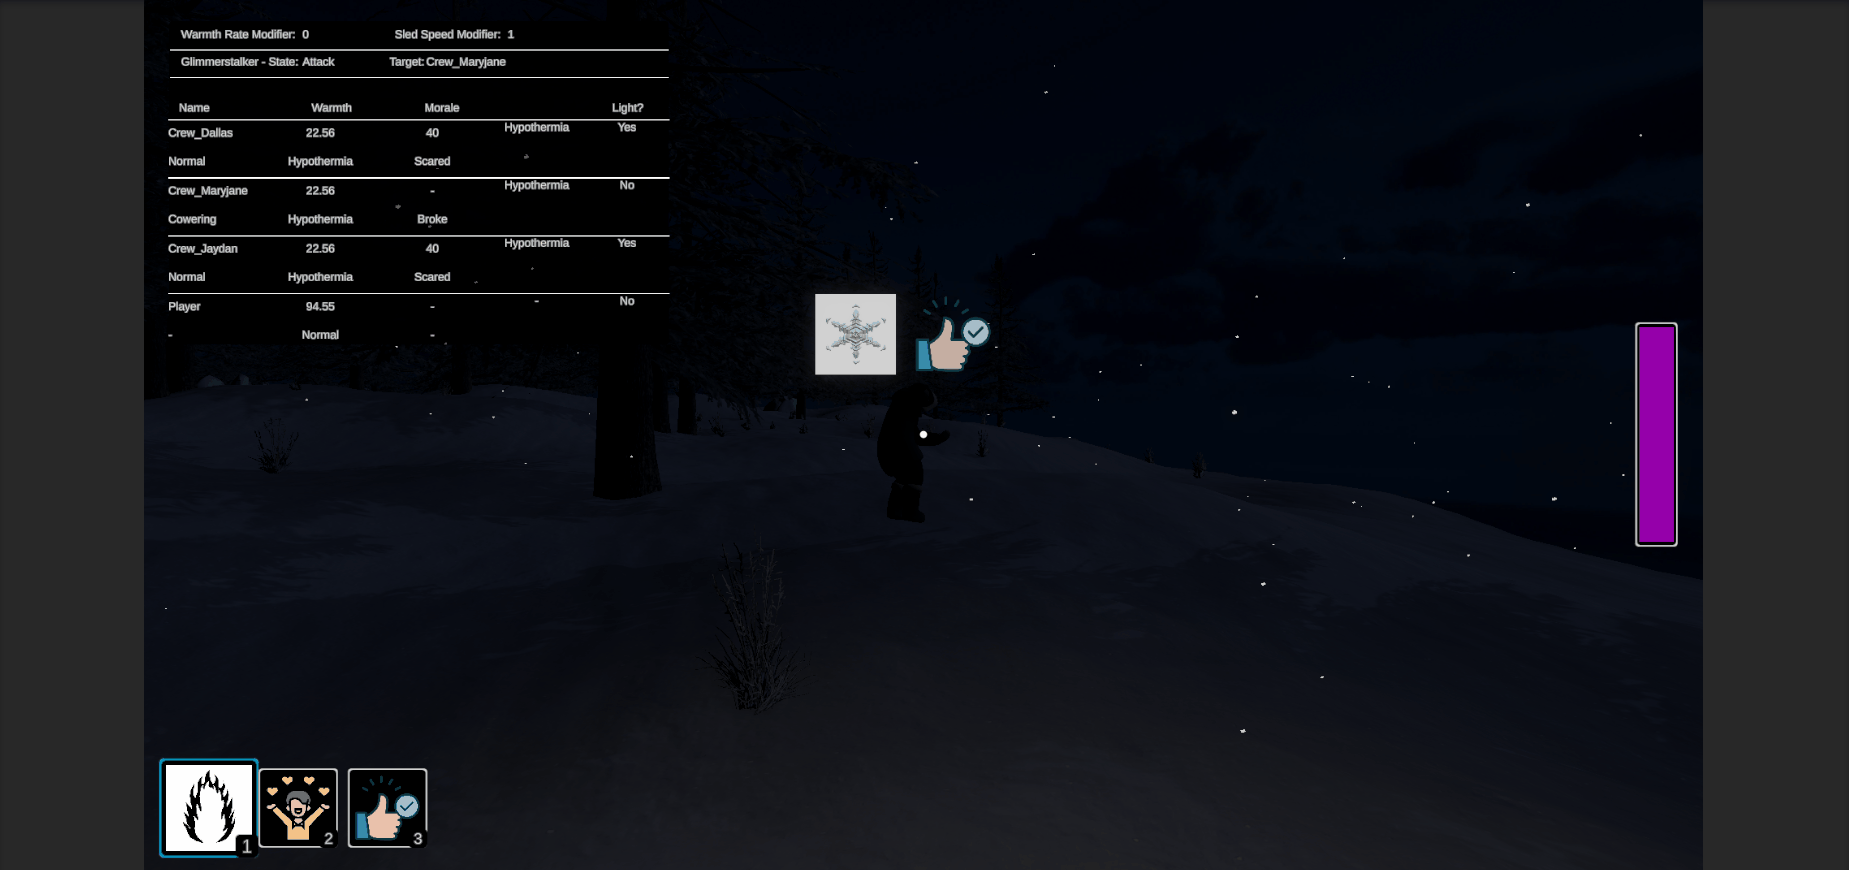
While testing the Avoid and Flee functionality, I was seeing some inconsistencies with which characters I expected to be protected by lights vs who actually was. When starting the game, all of the Crew should have been protected by lights, since they all start right next to the Caravan. Looking at the Debug panel though, some Crew would be protected, while others weren't. This appeared to be random and I couldn't see any rhyme or reason for their values.

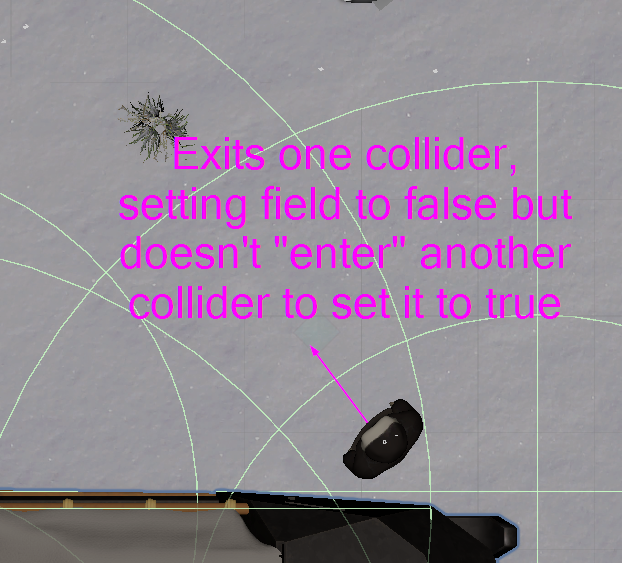
Digging in further, I stumbled onto a potential lead related to the interactions between the colliders we have on the lights and the Crew/Player. To summarize how the lights currently work, we have two colliders, one each for the Avoid and Flee zones, that detect when a character enters/exist. This would set an _isProtectedByLight field true or false if they were entering or exiting, respectively. Now, the problem comes when we leave a collider (which sets the field to false) but the character is still within another Light zone. Because we are using colliders, it doesn't "hit" the other collider, so the field is never set to true again until they leave completely and come back in. Essentially, we were using multiple flags to denote the state but we were only really looking at whatever the last flag change was.

Screenshot showing the problem with the light colliders

It was at this point that I realized that we would have to rework how the light zones were managed and how we determined if something was protected by light and to what degree (e.g. No protection, Avoid, or Flee). The original implementation was built exactly how we had talked about, so props to Andrew for building it. We just didn't know about all of the problems we would face going that route. Now we know more about colliders and how (not) to use them!

Problem 2: Never Fleeing

I wasn't planning on doing that work now, since I just wanted to get the Stalking behavior finished and out to the group. There are a lot of good changes related to it that would help the team. That was the plan, until I got to really testing the new Glimmerstalker Avoid and Flee behaviors.

I got the new Avoid functionality implemented and it was working exactly as we had hoped. Now that that was looking good, I wanted to test the Flee behavior. I would wait until the Glimmerstalker would get really close, then cast the Light spell. I expected the Glimmerstalker to enter the Flee state but it always would enter the new AvoidantStalking state. It appeared that the Glimmerstalker was always colliding with the Avoid zone first, even if it would have also hit the Flee zone. Typing this out, it also could have just been the last state we called MoveToState with, like if the Flee was hit first but the Avoid was also hit on the same frame, then AvoidantStalking would have been the last state. Either way, I tried changing the order of the colliders in the prefab but that didn't work. The Flee zone worked perfectly when I disabled the Avoid zone, so I know everything was set up correctly on that front.

At this point, I was fed up with the colliders and their quirks. They were doing their thing like they are supposed to but I think we were just using the right tool for the wrong job. I decided to rework how the lights worked now, because I couldn't actually test the full Stalking functionality without it.

Reworking the Light Zones

I wanted to revisit one of the original ideas I had for how the lights could work. The idea was that there is a Light Manager that each light would register itself with and other scripts could query to see if a given point was within a light.

I started with getting the Light Manager class made up. Well, actually, I ended up making it more generic to be a RepellingZoneManager. When Andrew built it, he had the good idea to make the actual mechanism behind the light to be a RepelZone instead of a light, specifically. Then he put the RepelZone on a light in the prefab. This makes a lot of sense and allows us to add other safe areas that aren't related to the lights.

It was pretty streamlined with just those three public methods. For checking the "Repel Level" for the point, I am just delegating that work to the individual RepelZone to tell the manager it's relation to the point. The manager simply iterates through all of the zones and returns the "highest" level of protection that it found. If any of the RepelZones returns back the Flee value, it immediately kicks out because that is the highest protection level. It actually did something different initially but writing this description out made me realize a flaw in the original logic. Gotta love it!

public class RepellingZoneManager : MonoBehaviour
{
    public static RepellingZoneManager Instance { get; private set; }

    private readonly List<RepelZone> _zones = new List<RepelZone>();

    private void Awake()
    {
        if (Instance == null)
        {
            Instance = this;
        }
        else
        {
            Destroy(gameObject);
        }
    }

    public void RegisterZone(RepelZone zone)
    {
        if (_zones.Contains(zone)) return;

        _zones.Add(zone);
    }

    public void UnregisterZone(RepelZone zone)
    {
        _zones.Remove(zone);
    }

    public RepelLevel GetRepelLevelForPoint(Vector3 point)
    {
        var highestLevelFound = RepelLevel.None;

        foreach (var zone in _zones)
        {
            var zoneLevel = zone.GetRepelLevelForPoint(point);

            if (zoneLevel == RepelLevel.Avoid)
            {
                highestLevelFound = zoneLevel;
            }
            else if (zoneLevel == RepelLevel.Flee)
            {
                highestLevelFound = zoneLevel;
                break;
            }
        }

        return highestLevelFound;
    }
}

The individual RepelZones have configurable Avoid and Flee radii and does a simple distance check to see if the distance to the point is within one of those radii. There is some validation that I excluded here that validates the Avoid Radius is always larger than the Flee Radius, that way I could ensure that the order I'm checking them in is always correct.

public class RepelZone : MonoBehaviour
{
    [Header("Config")]
    [SerializeField]
    private float _avoidRadius = 2f;

    [SerializeField]
    private float _fleeRadius = 1f;

    private void OnEnable()
    {
        RepellingZoneManager.Instance.RegisterZone(this);
    }

    private void OnDisable()
    {
        RepellingZoneManager.Instance.UnregisterZone(this);
    }

    public RepelLevel GetRepelLevelForPoint(Vector3 point)
    {
        var distance = Vector3.Distance(transform.position, point);

        if (distance <= _fleeRadius)
        {
            return RepelLevel.Flee;
        }
        else if (distance <= _avoidRadius)
        {
            return RepelLevel.Avoid;
        }

        return RepelLevel.None;
    }
}

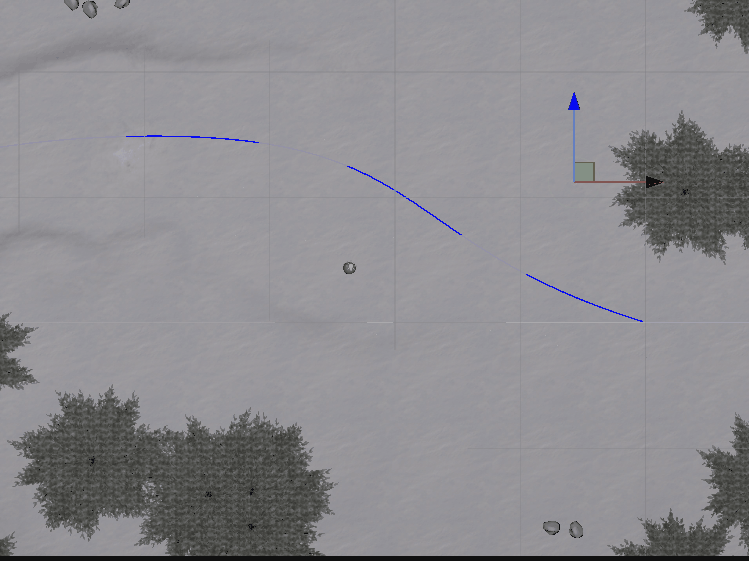
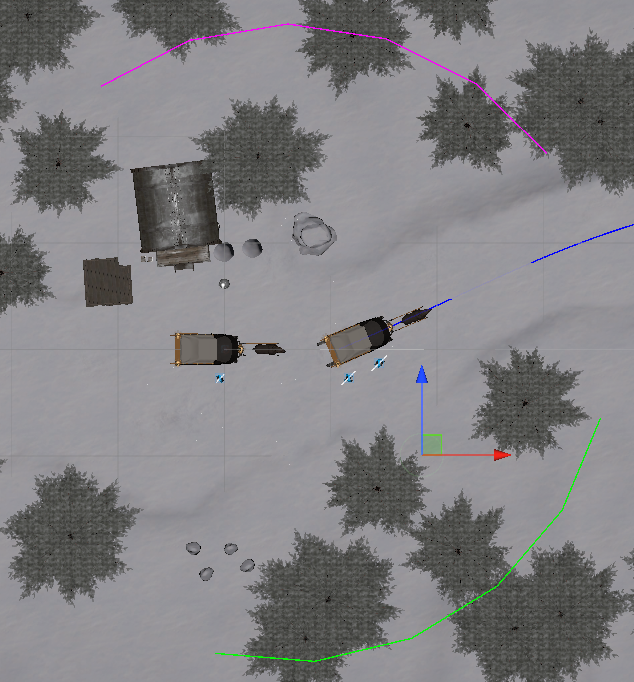
While testing the new Repelling Zone Manager, I noticed a deficiency between the old way and this new way. I couldn't tell where the zones ended in relation to the light. In the old system you could tell where the zones ended because they were colliders that showed up in the editor. To remedy this, I fell back on my trusty debug arcs. However, now that I needed to draw a circle in multiple places, I decided to encapsulate that functionality in the same CoreUtils class that draws the arcs.

public static void DrawDebugCircle(Vector3 origin, float radius, int segmentCount, Color color)
{
    var halfSegmentCount = segmentCount / 2;
    DrawDebugArc(origin, radius, Vector3.forward, 0, 180, halfSegmentCount, color);
    DrawDebugArc(origin, radius, -Vector3.forward, 0, 180, halfSegmentCount, color);
}

This way, I don't have to remember how to do it every time and it is in a nice, easy package. Called like this:

private void OnDrawGizmos()
{
    if (!_showDebugLines) return;

    CoreUtils.DrawDebugCircle(transform.position, _avoidRadius, 20, _avoidRadiusColor);
    CoreUtils.DrawDebugCircle(transform.position, _fleeRadius, 20, _fleeRadiusColor);
}

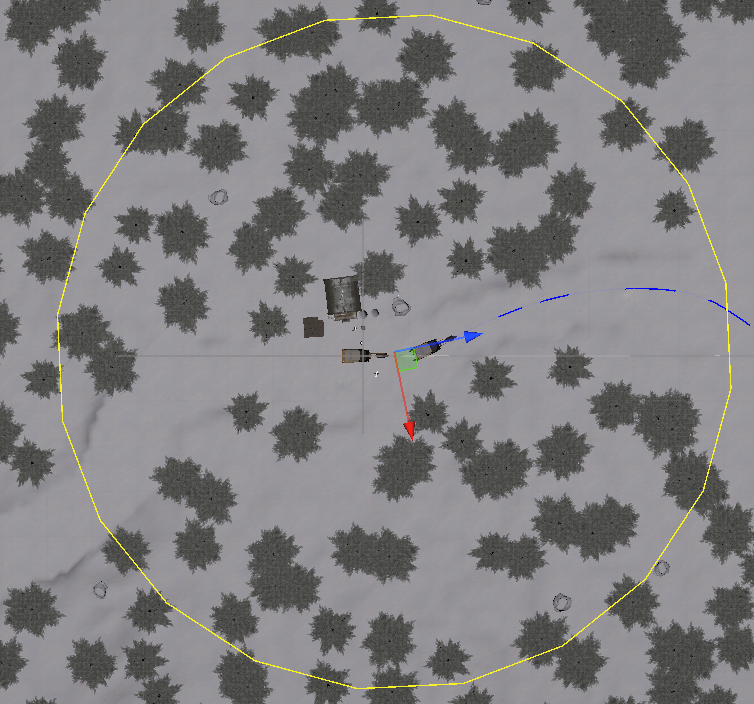
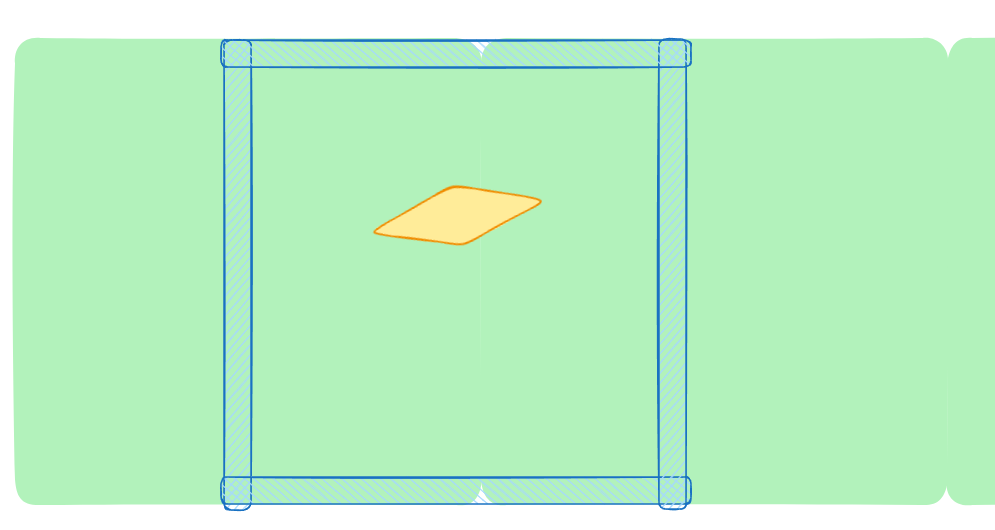
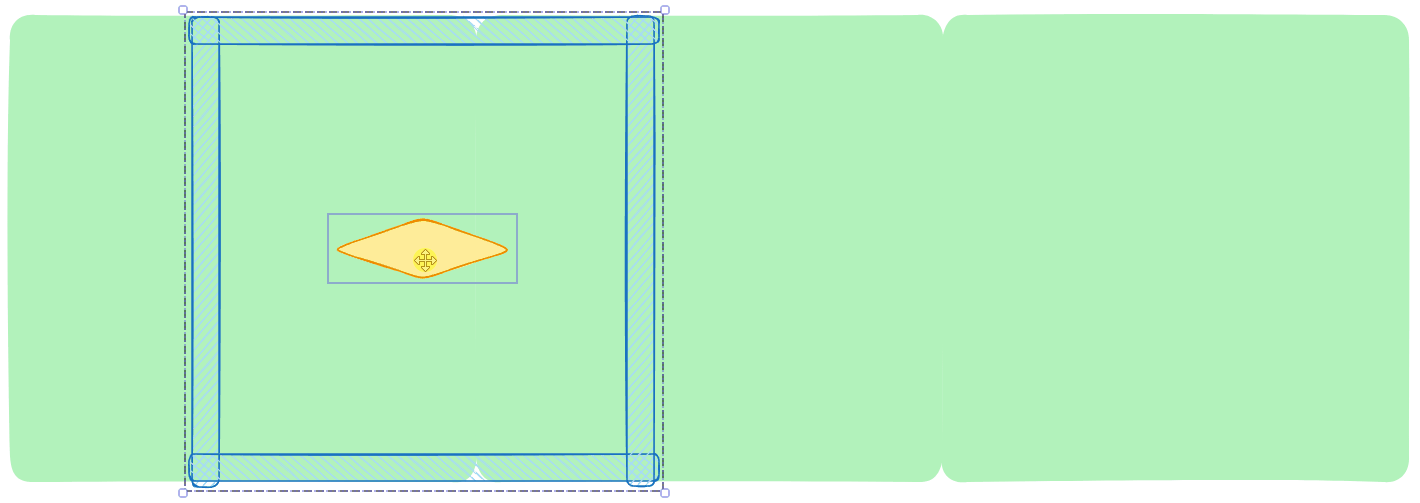
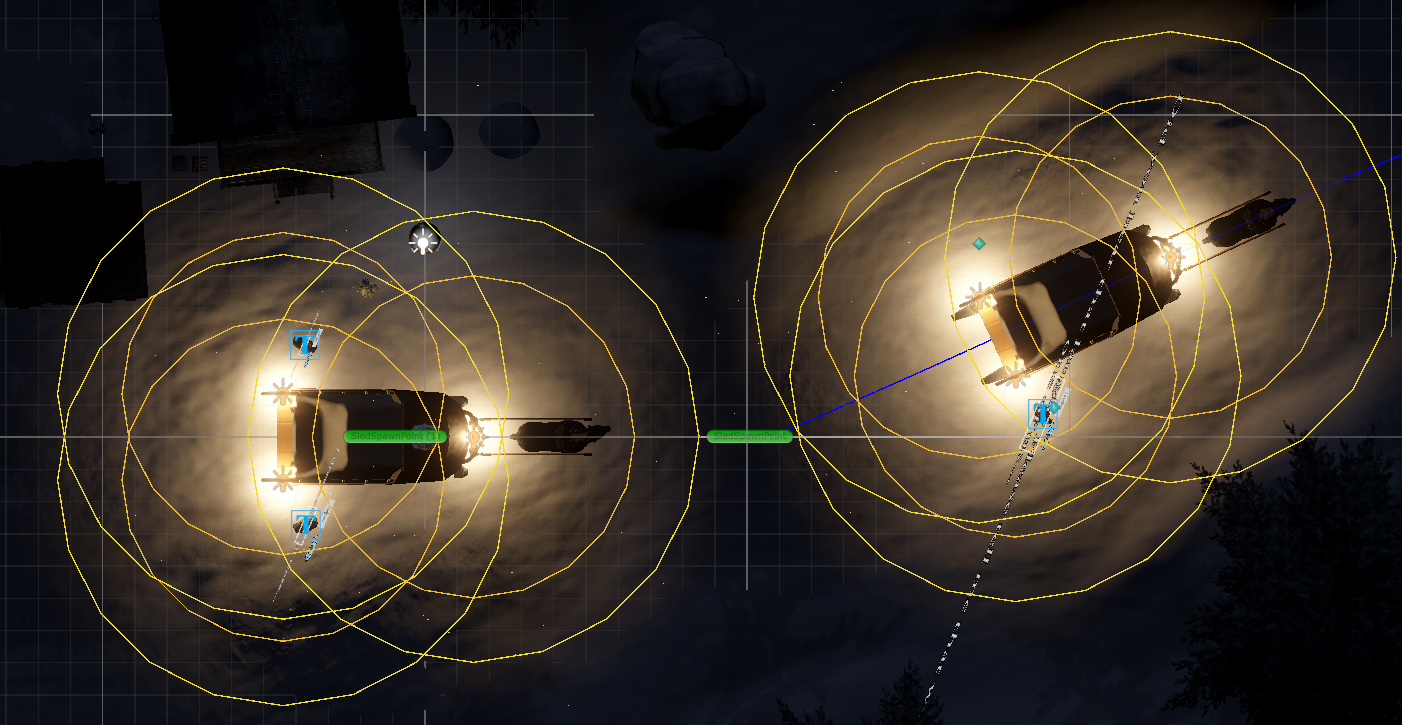
With the end result looking like this, with the lighter yellow being the Avoid Radius and the darker being the Flee Radius.

Screenshot showing the Avoid and Flee light radii being drawn in the editor

It's All Coming Together

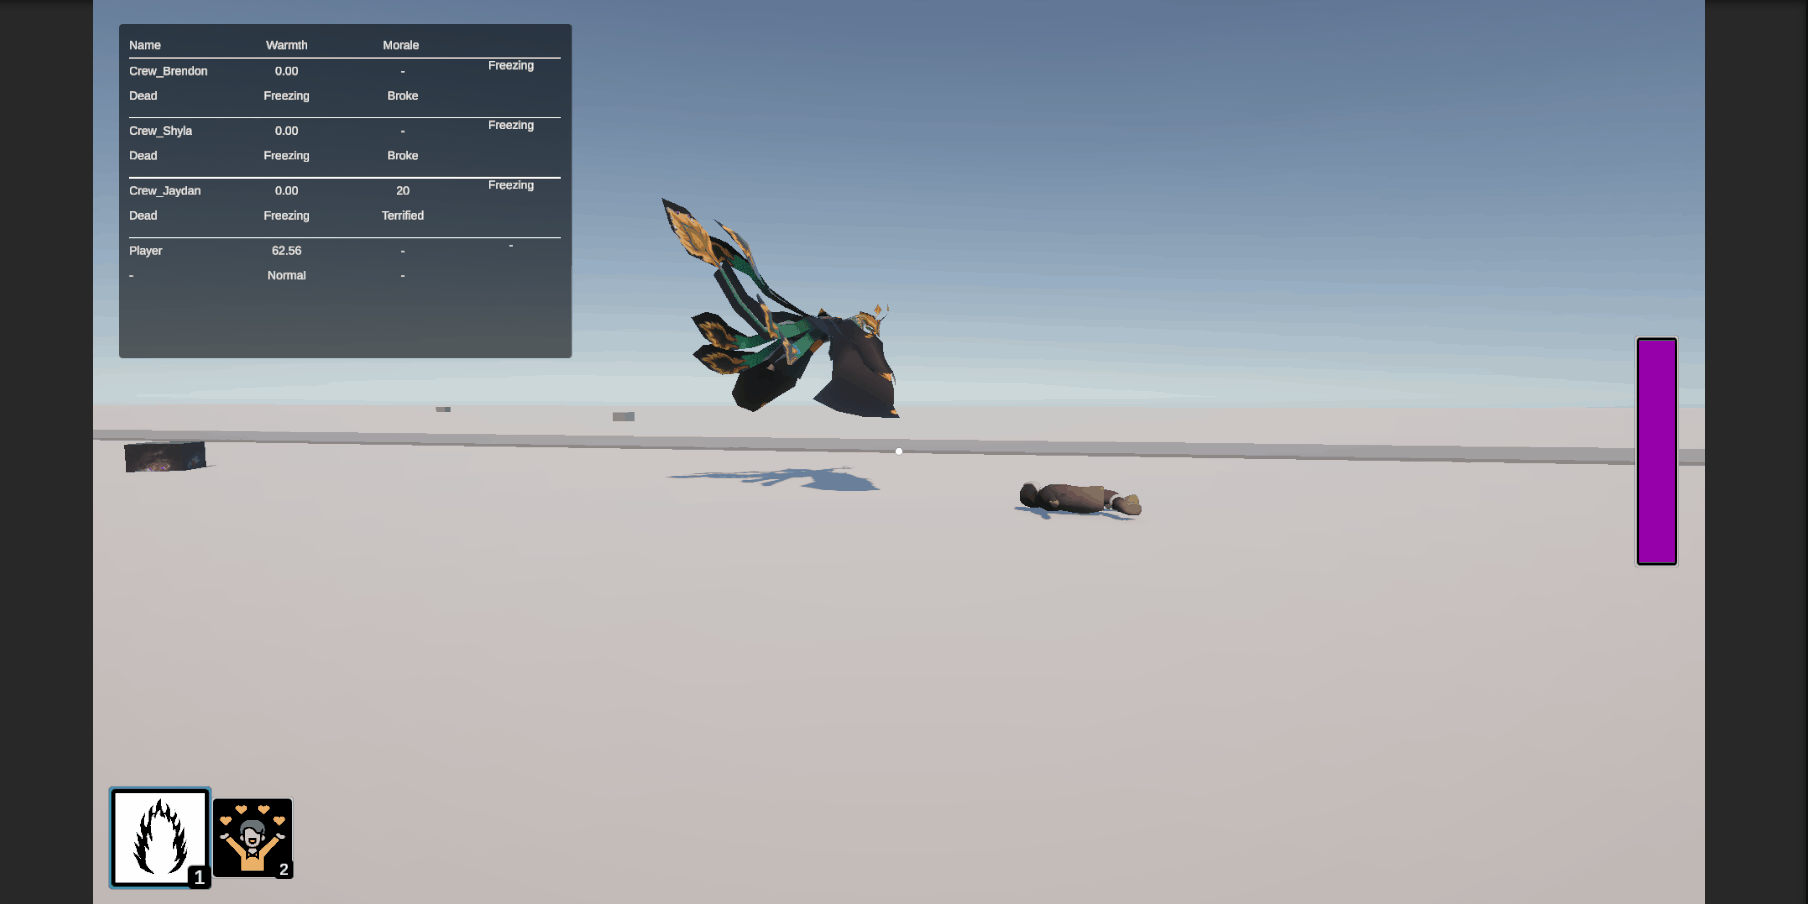
After reworking the lights to use the new and improved RepelZones I went around and tried buttoning up the rest of the functionality. This mainly entailed making the Crew die when hit or the game end when the Player is hit, as well as some various testing.

As you can see, the Crew now dies when hit by the Glimmerstalker. Once again, this is missing any effects to make it smoother.

Gif of the Glimmerstalker attacking a Cowering Crew member

The last thing I can think of to add is to make the Glimmerstalker go back to Harassing state if their Stalking target stays within the light for a set amount of time.

Light Work Today

Today didn't have a lot of work being done and was mostly spent ensuring the stalking was working as expected. So far everything was looking good. Some cleanup here and there but nothing really interesting.

I did add some additional keybinds to the new Debug Commands for setting the Warmth Depletion Rate and the Sled Speed. I have two keyboards and one of the doesn't have a dedicated number pad and I couldn't send those commands on it.

Now you can use the following keybinds:

Action             Key       Alt Key
Zero Warmth Rate   NumPad 1 ,
Normal Warmth Rate NumPad 2 .
Double Warmth Rate NumPad 3 /
Zero Sled Speed     NumPad 4 l
Normal Sled Speed   NumPad 5 ;
Double Sled Speed   NumPad 6 '

Making the Glimmerstalkers Actually Stalk

Today was the day that I would actually tackle trying to make the Glimmerstalkers actually stalk the characters. I'm not sure why I've been hesitant to but here we are!

Our original idea was that when a Glimmerstalker entered the Stalking state, it would move towards towards its target and when it got within a certain distance, it would "hover" around the target. The intent was that it would take some time before the Glimmerstalker would attack to give the Player time to react and the hover would serve to provide variation on where the character would be attacked from.

I was able to get that implemented but I found that it wasn't going to quite work how we imagined. Once the Glimmerstalkers got within hover range of the character they would constantly pick a new position. I realized that I would need to add some type of timer to delay finding a new position.

Gif of Glimmerstalker hovering around the character in a jittery manner

I started really thinking about how to fix that and what we were trying to accomplish. Ultimately, we want some minimum amount of time from when a Glimmerstalker starts stalking a character to communicate to the Player what is happening. I decided to forego the actual movement towards the character and instead to just rely on a timer to provide the delay. We had planned on using a timer to define the minimum time anyway, so why not just use that as the primary mechanism for this whole behavior?

I reworked state to use a timer to determine when the Glimmerstalker should find a new position instead of moving towards the character. This would be a separate timer from the "minimum" timer discussed earlier. This would allow us to configure how often it would change position to vary things up.

Gif of Glimmerstalker hovering around the character in a smoother manner

This seemed to work much better and was a lot easier to tune. We could now set how far away the Glimmerstalker stays from the character and when it changes position. The only problem I was running into was that the Glimmerstalker doesn't keep up with the character when they move. This poses a problem because if the Glimmerstalker is in front of the character then when the Glimmerstalker goes to attack it might be too close to the character for them to react.

To fix this, I changed the Glimmerstalker's position from an absolute position to a relative offset. Then, every frame, we update the Glimmerstalker's position to match the character's position and apply that offset. Now it follows the character as expected.

Gif of Glimmerstalker hovering around the character while moving

That was all for today. Tomorrow will hopefully be implementing the Attack state.

Fixing Refactor Issues

Today was spent making sure I didn't break anything when refactoring the Glimmerstalker.

Errors with the Harassment Actions

When I went to configure the new basic Harassment Action in the Inspector yesterday, I ran into an error when hovering over the add/remove buttons for the Potential Morale Modifiers list. I was able to add one element to the list before it stopped working completely.

Trolling around online, I came across that private nested classes don't play well with ScriptableObjects. I was using a private nested class to get the "Dictionary" behavior in the Inspector so I could pair the Morale Modifiers with their chances of being selected. I've used this pattern several other times without any issues but apparently they work because Unity is not wholesale serializing those objects like they do with ScriptableObjects. Changing the nested class to be public resolved a couple of the errors being shown but there were still one other error.

This one was harder to track down but from a Unity forum post, it looks like this error was introduced in Unity version 6000.0.51f2 and hasn't been resolved yet. For now, it is not blocking our work, so I won't worry about upgrading to Unity 6.2.

Crew Not Protected by Lights

Once I got the HarassmentAction working I went to test it in game. I quickly ran into a problem where the Glimmerstalker would almost immediately switch over to the Stalking state and wouldn't harass. I didn't have the Stalking state doing anything yet, just switching over to it if there was an applicable target.

It took a bit to figure out what was going on. I didn't really have good messaging for when the Glimmerstalker changed states so at first it just looked like they weren't doing anything. I ended up expanding the debug panel to include the Glimmerstalker state and target. It made it obvious that the Glimmerstalker was moving to the Stalking state almost immediately but not why. To help figure that out, I added more info to the debug panel. Now I could see which characters were in the light and which ones weren't.

Here is what that looked like at the end. You can see that the Glimmerstalker starts Stalking Lee once they have been out of the light for long enough.

Note: This gif is from after I fixed the problem explained below, I just wanted to show the panel working here and I didn't have a "before" gif

Gif of debug panel showing the Glimmerstalker state and Crew light statuses changing

What I found when looking at all the info was that none of the Crew were ever shown as being in the light. This meant that they were all unprotected the entire time and as soon as the stalking timer elapsed, the Glimmerstalker would pick one and start Stalking them.

This problem turned out to not be related to my refactoring. The Crew had never been protected by the lights, we just didn't know it because we never had logic to change the Glimmerstalker to the Stalking state before. After a lot of Debug.Log(...) this turned out to be an easy fix. In order for a trigger collider to fire, one of the two objects needs to have a RigidBody component. Neither the Crew nor the light had a RigidBody. We didn't notice it before because the Player and the Glimmerstalker both a RigidBody on it and they were triggering the debug logs, so the lack of the Crew triggering them was buried.

Putting a new RigidBody on the Crew fixed the issue.

Random Movement to Origin

One thing I noticed was the Crew and the Glimmerstalker would periodically move to the world origin instead of a random point. I didn't see this behavior on the Crew until we added the Terrain. This makes sense to me because the original logic for finding a point on the NavMesh didn't take verticality into account. My hypothesis was that the point we were testing was actually underneath the terrain and not close enough to the NavMesh for it to pick it up.

The fix I added was to move the point I'm testing for up by some amount then try raycasting down to see if it hits something.

Diagram showing how the raytracing fix works

This allows a lot more flexibility when the Crew or Glimmerstalkers pick new points to move to. So far I haven't seen the same issue.

Too Short of a Leash

From the beginning, we've wanted the Player to be "tethered" to the caravan to prevent them from running off the edge of the map or (more importantly) not running too far ahead to reach the end or too far behind and having the tile unload underneath them. Andrew got that implemented and it works well...too well, in fact.

Once you take the snow spawning into account, the tether was too short and almost all of the "energy" snow (used to refill your spell energy) was outside the tether. I wanted to increase the distance, but I had no idea how the numbers correlated to the scene itself. Was 10 enough? What about 100?

I needed a way to visualize the tether range. Luckily, I've already done this a few times! Instead of making a new DrawCircle method, I ended up just using the existing DrawArcs methods I had and configured them to draw a circle instead (i.e. two arcs of 180°). Now I could see where the tether ended and could adjust it appropriately.

Screenshot of the debug circle for the tether distance being drawn around the caravan

This felt a lot better to play. However, when showing Terra the functionality she brought up a really good question.

Are we going to ensure that the energy snow only spawns within range?

This was a tricky question to answer but a good one. When testing, it was incredibly frustrating to see energy snow just outside your reach!

We couldn't just say it should only spawn within X units of the caravan because the snow is spawned when the tile is spawned. Another compounding factor is that the path the won't necessarily be straight, as seen above. This means that if we just make it X distance from the center, there will be some spots where the snow just ends as the caravan moves further away from the center line.

A potential solution we came up with would be to have a box of colliders that follow the caravan along the x-axis. Since it is locked to the x-axis, it will keep up with the caravan but it won't move off the tiles in the z-axis. This would allow us to use the full breadth of the tiles (or at least a more controlled area) to spawn the snow in.

In the graphics below, the green are the tiles, yellow is the caravan, and the blue are the proposed colliders. You can see from the first graphic that even though the caravan is off-center the colliders are still centered in the z-axis.

Diagram of the proposed tether alternative

Animated diagram of the proposed tether alternative

We want to run the idea past Andrew as well to get his suggestions for the tether problem. For now though, some quality of life to make the Stalking testing easier.

Adding Debug Commands to Debug UI

One of the problems I've been running into while playtesting everything is that sometimes I don't want to deal with the cold or maybe I don't want the caravan to move (or to move faster!). The real answer is to actually tune the game so everything doesn't happen as fast but that doesn't sound like as much fun as adding new features!

I added a couple more keybinds that are only active if you have the debug panel open. These keybinds affect the global warmth depletion rate and the caravan speed.

Action Key
Zero Warmth Rate NumPad 1
Normal Warmth Rate NumPad 2
Double Warmth Rate NumPad 3
Zero Sled Speed NumPad 4
Normal Sled Speed NumPad 5
Double Sled Speed NumPad 6

You can see them in action here. Along the top of the debug panel it shows the current value for those modifiers.

Gif of the debug panel and scene being affected by the new commands

Maybe tomorrow I'll stop procrastinating and work on the actual Stalking behavior!

Preparing to Make the Glimmerstalkers Actually Stalk

Today was about getting a start on implementing the Glimmerstalker's Stalking state. Before I could really start working on that though, I wanted to take some time to refactor pieces of the existing Glimmerstalker script to change how they pick positions to Harass from and when the physical body is shown.

Previously, the Glimmerstalker picked a random target to "hover" around when Harassing and had a physical body.

Screenshot of the Glimmerstalker in the background

While the physical body was only meant as a temporary placeholder, it posed a couple of problems:

  1. When we go to add dialog to the Glimmerstalker, it will always show up right next to one of the crew (or the Player)
  2. Related, but when going into the Stalking state, it will always be right next to them
  3. Because the body has collision, it would push the Crew or the Player around as it tried to get to them
    1. This was exacerbated because the collision on it was massive

While pretty hilarious, overall it wasn't the vibe we want. I needed to refactor in order to address the above issues.

Gif of the Glimmerstalker pushing the body of a Crew member along the ground after they died

Poor, poor Jayden...even in death he is harassed!

Reworking the Harassing State

I wanted to make the following changes to the Harassing state:

  1. Remove the physical body and colliders unless the Glimmerstalker was in the Attack state
    1. This was always the intention, since we only wanted the body actually visible when it is charging the character
    2. This would also take care of the characters being pushed around
  2. Change the Glimmerstalker to teleport to different positions when Harassing instead of using the NavMeshAgent
    1. This would allow us to not need collision/NavMeshAgent active when it is invisible
  3. Adjust the collision on the Glimmerstalker for when it is shown

Removing the physical body and the NavMeshAgent, for now, was easy. I just disabled their respective components/GameObjects in the prefab and went about my day. I also adjusted the collision while I was at it

General Refactoring

While implementing all of this, I also refactored quite a bit of the surrounding code to extract different pieces into more reusable chunks and to move some logic into better spots. One of the bigger pieces was extracting out the "is protected by light" logic into its own component that the Crew and Player scripts utilize, instead of being lumped in with the IGlimmerstalkerTarget interface. It centralized a lot of the logic and provided a much cleaner interface for the lights to work with.

using UnityEngine;

public class LightDetector : MonoBehaviour, IProtectedByLight
{
    private bool _isProtectedByLight = false;
    private float _timeOutsideLight = 0;

    private void Update()
    {
        if (_isProtectedByLight) return;

        _timeOutsideLight += Time.deltaTime;
    }

    public void OnEnterLight()
    {
        _isProtectedByLight = true;
        _timeOutsideLight = 0f;
    }

    public void OnExitLight()
    {
        _isProtectedByLight = false;
    }

    public bool IsProtectedByLight(float timeOutsideLightLimit)
    {
        if (_isProtectedByLight) return true;
        if (_timeOutsideLight < timeOutsideLightLimit) return true;

        return false;
    }
}

Now the "Repelling Lights" only have to know about the IProtectedByLight and IRepellable interfaces. Makes that nice and clean.

Making it Teleport

The next thing to tackle was getting it to teleport when Harassing. I decided to reuse the arc point logic I had made for the Crew flee point selection. This should ensure that the Glimmerstalker is on a valid point on the NavMesh for when we reenable the NavMeshAgent and body. It also makes it harder to "track" the Glimmerstalker, which adds to the mystery and makes it harder to guess where it will charge from until it actually starts charging.

Screenshot of the Glimmerstalker Harassment Point arcs around the Caravan

Reworking the Harassment Actions

Since I was reworking all of the stuff surrounding the Harass state, I figured I might as well redo the Harassment Actions because they were a little barebones. There were some variables that were being set at the Glimmerstalker-level that should have been set at the Action level (like number of targets) and I was trying to figure out what was needed still and what wasn't.

I ended up converting the HarassmentAction class to be a ScriptableObject and added a list of them into the Glimmerstalker script, instead of the single hard-coded one we had before.

In the screenshot below, you can see the new list (as well as the "arc" related variables)

Screenshot of the Inspector showing the new Harassment fields on the Glimmerstalker prefab

Then, in the ScriptableObject itself, I had a similar structure, where it had a list of potential Morale Modifiers that could be applied, and their weights. The Weight field is a little deceptive because it looks like they need to add up to 1 but it actually uses a "weighted" random behinds the scenes, meaning it sums all the weights then uses that as the basis for checking, instead of requiring everything to equal 1.

Screenshot of the Inspector showing the Sibilant Whispers Harassment Action configuration